
English Русский
Български
Беларускі
Український
Српски
Hrvatski
Română
Polski
Slovenský
Magyar
Bookmark Articles Sitemap Contacts
Company Hyundai Company Opel Company Skoda Company Kia Company Mitsubishi Company LADA Company Audi
PeugeotBook.ru


Series 100   Series 200   Series 300   400-500   Series 600   Crossovers   Others
 
Partner I (1996-2008) Peugeot 807 (2002-2014) Peugeot 806 (1994-2002) Peugeot J5 (1981-1993)

Speedometer Drive — removal and installation (Peugeot Partner I)

  • Main
  • Пежо
  • Partner I (1996-2008)
  • Transmission
  • Mechanical gearbox
  • Speedometer Drive — removal and installation
0
Table of contents: Removal 🠇 Installation 🠇

Removal


1. Place wheel chocks under the rear wheels. Apply the parking brake fully. Raise the front of the vehicle and support it securely (see "Lifting and installing the car on supports"). The speedometer drive is located on the rear of the gearbox housing, near the inner end of the right axle shaft. Remove the screws and remove the engine protection (if applicable).

2. Disconnect the speedometer drive electrical connector (figure 6.2).
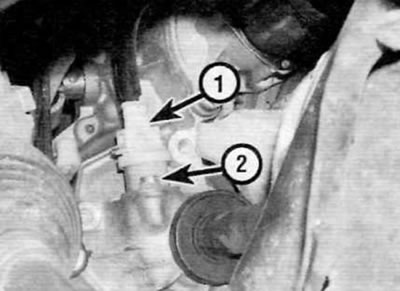
Figure 6.2. Electrical connector (1) and mounting bolt (2) of the speedometer drive

Figure 6.2. Electrical connector (1) and mounting bolt (2) of the speedometer drive


3. Unscrew the bolt and remove the heat shield (if applicable). Remove the speedometer drive assembly with the driven gear together with the corresponding sealing ring from the gearbox housing.

4. If necessary, the gear can be removed from the housing and the seal can be removed from the top of the housing. Inspect the gear for signs of damage and replace if necessary. Be sure to replace the housing sealing ring.

5. If the driven gear is worn or damaged, also inspect the drive gear in the transmission housing for similar signs.


6. To replace the drive gear on the MA5 gearbox, you must disassemble the gearbox and remove the differential. Therefore, this work should be entrusted to a Peugeot/Citroen dealer or a gearbox specialist.

7. To remove the pinion gear on the BE3/5 and BE4/5 gearboxes, first remove the right half shaft as described in Chapter 8. Unscrew the three bolts and remove the speedometer drive housing together with the corresponding sealing ring from the gearbox. Remove the pinion gear from the differential and remove all shims from the pinion gear (figure 6.7, a, b).
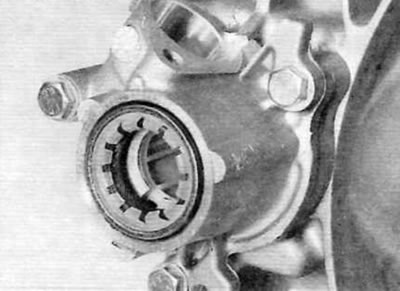
Figure 6.7, a. On gearboxes BE3/5 and BE4/5, unscrew the housing mounting bolts...
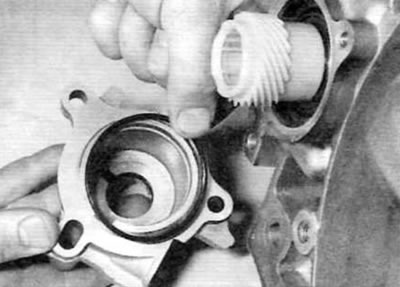
Figure 6.7, a. On gearboxes BE3/5 and BE4/5, unscrew the housing mounting bolts...


Figure 6.7, b....and remove the housing, sealing ring and drive gear from the gearbox

Figure 6.7, b....and remove the housing, sealing ring and drive gear from the gearbox


Installation


8. On VEZ/5 and VE4/5 gearboxes, if the drive gear has been removed, install adjusting shims on the differential gear, then install the speedometer drive on the gear, making sure that the protrusions of the drive gear correctly enter the grooves of the gear (figure 6.8). Install a new O-ring onto the rear of the speedometer drive housing, then install the housing onto the transmission and tighten the associated bolts to the specified torque. Inspect the axle shaft seal for signs of wear and replace if necessary. Install the axle shaft as described in chapter 8.
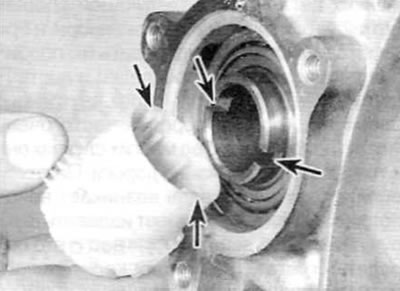
Figure 6.8. On gearboxes BE3/5 and BE4/5, make sure that the pinion protrusions fit correctly into…

Figure 6.8. On gearboxes BE3/5 and BE4/5, make sure that the pinion protrusions fit correctly into the pinion grooves during installation (marked with arrows)


9. On all gearboxes, apply a small amount of grease to the sealing lips of the cuff and to the driven gear shaft and insert the gear into its proper position in the speedometer drive.

10. Install a new O-ring onto the speedometer drive and install it onto the gearbox, ensuring that the drive and driven gears are properly engaged. Screw in the drive mounting bolt together with the heat shield (if applicable) and tighten it securely.

11. Connect the electrical connector to the speedometer drive. Install engine protection (if applicable). Lower the car.
This article is available at russian, bulgarian, belarusian, ukrainian, serbian, croatian, romanian, polish, slovak, hungarian
Article reviewed by editor: Nikonova Veronica
Share information:
Previous
Partner I: Mechanical gearbox
Next

Reverse Light Switch — checking, removing, and installing
Cuffs — replacement
Gear shift lever mechanism — removal and installation
Manual transmission — draining and filling transmission fluid
General information about manual transmission
Manual transmission — removal and installation
Gearbox Overhaul — general information
See similar information for other Peugeot models

➨ Speedometer drive — removal and refitting Peugeot 106 (1991-2003)
➨ Replacing the accessory drive belt (petrol engines) Peugeot 207 (2006-2014)
➨ Removal and installation the camshaft drive belt (engine is on… Peugeot 305 (1977-1989)
➨ Removal and installation the speedometer drive Peugeot 406 (1995-2004)
➨ Drive shaft CV joint covers — inspection Peugeot 605 (1989-2000)
Link to this article in different formats
Comments and feedback from visitors
No comments yet


Add two numbers 29 + 10


Partner I (1996-2008) 
  • General information
  • Introduction to the guide
  • Faults en route
  • Weekly checks
  • User manual
  • Maintenance (petrol)
  • Maintenance (diesel)
  • Power unit
  • Petrol engines
  • Diesel engines «XUD»
  • Diesel engines «DW»
  • Overhaul of petrol engines
  • Overhaul of diesel engines
  • Cooling and heating
  • Power and exhaust (petrol)
  • Power and exhaust (XUD diesels)
  • Power and exhaust (DW diesels)
  • Emission reduction
  • Starting and charging system
  • Transmission
  • Clutch
  • Mechanical gearbox
  • Drive shafts
  • Chassis, running gear
  • Brake system
  • Car suspension
  • Steering
  • Body and interior
  • Exterior (external elements)
  • Interior (internal elements)
  • Doors, locks and windows
  • Electrical equipment
  • Equipment and devices
  • Electrical circuits
Peugeot 807 (2002-2014) 
  • General information
  • Operating instructions
  • Maintenance
  • Troubleshooting
  • Power unit
  • Gasoline engines
  • Diesel engines
  • Cooling and heating
  • Fuel injection (petrol)
  • Fuel system (diesel)
  • Fuel system
  • Exhaust system
  • Ignition system
  • Transmission
  • Clutch
  • Manual gearbox
  • Automatic gearbox
  • Chassis, running gear
  • Brake system
  • Car suspension
  • Steering system
  • Body and interior
  • Exterior (external elements)
  • Interior (internal elements)
  • Electrical equipment
  • Power devices
  • Electrical circuits
Peugeot 806 (1994-2002) 
  • General information
  • User manual
  • Maintenance
  • Power unit
  • Petrol engines
  • Diesel engines
  • Lubrication system
  • Cooling system
  • Fuel injection (petrol)
  • Fuel system (diesel)
  • Ignition and exhaust systems
  • ECM Bosch Motronic MP 3.2
  • ECM Magneti-Marelli (MM)
  • Transmission
  • Clutch
  • Mechanical gearbox
  • Chassis, running gear
  • Brake system
  • Car suspension
  • Steering
  • Electrical equipment
  • Equipment and devices
  • Electrical circuits
Peugeot J5 (1981-1993) 
  • General information
  • Introduction to manual
  • Specifications
  • Gasoline engine
  • Engine repair
  • Lubrication system
  • Cooling system
  • Fuel system
  • Ignition system
  • Diesel engine
  • Engine repair (DB9)
  • Lubrication system (DB9)
  • Cooling system (DB9)
  • Fuel injection (DB9)
  • Engine repair (U25)
  • Lubrication system (U25)
  • Cooling system (U25)
  • Fuel injection (U25)
  • Transmission
  • Clutch
  • Gearbox
  • Drive shafts
  • Chassis, running gear
  • Steering system
  • Car suspension
  • Brake system
  • Electrical equipment
  • Power devices
  • Electrical circuits
PeugeotBook.ru © 2018–2026 | Mobile version | Sitemap: EN BG BY UA RS HR RO PL SK HU | Write message | Site search | Add to bookmarks | Peugeot owners
106 (1991-2003) | 206 (1998-2012) | 207 (2006-2014) | 305 (1977-1989) | 306 (1993-2002) | 307 (2001-2008) | 405 (1987-1997) | 406 (1995-2004) | 605 (1989-2000) | Partner-I (1996-2008) | Eurovans-807 (2002-2014) | Eurovans-806 (1994-2002) | J5 (1981-1993) |
Cookies are used to ensure the correct display of pages on the site.