English Русский
Български
Беларускі
Український
Српски
Hrvatski
Română
Polski
Slovenský
Magyar
Bookmark Articles Sitemap Contacts
Company Hyundai Company Opel Company Skoda Company Kia Company Mitsubishi Company LADA Company Audi
PeugeotBook.ru


Series 100   Series 200   Series 300   400-500   Series 600   Crossovers   Others
 
Peugeot 206 (1998-2012) Peugeot 207 (2006-2014)

Replacement of mudguards on the drive manufactured by PSA (Peugeot 206)

  • Main
  • 20X
  • Peugeot 206 (1998-2012)
  • Transmission
  • Drive shafts
  • Replacement of mudguards on the drive manufactured by PSA
0
When replacing front wheel drive covers, Peugeot service centres use the following special tool:
  • inertial puller 0316-A, 1671-T;
  • threaded sleeve for removal 0410-A, 4083-T;
  • threaded sleeve for removing BOXER/JUMPER 0410-L;
  • protective element of the hinge sleeve — 0410-J;
  • clamp for clamps — clic, QETIKER.

Replace the outer joint mudguard in the following order:
  • remove the front wheel drive as described above;
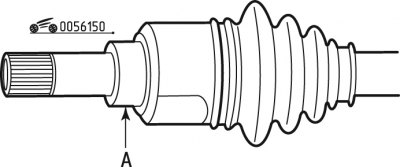
Figure 6.150. Inner hinge: A - supporting surface

Figure 6.150. Inner hinge: A - supporting surface

  • stick the adhesive tape on the supporting surface A (figure 6.150) under the seal;
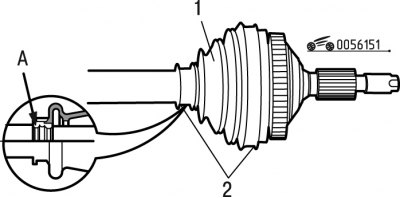
Figure 6.151. Outer hinge: 1 - case; 2 - clamps; A - grooves

Figure 6.151. Outer hinge: 1 - case; 2 - clamps; A - grooves

  • mark the position of the cover 1 (figure 6.151) relative to the shaft, if there are no mounting grooves on it A;
  • remove clamps 2;

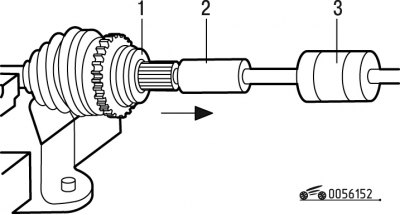
Figure 6.152. Removing the outer joint from the shaft: 1 - outer hinge; 2, 3 - devices

Figure 6.152. Removing the outer joint from the shaft: 1 - outer hinge; 2, 3 - devices


  • clamp the wheel drive shaft in a vice and using tools 2 and 3 (figure 6.152) remove the outer joint housing 1 from the shaft;
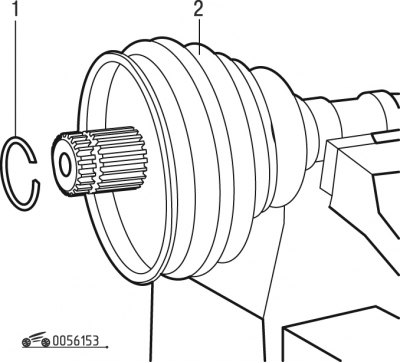
Figure 6.153. Removing the retaining ring: 1 - retaining ring; 2 - case

Figure 6.153. Removing the retaining ring: 1 - retaining ring; 2 - case

  • remove the retaining ring 1 from the shaft (figure 6.153) and case 2;
  • remove old grease from the joint and wash it with kerosene;

Caution! Do not use solvent.

  • install new mudguard 2 and retaining ring 1 on the shaft;
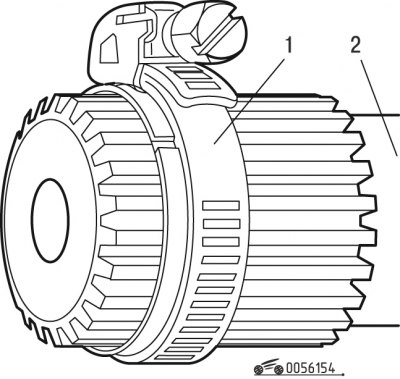
Figure 6.154. Installation of the clamp: 1 - clamp; 2 - shaft

Figure 6.154. Installation of the clamp: 1 - clamp; 2 - shaft

  • install clamp 1 on the retaining ring (figure 6.154) for easy installation with hinge;
  • fill the cavity of the hinge and boot with the recommended lubricant;
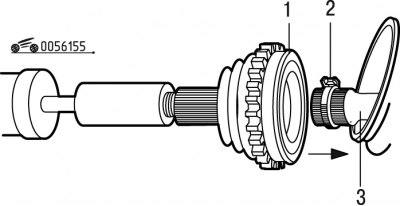
Figure 6.155. Installing the outer joint on the shaft: 1 - outer hinge; 2 - clamp; 3 - shaft

Figure 6.155. Installing the outer joint on the shaft: 1 - outer hinge; 2 - clamp; 3 - shaft


  • insert shaft 3 (figure 6.155) into the hinge cage 1;
  • remove clamp 2;
  • install the cover in a fixed position on the shaft and the hinge housing;
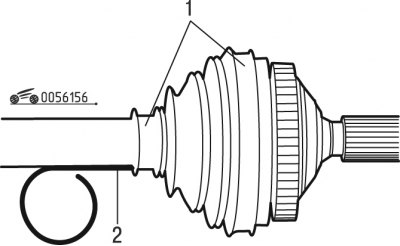
Figure 6.156. Installing clamps: 1 - clamps; 2 - wire

Figure 6.156. Installing clamps: 1 - clamps; 2 - wire

  • install two clamps 1 into place (figure 6.156), without tightening them;
  • carefully, so as not to damage the cover, connect the inner cavity of the hinge to the atmosphere using wire 2 from a blunt-ended welding electrode;
  • remove the wire and tighten the clamps with clamps;
  • complete the installation of the wheel drive on the vehicle in the reverse order of removal.

Replace the inner joint mudguard in the following order:

Text taken from the website (Peugeotbook.ru)
  • remove the front wheel drive as described above;
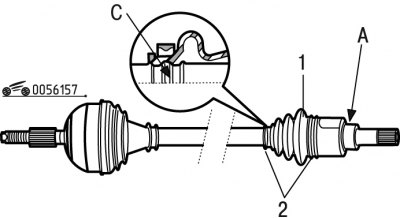
Figure 6.157. Removing the inner hinge cover: 1 - case; 2 - clamps; A - support surface for the seal

Figure 6.157. Removing the inner hinge cover: 1 - case; 2 - clamps; A - support surface for the seal


  • stick the adhesive tape on the supporting surface A (figure 6.157) under the seal;
  • mark the position of the cover 1 relative to the shaft if it does not have mounting grooves A;
  • remove clamps 2;
  • slide cover 1 along the shaft;
  • remove the hinge housing from the shaft;
  • remove the cover from the shaft;
  • remove old grease from the joint and wash it with kerosene;

Caution! Do not use solvent.

  • install a new cover on the shaft;
  • fill the cavity of the hinge and boot with the recommended lubricant;
  • install the shaft into the hinge housing;
  • install the cover in the correct position in relation to the shaft and housing;
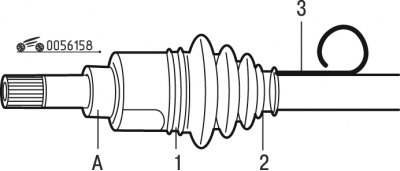
Figure 6.158. Installing the inner hinge cover: 1, 2 - clamps; 3 - wire; A - support surface for…

Figure 6.158. Installing the inner hinge cover: 1, 2 - clamps; 3 - wire; A - support surface for the seal

  • install two clamps 1 and 2 in their places (figure 6.158), without tightening them;
  • carefully, so as not to damage the cover, connect the internal cavity of the hinge to the atmosphere using wire 3 from a blunt-ended welding electrode;
  • remove the wire and tighten the clamps with clamps;
  • remove the adhesive tape from surface A;
  • complete the installation of the wheel drive on the vehicle in the reverse order of removal.
This article is available at russian, bulgarian, belarusian, ukrainian, serbian, croatian, romanian, polish, slovak, hungarian
Article reviewed by editor: Matveev Demid
Share information:
Previous
Peugeot 206: Drive shafts
Next

Replacing mudguards on a GKN drive
Removal and installation front wheel drive (models with manual…
Removal and installation the front wheel drive (models with…
General information about front wheel drive shafts
 
See similar information for other Peugeot models

➨ Speedometer drive — removal and refitting Peugeot 106 (1991-2003)
➨ Removal and installation the camshaft drive belt (engine is on… Peugeot 305 (1977-1989)
➨ Checking the auxiliary drive belt (10,000 km/6 months) Peugeot 405 (1987-1997)
➨ Drive shaft CV joint covers — inspection Peugeot 605 (1989-2000)
➨ Checking the condition of the drive shaft covers Peugeot 806 (1994-2002)
Link to this article in different formats
Comments and feedback from visitors
No comments yet


Add two numbers 26 + 36


Peugeot 207 (2006-2014) 
  • General information
  • Car care
  • Governing bodies
  • Driving and operation
  • Power unit
  • Engine characteristics
  • Engine repair
  • Cooling system
  • Lubrication system
  • Ignition system
  • Control system (gasoline)
  • Fuel system (gasoline)
  • Control system (diesel)
  • Transmission
  • Clutch
  • Mechanical gearbox
  • Automatic gearbox
  • Drive shafts
  • Chassis, running gear
  • Car suspension
  • Steering
  • Brake system
  • Body and interior
  • Exterior (external elements)
  • Interior (internal elements)
  • Heating and air conditioning
  • Electrical equipment
  • Equipment and devices
  • Headlights and lighting
  • Power devices
  • Electrical circuits
Peugeot 206 (1998-2012) 
  • General information
  • User manual
  • Maintenance
  • Power unit
  • Gasoline engines
  • Diesel engines
  • Diesel power system
  • Engine management system
  • Transmission
  • Clutch
  • Mechanical gearbox
  • Automatic gearbox
  • Drive shafts
  • Chassis, running gear
  • Front suspension
  • Rear suspension
  • Steering
  • Brake system
  • Body and interior
  • Body elements
  • Doors, locks and windows
  • Electrical equipment
  • Equipment and devices
  • Electrical circuits
PeugeotBook.ru © 2018–2026 | Mobile version | Sitemap: EN BG BY UA RS HR RO PL SK HU | Write message | Site search | Add to bookmarks | Peugeot owners
106 (1991-2003) | 206 (1998-2012) | 207 (2006-2014) | 305 (1977-1989) | 306 (1993-2002) | 307 (2001-2008) | 405 (1987-1997) | 406 (1995-2004) | 605 (1989-2000) | Partner-I (1996-2008) | Eurovans-807 (2002-2014) | Eurovans-806 (1994-2002) | J5 (1981-1993) |
Cookies are used to ensure the correct display of pages on the site.