



Removal of the gearbox is carried out depending on the type of vehicle as follows:
- Engines with a working volume of 1.4 and 1.6 liters (type TU)
- Bring the engine compartment hood to a vertical position.
- Disconnect the air intake hose and air filter outlet hose and remove the air filter.
- Disconnect the battery cables and remove the battery.
- Disconnect the following parts from the gearbox; ground jumper, reverse light switch wire, gear shift rod on the side of the gearbox, etc.
- Remove the three starter mounting bolts and the air filter mounting bracket (Figure 187) and disengage the starter from the gearbox. Place the starter aside without disconnecting the electrical wires. Never hang the starter on electrical wires, even if they appear strong enough.
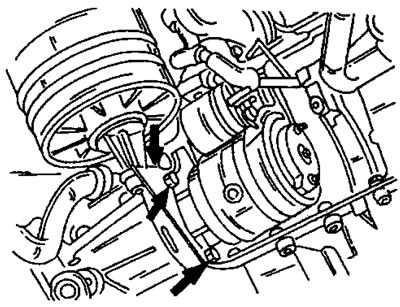
Figure 187. Releasing the starter. In addition, three bolts secure the air filter mounting bracket.
- Disconnect the clutch cable from the clutch release fork (unscrew the nut) and release the cable from the support.
- Release the wire harnesses secured to the battery tray, unscrew the bolts in the middle of the tray and remove the tray.
- Tighten the handbrake, remove the decorative caps of both front wheels and loosen the drive shaft nuts, but do not unscrew them completely.
- Place the front of the vehicle on suitable jack stands high enough to allow you to work underneath the vehicle. Remove the wheel arch liner from the gearbox side (the locker is attached with clamps).
- If the ABS system is present, release the ABS control unit from its mount and move it to the side. Unscrew and remove the bracket located underneath.
- From the bottom of the car, unscrew the plug on the side of the gearbox. Drain the oil into a clean container with a capacity of approximately 2 liters. Drain the oil completely and tighten the drain plug.
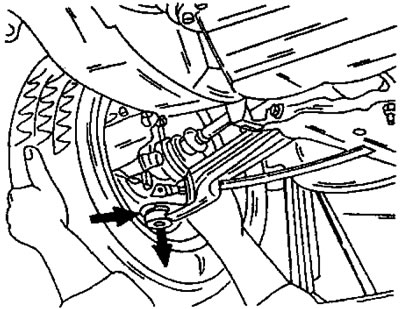
Figure 188. Separating the wishbone from the steering knuckle. Pull the entire wishbone down.
(Original published on the portal: www.PeugeotBook.ru)
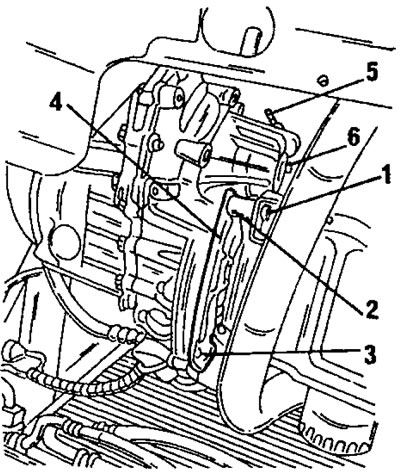
Figure 189. Removing and installing the gearbox. Digital designations are deciphered in the text.
- On the right and left sides of the vehicle, loosen the lower wishbone tie rods from the underside of the steering knuckles and disconnect the connections. Do not insert a screwdriver into the tie rod to widen it. Grasp the control arm as shown in Figure 188 and pull it down until the ball joint pin is released. Remove the protective washer from the ball joint, indicated by the arrow in the figure.
- Subsequent work is performed using Figure 189. Unscrew the bolt (1) and remove the spacer sleeve (2). After this, unscrew the bolt (3) and remove the clutch basket casing (4). Unscrew the lower bolt (b) between the engine and the gearbox. Loosen the union nut of the speedometer flexible shaft.
- Loosen the two torque support nuts and turn the heads of both eccentrics half a turn. Both nuts (1) are shown in Figure 190. Do not unscrew the support bolt indicated by the arrow.
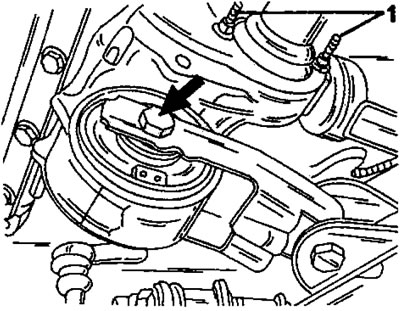
Figure 190. Releasing the moment support. Loosen both nuts (1) as described in the text.
- Remove following directions section 9.1, drive shafts.
- Raise the engine in the suspension as described in at the beginning of this section, until there is slight tension in the suspensions.
- Raise the gearbox with a crane on a cable loop so that it cannot fall during subsequent work. To do this, secure a cable or chain to one of the bolts between the engine and the gearbox, and secure the other end of the cable to the crane.
- After this, remove the gearbox mounts. First, unscrew the nut in the middle of the suspension and remove the washer. Unscrew the suspension beam bolts located on the side and pull out the beam with rubber-metal supports. Also unscrew the remaining support journal on the gearbox (3 bolts).
- Lower the power unit until the exhaust manifold is flush with the wishbone and remove the three bolts connecting the gearbox to the engine. Rotate the transmission so that the differential is on top to remove it from the frame. Check the gearbox mount on the cable and disengage it from the engine. The gearbox sits on centering pins and to release it you need to rock it a little in different directions. If you don't have a crane, you can place a roller jack under the gearbox and lower it onto the jack. Of course, an assistant must hold the gearbox in place.
Engines with a displacement of 1.8 and 2.0 liters (type XU)
Aside from removing the battery and its tray, gearbox removal is essentially the same as described for the TU engine. The differences are listed below:
- On 8-valve engines with a displacement of 1.8 and 2.0 liters, remove the air intake hose.
- On diesel engines, remove the air filter with all hoses connected to it.
- On turbodiesel engines, remove the heat exchanger and air filter with all hoses connected to it.
- On 16-valve engines, drain the coolant, disconnect the upper water hose from the thermostat housing and remove the air cleaner with all hoses connected to it.
- Locate the wiring harness mount and remove the retaining clips.
- Remove the starter without disconnecting the wires.
- If the ABS system is present, release the ABS control unit from its mount and move it to the side. Unscrew and remove the bracket located underneath (4 bolts).
- The gearbox suspension support is removed in a similar manner. You should also unscrew the console with the support pin. Figure 191 shows the support already removed.
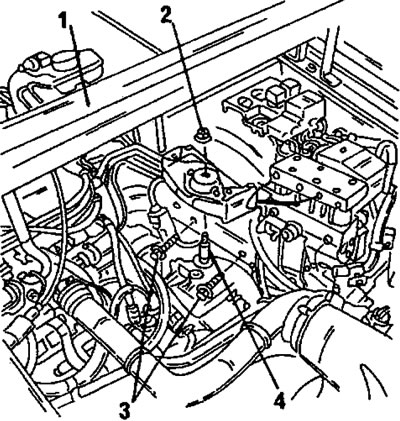
Figure 191. Removing and installing the gearbox suspension. 1. Lifting beam; 2. Nut, 65 nm; 3. Bolts, 25 nm; 4. Support journal, 50 nm
- On 16-valve or turbodiesel engines, loosen the clamping bolt (1) of the clutch release fork in Figure 192 and press the fork (2) off the release shaft.
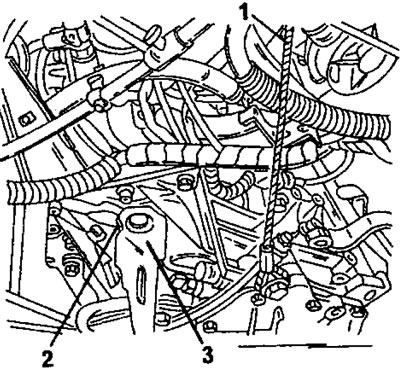
Figure 192. The clutch fork (3) is removed after unscrewing the tension bolt (2). After removal, the gearbox hangs on the cable.
- After this, the gearbox is pulled out in the same way as with a TU type engine.