
General information
The power that an engine can develop depends on the amount of air and fuel that enters the engine's cylinders. To increase engine power, it is necessary to increase the air and fuel supply. Supplying more fuel will have no effect until there is enough air for combustion. To increase the amount of air supplied to the engine, a turbocharger is used to force air into the combustion chamber.
The turbocharger consists of a centrifugal supercharger wheel and a turbine connected to each other by a common rigid axle. Exhaust gases leaving the engine cylinders are at high temperature and pressure. They accelerate to high speed and interact with the blades of the turbine, which converts kinetic energy into mechanical rotational energy. Energy conversion is accompanied by a decrease in the temperature and pressure of the exhaust gases. The turbocharger sucks air through the air filter, compresses it and delivers it to the engine cylinders. The amount of fuel that is mixed with air can be increased, allowing the engine to develop more power.
To lubricate the turbocharger, engine oil is supplied under pressure through a special pipeline.
Since the turbocharger operates at high speed, care and cleanliness must be observed: dirt entering the turbocharger can damage it.
Attention! Before disconnecting any elements from the turbocharger, thoroughly clean them of dirt. To protect against contamination, place the elements removed from the turbocharger in a sealed container, close the air channels of the turbocharger.
Removing
Switch off ignition and disconnect a wire from the negative plug of the storage battery.
Attention! The connecting element in the front exhaust pipe must be protected from any mechanical damage. The connecting element in the downpipe must not be bent more than 20°or misaligned by 20 mm axially and 25 mm radially, otherwise it will be damaged.
Remove the bottom protection of a motor compartment.
Remove system of release of the fulfilled gases.
Remove the front tunnel heat shields and steering racks.
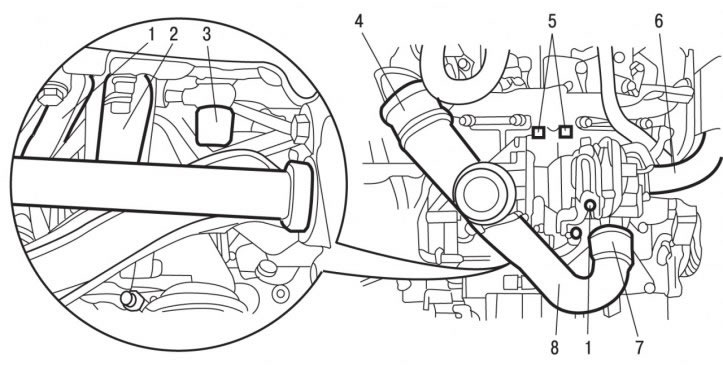
Pic. 4.79. Elements of fastening and connection of the turbocharger: 1 - oil return pipe from the turbocharger; 2 - lower turbocharger support; 3 - hollow bolt for supplying oil to the turbocharger; 4 - bushing; 5 - nuts; 6 - connecting element; 7 - bushing; 8 - air supply pipe to the turbocharger
Remove pipe 8 (pic. 4.79) air supply to the turbocharger together with bushings 4 and 7.
Remove the lower turbocharger support 2.
Disconnect the oil return pipe 1 from the turbocharger.
Turn out on the cylinder block a hollow bolt 3 for supplying oil to the turbocharger.
Disconnect and move aside the connecting element 6 at the inlet to the turbocharger.
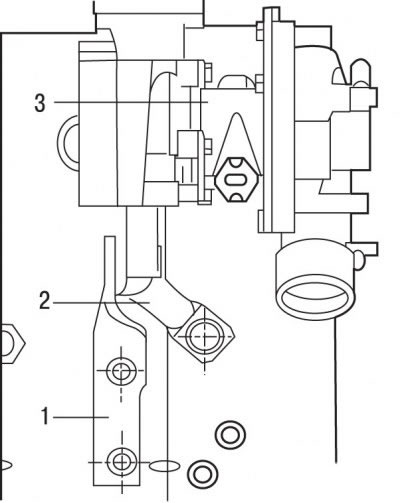
Pic. 4.80. Bracket location (2) and supports (1) turbocharger (3)
Remove bracket 2 (pic. 4.80) turbocharger.
Remove nuts 5 (see fig. 4.79) and remove them through the outlet tunnel.
Remove turbocharger 3 (see fig. 4.80).
Installation
Attention! When installing the turbocharger, it is necessary to use new bolts 10 (pic. 4.81), nuts 5, leather gaskets 14 and 19 and sealing collar 9.
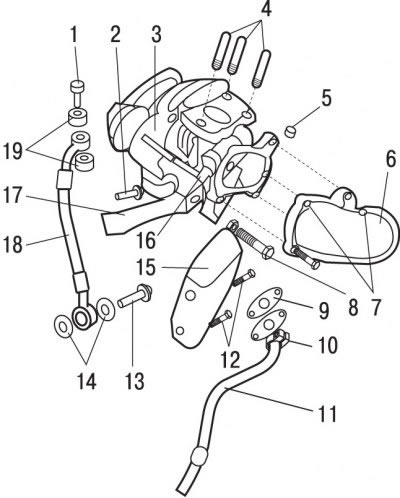
Pic. 4.81. Turbocharger mounting elements: 1 - hollow bolt, 30 Nm; 2 - bolt, 25 Nm; 3 - turbocharger; 4 - studs, 10 Nm; 5 - nuts, 25 Nm; 6 - connecting element of the exhaust pipe; 7 - bolts; 8 - bolt; 9 - sealing cuff; 10 - bolts, 10 Nm; 11 - oil return pipe; 12 - bolts, 25 Nm; 13 - hollow bolt, 55 Nm; 14 - leather pads; 15 - support; 16 - nut, 30 Nm; 17 - support; 18 - oil supply pipe; 19 - leather pads
Install tube 18 (see fig. 4.81) oil supply with new leather gaskets 19 and secure with a hollow bolt 1, tightening it with a torque of 30 Nm.
Install the intermediate connecting element 6 of the exhaust pipe and fix with bolts 7.
Tighten studs 4 on the exhaust manifold to 10 Nm.
Install turbocharger 3 and secure with nuts 5, tightening them to 25 Nm.
Install a new seal 9.
Install the oil return pipe 11 and secure with new bolts 10, tightening them to a torque of 10 Nm.
Install the hollow bolt 13 with new leather gaskets 14 and tighten it to 55 Nm.
Install support 17 and secure with bolt 2, tightening it by hand.
Install support 15 and secure with bolts 12, tightening them by hand.
Screw on nut 16 and tighten it to 30 Nm.
Tighten bolt 2 to 25 Nm.
Tighten bolt 12 to 25 Nm.
Further installation is carried out in the reverse order of removal.