
English Русский
Български
Беларускі
Український
Српски
Hrvatski
Română
Polski
Slovenský
Magyar
Bookmark Articles Sitemap Contacts
Company Hyundai Company Opel Company Skoda Company Kia Company Mitsubishi Company LADA Company Audi
PeugeotBook.ru


Series 100   Series 200   Series 300   400-500   Series 600   Crossovers   Others
 
Peugeot 305 (1977-1989) Peugeot 306 (1993-2002) Peugeot 307 (2001-2008)

Fuel distributor (Common Rail) — removal and installation (Peugeot 307)

  • Main
  • 30X
  • Peugeot 307 (2001-2008)
  • Power unit
  • Diesel engines DW10
  • Fuel distributor (Common Rail) — removal and installation
0
Table of contents: Removal 🠇 Installation 🠇

Removal


Turn off the ignition and disconnect the cable from the negative battery terminal.

Remove the decorative engine cover.

Disconnect the connectors from the injectors, diesel fuel temperature and pressure sensors, fuel flow and pressure control solenoid valves, and the camshaft position sensor. Move the wiring harness to the side.

Remove the fuel pump support to fill the system with fuel.

Remove the engine decorative cover support.

Remove the diesel fuel temperature sensor.

Disconnect and move away the crankcase ventilation hose.

Use SODIMAC 35 to clean the high-pressure fuel pipe union nuts and the areas around the nuts.
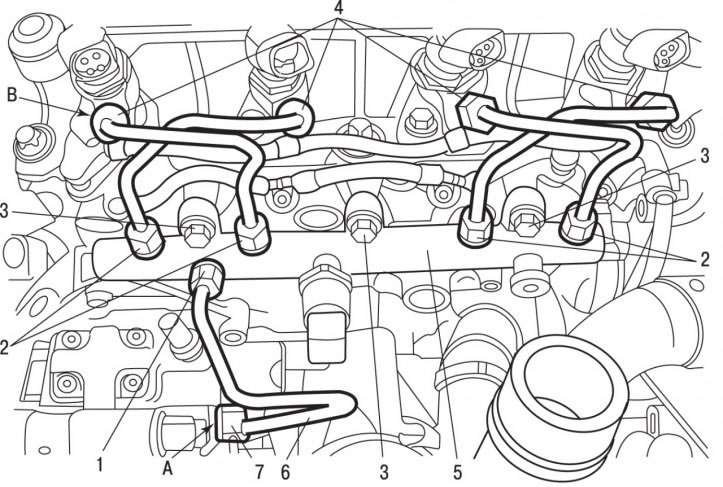
Figure 4.68. Fuel distributor (Common Rail): 1, 2 - connecting nuts, 28 Nm; 3 - bolts, 23 Nm; 4, 7…

Figure 4.68. Fuel distributor (Common Rail): 1, 2 - connecting nuts, 28 Nm; 3 - bolts, 23 Nm; 4, 7 - connecting nuts, 25 Nm; 5 - fuel distributor; 6 - high pressure tube; A - hexagon on the high pressure fuel outlet fitting; B - hexagon on the nozzle


Holding the Allen key A with a wrench (figure 4.68) on the high-pressure fuel pump, use the second key to unscrew the connecting nut 7 securing the high-pressure fuel line 6.


Unscrew the connecting nut 1 securing the high-pressure fuel line 6 to the fuel distributor and remove the fuel line.

While holding the hexagons B on the injectors with a wrench, use a second wrench to unscrew the connecting nuts 4 securing the high-pressure fuel pipes to the injectors.

Loosen the connecting nuts 2 securing the high-pressure fuel pipes to the fuel distributor and remove the fuel pipes. To prevent dirt from entering, close the fuel lines and fittings on the fuel distributor with suitable plugs.

Disconnect the high pressure sensor connector.

Unscrew bolts 3 and remove the fuel distributor (Common Rail).

Caution! Do not remove the high pressure sensor from the fuel distributor (Common Rail).


Installation


Install the fuel distributor 5 (see figure 4.68) and secure with bolts 3, tightening them by hand at this stage.

Caution! When installing the fuel distributor, it is necessary to use new high-pressure fuel lines.


Install high-pressure fuel pipes onto the injectors and fuel distributor and secure them with connecting nuts 2 and 4, tightening them by hand at this stage.

Install high pressure pipe 6 and secure it with union nuts 1 and 7, tightening them by hand at this stage.

Tighten connecting nuts 1 and 2 of the high-pressure pipes to the fuel distributor to a torque of 28 N·m.

Tighten the fuel distributor mounting bolts 3 to a torque of 23 Nm.

Tighten connecting nuts 4 and 7 of the high-pressure pipes to the fuel pump and injectors to a torque of 25 N·m.

Further installation is carried out in the reverse order of removal.


Conduct computer programming.

Check the tightness of the connections.

Start the engine.

Check for fuel leaks.
This article is available at russian, bulgarian, belarusian, ukrainian, serbian, croatian, romanian, polish, slovak, hungarian
Article reviewed by editor: Sidorov Timofey
Share information:
Previous
Peugeot 307: Diesel engines DW10
Next

Fuel system — safety precautions
Water pump — removal and installation
Replacing the coolant
Lubrication system — general information and pressure testing
Timing belt — removal, inspection and installation
Fuel injectors — removal and installation
Fuel filter — removal and installation
Siemens high-pressure fuel pump
Turbocharger — description, removal, and installation
Exhaust gas recirculation (EGR) valve
See similar information for other Peugeot models

➨ Fuel filter renewal — carburetor models Peugeot 106 (1991-2003)
➨ Cleaning the fittings on the high-pressure fuel rail Peugeot 207 (2006-2014)
➨ Fuel filler neck, trunk, hood Peugeot 405 (1987-1997)
➨ Replacing the fuel filter Peugeot 605 (1989-2000)
➨ Fuel rail and injectors Peugeot Partner I (1996-2008)
Link to this article in different formats
Comments and feedback from visitors
No comments yet


Add two numbers 26 + 25


Peugeot 307 (2001-2008) 
  • User manual
  • Keys, doors and alarm
  • Controls and instruments
  • Driving and operation
  • Maintenance
  • Power unit
  • Petrol engines TU3 and TU5
  • Petrol engines EW10
  • Diesel engines DV10
  • Diesel engines DW10
  • Transmission
  • Clutch and drive shafts
  • Mechanical gearbox
  • Automatic gearbox
  • Chassis, running gear
  • Front suspension
  • Rear suspension
  • Steering
  • Brake system
  • Body and interior
  • Exterior (external elements)
  • Interior (internal elements)
  • Doors, locks and windows
  • Heating and air conditioning
  • Electrical equipment
  • Equipment and devices
  • Power devices
  • Airbags
  • Electrical circuits
Peugeot 306 (1993-2002) 
  • General information
  • Introduction to manual
  • Specifications
  • Gasoline engine
  • Engine repair
  • Lubrication system
  • Cooling system
  • Fuel injection
  • Ignition system
  • Diesel engine
  • Engine repair
  • Lubrication system
  • Cooling system
  • Fuel injection
  • Transmission
  • Clutch
  • Gearbox
  • Drive shafts
  • Chassis, running gear
  • Steering system
  • Front suspension
  • Rear suspension
  • Brake system
  • Electrical equipment
  • Power devices
  • Electrical circuits
Peugeot 305 (1977-1989) 
  • General information
  • Maintenance
  • Power unit
  • Gasoline engines
  • Diesel engines
  • Cooling system (gasoline)
  • Cooling system (diesel)
  • Fuel system (gasoline)
  • Fuel system (diesel)
  • Ignition system
  • Transmission
  • Clutch
  • Mechanical gearbox BB8
  • Mechanical gearbox BE1
  • Automatic gearbox ZF4
  • Shafts, hubs and wheels
  • Chassis, running gear
  • Brake system
  • Car suspension
  • Steering
  • Body and interior
  • Exterior (external elements)
  • Interior (internal elements)
  • Electrical equipment
  • Equipment and devices
  • Headlights and lighting
  • Power devices
  • Electrical circuits
  • Wiring diagrams (diesel)
PeugeotBook.ru © 2018–2026 | Mobile version | Sitemap: EN BG BY UA RS HR RO PL SK HU | Write message | Site search | Add to bookmarks | Peugeot owners
106 (1991-2003) | 206 (1998-2012) | 207 (2006-2014) | 305 (1977-1989) | 306 (1993-2002) | 307 (2001-2008) | 405 (1987-1997) | 406 (1995-2004) | 605 (1989-2000) | Partner-I (1996-2008) | Eurovans-807 (2002-2014) | Eurovans-806 (1994-2002) | J5 (1981-1993) |
Cookies are used to ensure the correct display of pages on the site.