
English Русский
Български
Беларускі
Український
Српски
Hrvatski
Română
Polski
Slovenský
Magyar
Bookmark Articles Sitemap Contacts
Company Hyundai Company Opel Company Skoda Company Kia Company Mitsubishi Company LADA Company Audi
PeugeotBook.ru


Series 100   Series 200   Series 300   400-500   Series 600   Crossovers   Others
 
Partner I (1996-2008) Peugeot 807 (2002-2014) Peugeot 806 (1994-2002) Peugeot J5 (1981-1993)

Fuel rail and injectors (Peugeot Partner I)

  • Main
  • Пежо
  • Partner I (1996-2008)
  • Power unit
  • Power and exhaust (petrol)
  • Fuel rail and injectors
0
Note: Before you begin, please read the warning provided in paragraph 1.


Note: If you suspect a faulty injector, try using one of the commercially available injector cleaners before removing the injectors.


Models with 1.4L engine


1. Disconnect the ground cable from the battery (see "Disconnecting the battery").

2. Remove the air cleaner assembly as described in paragraph 2.

3. On later models with the ignition coil pack mounted above the fuel rail, remove the coil pack as described in chapter 5B.

4. Disconnect the accelerator cable (if applicable) from the cam on the throttle body, then pull the cable housing along with the corresponding spring clip out of the rubber grommet in the support bracket.

5. Remove the screws and the accelerator cable bracket from the manifold/cylinder head (figure 13.5).
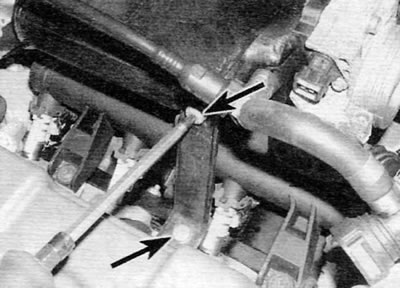
Figure 13.5. Remove the screws (marked with arrows) and remove the accelerator cable bracket…

Figure 13.5. Remove the screws (marked with arrows) and remove the accelerator cable bracket (models with a 1.4 L engine)


6. On early models, disconnect the vacuum line from the fuel pressure regulator.

7. Taking into account the information given in paragraph 7, disconnect the fuel supply hose, and on earlier models, the return hose. To do this, you should release the clamps or disconnect the quick-release couplings (figure 13.7).
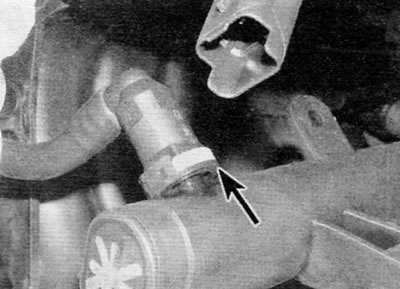


Figure 13.7. Press the clamp (marked with an arrow) and disconnect the fuel hose from the fuel rail…

Figure 13.7. Press the clamp (marked with an arrow) and disconnect the fuel hose from the fuel rail (models with a 1.4 L engine)


8. Unscrew the two bolts securing the fuel rail to the cylinder head and unscrew the nut securing the fuel rail to the manifold. Loosen the bolt securing the fuel rail center bracket to the intake manifold, then remove the bracket (the bracket has a groove for easy removal) (figure 13.8, a, b).
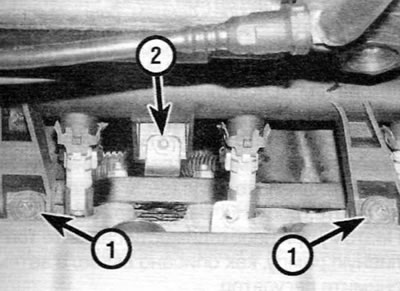
Figure 13.8, a. Loosen the bolts (1) and unscrew the nut (2) securing the fuel rail...
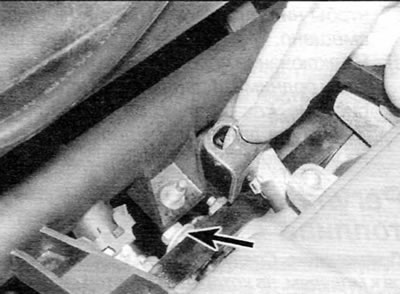
Figure 13.8, a. Loosen the bolts (1) and unscrew the nut (2) securing the fuel rail...


Figure 13.8, b....then release the bolt (marked with an arrow) and remove the central bracket

Figure 13.8, b....then release the bolt (marked with an arrow) and remove the central bracket


9. Disconnect the injector wiring harness electrical connector, and then release the electrical connector from the clamp on the rear of the intake manifold. Also disconnect the electrical connectors at the throttle body and move the wiring harness away from the manifold so that it does not interfere with removal of the fuel rail.

10. Carefully remove the fuel rail assembly with injectors from the cylinder head and remove the unit from the engine compartment. Remove the seals from the end of each injector and discard them; they should be replaced each time they are removed (figure 13.10).
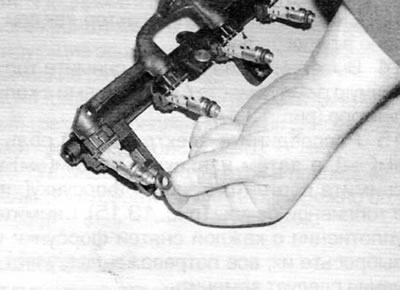
Figure 13.10. Remove the seal from the end of each injector (models with a 1.4 L engine)

Figure 13.10. Remove the seal from the end of each injector (models with a 1.4 L engine)


11. Disconnect the electrical connector, then remove the clamp and remove the corresponding injector from the fuel rail. Remove the top seal from the injector(s) and discard; after removal, seals must be replaced (figure 13.11, a, b).
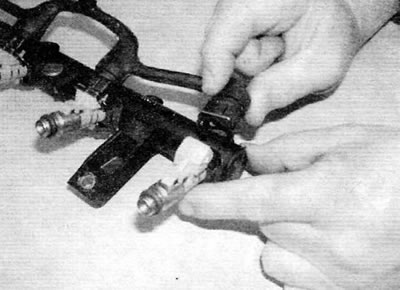
Figure 13.11, a. Disconnect the electrical connector...
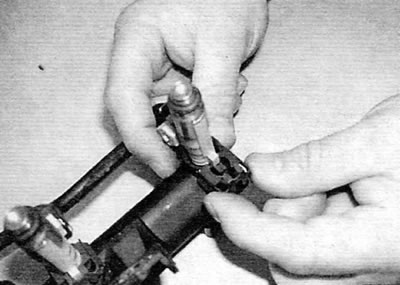
Figure 13.11, a. Disconnect the electrical connector...


Figure 13.11, b....then remove the clamp and remove the injector from the fuel rail (models with a…

Figure 13.11, b....then remove the clamp and remove the injector from the fuel rail (models with a 1.4 L engine)


12. Installation is carried out in the reverse order of removal, taking into account the following points:
  • a) Install new seals on all removed injectors (figure 13.12).
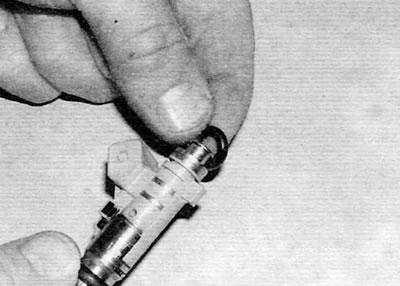
Figure 13.12. Replace all seals on the removed injector (models with a 1.4 L engine)

Figure 13.12. Replace all seals on the removed injector (models with a 1.4 L engine)

  • b) To facilitate installation, apply a small amount of engine oil to the seals, then install the injectors and fuel rail into place, ensuring that none of the seals are displaced.
  • c) Finally, connect the battery and increase the pressure in the fuel system as described in paragraph 7. Start the engine and check for fuel leaks.

Models with 1.6L engine


13. Remove the intake manifold as described in paragraph 14.


14. Unscrew the two bolts and remove the fuel rail together with the injectors from the manifold (figure 13.14).
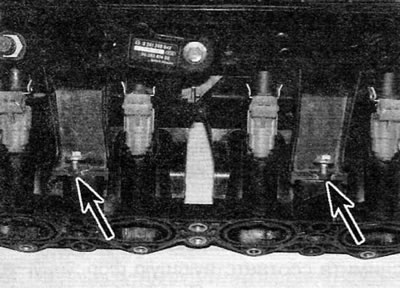
Figure 13.14. Remove two bolts (marked with arrows) and remove the fuel rail from the manifold…

Figure 13.14. Remove two bolts (marked with arrows) and remove the fuel rail from the manifold (models with a 1.6 L engine)


15. Disconnect the electrical connector, then remove the clamp and remove the corresponding injector from the fuel rail (figure 13.15). Remove the seals from each removed injector and discard them; all damaged seals should be replaced.
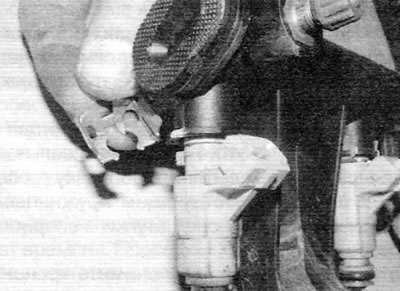
Figure 13.15. Remove the clamp and remove the corresponding injector from the fuel rail (models…

Figure 13.15. Remove the clamp and remove the corresponding injector from the fuel rail (models with a 1.6 L engine)


16. Installation is carried out in the reverse order of removal, taking into account the following points:
  • a) Install new seals on all removed injectors (figure 13.16).
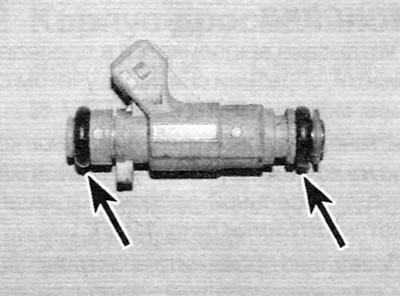
Figure 13.16. Replace all seals on the removed injector (marked with arrows) (models with a 1.6 L…

Figure 13.16. Replace all seals on the removed injector (marked with arrows) (models with a 1.6 L engine)

  • b) To facilitate installation, apply a small amount of engine oil to the seals, then install the injectors and fuel rail into place, ensuring that none of the seals are displaced.
  • c) Finally, connect the battery and pressurize the fuel system as described in paragraph 7. Start the engine and check for fuel leaks.
This article is available at russian, bulgarian, belarusian, ukrainian, serbian, croatian, romanian, polish, slovak, hungarian
Article reviewed by editor: Nikonova Veronica
Share information:
Previous
Partner I: Power and exhaust (petrol)
Next

Throttle body — removal and installation
Engine management system — checking and adjustment
Fuel tank — removal and installation
Fuel level indicator sensor — removal and installation
Fuel pump — removal and installation
Fuel pressure regulator
Throttle potentiometer
Electronic control unit
Stepper motor for adjusting the crankshaft speed in idle mode
Engine management system sensors
See similar information for other Peugeot models

➨ Fuel filter renewal — carburetor models Peugeot 106 (1991-2003)
➨ Fuel injectors Peugeot 207 (2006-2014)
➨ Fuel injectors — removal, inspection and installation Peugeot 305 (1977-1989)
➨ Fuel injectors — removal, inspection and installation Peugeot 406 (1995-2004)
➨ Replacing the fuel filter Peugeot 605 (1989-2000)
Link to this article in different formats
Comments and feedback from visitors
No comments yet


Add two numbers 32 + 38


Partner I (1996-2008) 
  • General information
  • Introduction to the guide
  • Faults en route
  • Weekly checks
  • User manual
  • Maintenance (petrol)
  • Maintenance (diesel)
  • Power unit
  • Petrol engines
  • Diesel engines «XUD»
  • Diesel engines «DW»
  • Overhaul of petrol engines
  • Overhaul of diesel engines
  • Cooling and heating
  • Power and exhaust (petrol)
  • Power and exhaust (XUD diesels)
  • Power and exhaust (DW diesels)
  • Emission reduction
  • Starting and charging system
  • Transmission
  • Clutch
  • Mechanical gearbox
  • Drive shafts
  • Chassis, running gear
  • Brake system
  • Car suspension
  • Steering
  • Body and interior
  • Exterior (external elements)
  • Interior (internal elements)
  • Doors, locks and windows
  • Electrical equipment
  • Equipment and devices
  • Electrical circuits
Peugeot 807 (2002-2014) 
  • General information
  • Operating instructions
  • Maintenance
  • Troubleshooting
  • Power unit
  • Gasoline engines
  • Diesel engines
  • Cooling and heating
  • Fuel injection (petrol)
  • Fuel system (diesel)
  • Fuel system
  • Exhaust system
  • Ignition system
  • Transmission
  • Clutch
  • Manual gearbox
  • Automatic gearbox
  • Chassis, running gear
  • Brake system
  • Car suspension
  • Steering system
  • Body and interior
  • Exterior (external elements)
  • Interior (internal elements)
  • Electrical equipment
  • Power devices
  • Electrical circuits
Peugeot 806 (1994-2002) 
  • General information
  • User manual
  • Maintenance
  • Power unit
  • Petrol engines
  • Diesel engines
  • Lubrication system
  • Cooling system
  • Fuel injection (petrol)
  • Fuel system (diesel)
  • Ignition and exhaust systems
  • ECM Bosch Motronic MP 3.2
  • ECM Magneti-Marelli (MM)
  • Transmission
  • Clutch
  • Mechanical gearbox
  • Chassis, running gear
  • Brake system
  • Car suspension
  • Steering
  • Electrical equipment
  • Equipment and devices
  • Electrical circuits
Peugeot J5 (1981-1993) 
  • General information
  • Introduction to manual
  • Specifications
  • Gasoline engine
  • Engine repair
  • Lubrication system
  • Cooling system
  • Fuel system
  • Ignition system
  • Diesel engine
  • Engine repair (DB9)
  • Lubrication system (DB9)
  • Cooling system (DB9)
  • Fuel injection (DB9)
  • Engine repair (U25)
  • Lubrication system (U25)
  • Cooling system (U25)
  • Fuel injection (U25)
  • Transmission
  • Clutch
  • Gearbox
  • Drive shafts
  • Chassis, running gear
  • Steering system
  • Car suspension
  • Brake system
  • Electrical equipment
  • Power devices
  • Electrical circuits
PeugeotBook.ru © 2018–2026 | Mobile version | Sitemap: EN BG BY UA RS HR RO PL SK HU | Write message | Site search | Add to bookmarks | Peugeot owners
106 (1991-2003) | 206 (1998-2012) | 207 (2006-2014) | 305 (1977-1989) | 306 (1993-2002) | 307 (2001-2008) | 405 (1987-1997) | 406 (1995-2004) | 605 (1989-2000) | Partner-I (1996-2008) | Eurovans-807 (2002-2014) | Eurovans-806 (1994-2002) | J5 (1981-1993) |
Cookies are used to ensure the correct display of pages on the site.