
Static regulation
2. Connect a 12V test lamp between the low voltage wire of the distributor and "earth". Remove the distributor cap or coil high voltage wire to prevent the engine from starting.
3. Turn on the ignition and, using a key thrown over the crankshaft pulley bolt, turn the crankshaft in the normal direction of its rotation. The lamp should light up every time one of the notches on the pulley passes the first notch on the setting scale.
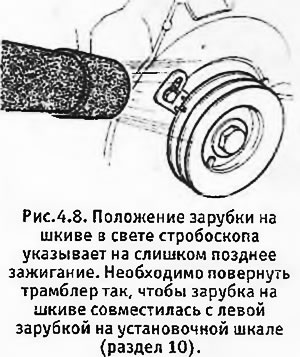
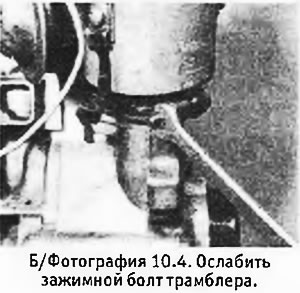
4. If the lamp lights up too early or too late, align one of the notches on the pulley with the first notch on the setting scale and loosen the distributor clamp bolt (see photo). Slightly turn the distributor so that the lamp just lights up. Tighten the clamping bolt, turn the crankshaft again and repeat the test for the second mark on the pulley.
5. After making sure that the ignition timing is adjusted correctly, turn off the ignition, disconnect the tester lamp and reinstall the distributor cap or coil high voltage wire.
Dynamic regulation
6. Clean the setting scale and bezel of the crankshaft pulley and mark both notches on the pulley and the first notch on the setting scale with quick dry paint.
7. Disconnect and plug the distributor vacuum tube. Connect the stroboscope to the high voltage wire connecting the coil to the distributor, strictly following the manufacturer's instructions.
8. Start the engine and reduce idle speed to 800 rpm (at high speeds, the centrifugal ignition controller will start to work). Aim the strobe light at the setting scale. With a correctly adjusted ignition timing and provided that the distributor is in good condition, both notches on the pulley in the light of the lamp will look like one, constantly aligned with the first notch on the setting scale.
9. If not, loosen the distributor clamp bolt and carefully rotate the distributor until the notches appear aligned in the light of the lamp. Tighten the clamping bolt and repeat the test again.
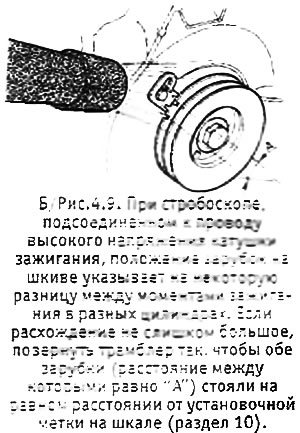
10. If, in the light of the lamp, 2 notches on the pulley do not merge into one or merge, but badly, so that the notch looks too wide, then this is a sign of wear on the distributor or cam. Slight wear can be compensated by turning the distributor so that the first notch on the setting scale is exactly in the middle between the two notches on the pulley (See b/fig. 4.9).
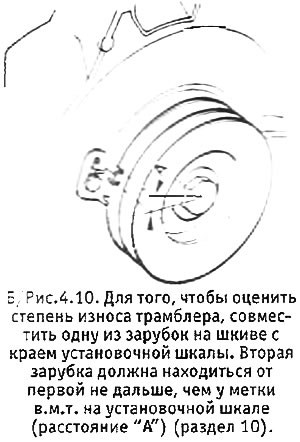
11. In order to determine the degree of wear, turn the distributor so that the right notch on the pulley is aligned with the right edge of the setting scale. The second notch should not be farther from the first than the notch for the T.M.T. on the setting scale. If it is removed more than this distance, the distributor must be replaced. After checking, re-adjust the ignition timing correctly.
12. On your own, you will not be able to accurately check the operation of the centrifugal and vacuum ignition regulators. However, keep in mind that under the strobe light, the marks on the pulley should move towards the earlier ignition as the engine speed is increased to fast idle, and the ignition should become even earlier when the vacuum tube is connected.
13. Upon completion, tighten the distributor clamping bolt, disconnect the strobe and raise the idle to normal.
Setting a completely misaligned ignition timing
14. If, as a result of engine overhaul or careless movement of the distributor, the correct ignition timing is completely lost, remove the valve cover and turn the crankshaft so that piston N 2 begins to rise on the compression stroke (both valves of cylinder No. 2 are closed, i.e. both rockers do not touch the ends of the rods) and alignment marks are aligned. Loosen the clamping bolt of the distributor, remove the distributor cover and turn the distributor so that the slider stands opposite the N 2 electrode in the cover (see b/fig. 4.5). After that, you can go to the static ignition control, as described above.