
English Русский
Български
Беларускі
Український
Српски
Hrvatski
Română
Polski
Slovenský
Magyar
Bookmark Articles Sitemap Contacts
Company Hyundai Company Opel Company Skoda Company Kia Company Mitsubishi Company LADA Company Audi
PeugeotBook.ru


Series 100   Series 200   Series 300   400-500   Series 600   Crossovers   Others
 
Peugeot 305 (1977-1989) Peugeot 306 (1993-2002) Peugeot 307 (2001-2008)

Distributor — removal and installation (Peugeot 305)

  • Main
  • 30X
  • Peugeot 305 (1977-1989)
  • Power unit
  • Ignition system
  • Distributor — removal and installation
0
1. The distributor is located in the right rear corner of the engine. Removing and installing the distributor will result in incorrect ignition timing. If the engine is still in the car, it is recommended that before removing the distributor, carefully mark the position of the rotor and the position of the distributor relative to the timing case, and then ensure that the crankshaft does not turn after removing the distributor. After this, all that remains is to install the distributor in its original position. If you have to turn the crankshaft with the distributor removed, or if you are reassembling the engine or timing after a rebuild, you will have to adjust the distributor position and ignition timing from the start.

2. Mark the spark plug wires so that they can be reconnected later in the same order and carefully disconnect them from the spark plugs. Disconnect the high voltage wire from the ignition coil, release the clamps and remove the distributor cap with wires.

3. Disconnect the low voltage wire from the coil that connects it to the distributor.

4. Disconnect the vacuum tube from the vacuum capsule.

5. Turn the crankshaft using a wrench placed on the pulley bolt so that the runner approaches the place where electrode No. 2 is located on the distributor cap. Continue turning the crankshaft until the notch on the pulley rim aligns with the first notch (in the direction of rotation of the crankshaft, i.e. clockwise, if you look at the pulley) on the setting scale on the clutch housing.


6. Mark the position of the distributor housing relative to the timing mechanism housing so that it can subsequently be installed exactly in its original position. Unscrew and remove the bolt with the spring washer. Be careful not to drop the tie rod into the support plate.

7. Carefully remove the distributor from the timing case.

8. If you did not touch the crankshaft and timing case when the distributor was removed, then before installing the distributor you should check that the notch on the crankshaft pulley is still aligned with the first notch on the installation scale on the clutch housing.

9. Turn the distributor shaft so that the runner is opposite electrode No. 2 on the distributor cover. Check that the projections on the end of the distributor shaft align with the offset slot in the shaft drive. Insert the distributor into place and check that the protrusions fit into the slot. If necessary, you can slightly rotate the housing and ensure that the marks made before removing the distributor are aligned. Install and tighten the bolt and washer securing the distributor clamp plate. Upon completion, check that the runner is still positioned opposite electrode No. 2.

10. If for some reason you removed the timing case cover while the distributor was removed, you should perform several additional operations when installing the distributor.

11. First of all, turn the crankshaft to the correct position. This is complicated by the fact that the rear flange of the crankshaft pulley has two notches, spaced 180° apart. These notches are used to determine the difference in ignition timing in all four cylinders using a stroboscope while the engine is running. The ignition timing is adjusted by cylinder N 2, and in order to determine which notch should be used, you need to turn the crankshaft in the normal direction of its rotation (clockwise when looking at the pulley) so that piston No. 2 begins to rise on the compression stroke. This can be determined by removing the valve cover and observing when both valves of cylinder No. 2 close. In this position, one of the notches on the pulley should be next to the setting scale. Turn the crankshaft again so that the notch on the pulley aligns with the first notch on the adjustment scale. Check that cylinder No. 2 is still on the compression stroke.


12. Now you can install the distributor (see paragraph 9). Skip the instructions for aligning the marks unless applicable.

13. After installing the distributor, check the ignition timing (see section 10) and tighten the clamp bolt and clamp plate mounting bolt. Replace the distributor cap and connect the spark plug wires and low voltage wire. Connect the high voltage wire to the ignition coil and the vacuum tube to the vacuum chamber. The correct position of the ignition wires is shown in B/Figure 4.5.
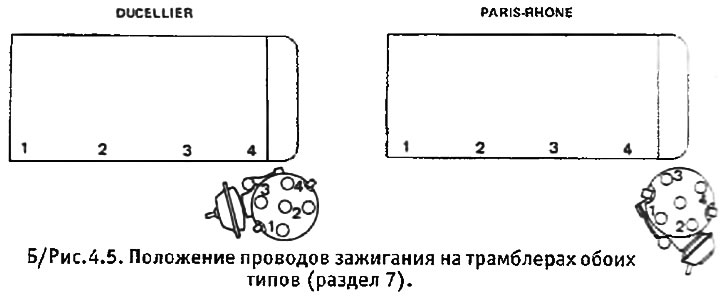
13. After installing the distributor, check the ignition timing (see section 10) and tighten the…
This article is available at russian, bulgarian, belarusian, ukrainian, serbian, croatian, romanian, polish, slovak, hungarian
Article reviewed by editor: Ostrovsky Fedor
Share information:
Previous
Peugeot 305: Ignition system
Next

Distributor — lubricant
Capacitor — removal, inspection and installation
Breaker contacts — removal, tidying up and installation
Angle of closed state of contacts — regulation
Breaker contacts — preliminary gap adjustment
Distributor — bulkhead
Setting scale — checking and adjustment
Ignition timing — regulation
Spark plugs and high-tension wires — common part
Diagnostic socket
See similar information for other Peugeot models

➨ Distributor — removal and refitting Peugeot 106 (1991-2003)
➨ Removal and installation the fuel distributor Peugeot 206 (1998-2012)
➨ Removal and installation the ignition distributor Peugeot 405 (1987-1997)
➨ Ignition distributor Peugeot J5 (1981-1993)
Link to this article in different formats
Comments and feedback from visitors
No comments yet


Add two numbers 43 + 47


Peugeot 307 (2001-2008) 
  • User manual
  • Keys, doors and alarm
  • Controls and instruments
  • Driving and operation
  • Maintenance
  • Power unit
  • Petrol engines TU3 and TU5
  • Petrol engines EW10
  • Diesel engines DV10
  • Diesel engines DW10
  • Transmission
  • Clutch and drive shafts
  • Mechanical gearbox
  • Automatic gearbox
  • Chassis, running gear
  • Front suspension
  • Rear suspension
  • Steering
  • Brake system
  • Body and interior
  • Exterior (external elements)
  • Interior (internal elements)
  • Doors, locks and windows
  • Heating and air conditioning
  • Electrical equipment
  • Equipment and devices
  • Power devices
  • Airbags
  • Electrical circuits
Peugeot 306 (1993-2002) 
  • General information
  • Introduction to manual
  • Specifications
  • Gasoline engine
  • Engine repair
  • Lubrication system
  • Cooling system
  • Fuel injection
  • Ignition system
  • Diesel engine
  • Engine repair
  • Lubrication system
  • Cooling system
  • Fuel injection
  • Transmission
  • Clutch
  • Gearbox
  • Drive shafts
  • Chassis, running gear
  • Steering system
  • Front suspension
  • Rear suspension
  • Brake system
  • Electrical equipment
  • Power devices
  • Electrical circuits
Peugeot 305 (1977-1989) 
  • General information
  • Maintenance
  • Power unit
  • Gasoline engines
  • Diesel engines
  • Cooling system (gasoline)
  • Cooling system (diesel)
  • Fuel system (gasoline)
  • Fuel system (diesel)
  • Ignition system
  • Transmission
  • Clutch
  • Mechanical gearbox BB8
  • Mechanical gearbox BE1
  • Automatic gearbox ZF4
  • Shafts, hubs and wheels
  • Chassis, running gear
  • Brake system
  • Car suspension
  • Steering
  • Body and interior
  • Exterior (external elements)
  • Interior (internal elements)
  • Electrical equipment
  • Equipment and devices
  • Headlights and lighting
  • Power devices
  • Electrical circuits
  • Wiring diagrams (diesel)
PeugeotBook.ru © 2018–2026 | Mobile version | Sitemap: EN BG BY UA RS HR RO PL SK HU | Write message | Site search | Add to bookmarks | Peugeot owners
106 (1991-2003) | 206 (1998-2012) | 207 (2006-2014) | 305 (1977-1989) | 306 (1993-2002) | 307 (2001-2008) | 405 (1987-1997) | 406 (1995-2004) | 605 (1989-2000) | Partner-I (1996-2008) | Eurovans-807 (2002-2014) | Eurovans-806 (1994-2002) | J5 (1981-1993) |
Cookies are used to ensure the correct display of pages on the site.