
English Русский
Български
Беларускі
Український
Српски
Hrvatski
Română
Polski
Slovenský
Magyar
Bookmark Articles Sitemap Contacts
Company Hyundai Company Opel Company Skoda Company Kia Company Mitsubishi Company LADA Company Audi
PeugeotBook.ru


Series 100   Series 200   Series 300   400-500   Series 600   Crossovers   Others
 
Peugeot 305 (1977-1989) Peugeot 306 (1993-2002) Peugeot 307 (2001-2008)

Setting scale — checking and adjustment (Peugeot 305)

  • Main
  • 30X
  • Peugeot 305 (1977-1989)
  • Power unit
  • Ignition system
  • Setting scale — checking and adjustment
0
1. The setting scale for adjusting the ignition timing is bolted to the clutch housing next to the crankshaft pulley. After the first installation and adjustment of the scale, its position is fixed with a stroke of white paint. If the scale was removed during an engine rebuild or clutch housing replacement, or if you suspect it is incorrectly adjusted, its position can be checked and adjusted as follows.

2. In Peugeot workshops, the scale is adjusted using a special tool, which you can easily make yourself from a rod with a diameter of 8 mm and a length of 130 mm.

3. Remove the plug from the timing case (immediately above the cover above the end of the crankshaft) (see photo). Turn the crankshaft using a wrench placed on the bolt of its pulley so that one of the notches on the pulley flange aligns with the second notch on the installation scale (the crankshaft turns clockwise when looking at the pulley). Insert the rod into the hole in the timing case and slightly rock the crankshaft so that the rod enters the slot on the crankshaft cheek and locks it in the TDC position for cylinders NN 2 and 3. If the rod does not fit into the slot, pull it out, rotate the crankshaft 180° and align the second notch on the pulley flange with the notch on the installation scale. Make sure that the rod does not fall under the timing case.
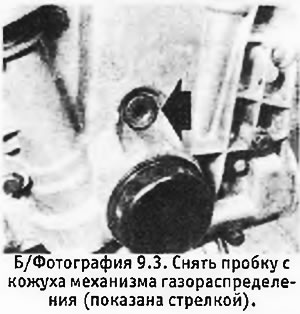
3. Remove the plug from the timing case (immediately above the cover above the end of the…


4. With the crankshaft locked in the TDC position, you can check the accuracy of the adjustment of the setting scale. If the notch on the pulley does not exactly align with the second notch on the scale (the first notch on the scale is designed to set the ignition timing at 8° or 10° BTDC), loosen the scale mounting bolt, carefully move the scale until the mark on the pulley exactly aligns with the second notch on the scale, and retighten the bolt. Once the scale is adjusted correctly, erase the old mark and apply a new one with paint.


5. Pull out the installation rod and install the plug in place.

Material copied from the resource peugeotbook
This article is available at russian, bulgarian, belarusian, ukrainian, serbian, croatian, romanian, polish, slovak, hungarian
Article reviewed by editor: Ostrovsky Fedor
Share information:
Previous
Peugeot 305: Ignition system
Next

Distributor — bulkhead
Distributor — removal and installation
Distributor — lubricant
Capacitor — removal, inspection and installation
Breaker contacts — removal, tidying up and installation
Ignition timing — regulation
Spark plugs and high-tension wires — common part
Diagnostic socket
TDC sensor — removal, installation and adjustment
Ignition system troubleshooting
See similar information for other Peugeot models

➨ Valve clearances (8-valve engines) — checking and adjustment Peugeot 106 (1991-2003)
➨ Checking tire pressure Peugeot 207 (2006-2014)
➨ Seat belts — description and adjustment Peugeot 405 (1987-1997)
➨ Engine Oil Level — Checking and Replacing Peugeot 605 (1989-2000)
➨ Ignition timing — checking and adjustment Peugeot Partner I (1996-2008)
Link to this article in different formats
Comments and feedback from visitors
No comments yet


Add two numbers 10 + 49


Peugeot 307 (2001-2008) 
  • User manual
  • Keys, doors and alarm
  • Controls and instruments
  • Driving and operation
  • Maintenance
  • Power unit
  • Petrol engines TU3 and TU5
  • Petrol engines EW10
  • Diesel engines DV10
  • Diesel engines DW10
  • Transmission
  • Clutch and drive shafts
  • Mechanical gearbox
  • Automatic gearbox
  • Chassis, running gear
  • Front suspension
  • Rear suspension
  • Steering
  • Brake system
  • Body and interior
  • Exterior (external elements)
  • Interior (internal elements)
  • Doors, locks and windows
  • Heating and air conditioning
  • Electrical equipment
  • Equipment and devices
  • Power devices
  • Airbags
  • Electrical circuits
Peugeot 306 (1993-2002) 
  • General information
  • Introduction to manual
  • Specifications
  • Gasoline engine
  • Engine repair
  • Lubrication system
  • Cooling system
  • Fuel injection
  • Ignition system
  • Diesel engine
  • Engine repair
  • Lubrication system
  • Cooling system
  • Fuel injection
  • Transmission
  • Clutch
  • Gearbox
  • Drive shafts
  • Chassis, running gear
  • Steering system
  • Front suspension
  • Rear suspension
  • Brake system
  • Electrical equipment
  • Power devices
  • Electrical circuits
Peugeot 305 (1977-1989) 
  • General information
  • Maintenance
  • Power unit
  • Gasoline engines
  • Diesel engines
  • Cooling system (gasoline)
  • Cooling system (diesel)
  • Fuel system (gasoline)
  • Fuel system (diesel)
  • Ignition system
  • Transmission
  • Clutch
  • Mechanical gearbox BB8
  • Mechanical gearbox BE1
  • Automatic gearbox ZF4
  • Shafts, hubs and wheels
  • Chassis, running gear
  • Brake system
  • Car suspension
  • Steering
  • Body and interior
  • Exterior (external elements)
  • Interior (internal elements)
  • Electrical equipment
  • Equipment and devices
  • Headlights and lighting
  • Power devices
  • Electrical circuits
  • Wiring diagrams (diesel)
PeugeotBook.ru © 2018–2026 | Mobile version | Sitemap: EN BG BY UA RS HR RO PL SK HU | Write message | Site search | Add to bookmarks | Peugeot owners
106 (1991-2003) | 206 (1998-2012) | 207 (2006-2014) | 305 (1977-1989) | 306 (1993-2002) | 307 (2001-2008) | 405 (1987-1997) | 406 (1995-2004) | 605 (1989-2000) | Partner-I (1996-2008) | Eurovans-807 (2002-2014) | Eurovans-806 (1994-2002) | J5 (1981-1993) |
Cookies are used to ensure the correct display of pages on the site.