English Русский
Български
Беларускі
Український
Српски
Hrvatski
Română
Polski
Slovenský
Magyar
Bookmark Articles Sitemap Contacts
Company Hyundai Company Opel Company Skoda Company Kia Company Mitsubishi Company LADA Company Audi
PeugeotBook.ru


Series 100   Series 200   Series 300   400-500   Series 600   Crossovers   Others
 
Peugeot 305 (1977-1989) Peugeot 306 (1993-2002) Peugeot 307 (2001-2008)

Breaker contacts — preliminary gap adjustment (Peugeot 305)

  • Main
  • 30X
  • Peugeot 305 (1977-1989)
  • Power unit
  • Ignition system
  • Breaker contacts — preliminary gap adjustment
0
1. To accurately regulate the gap between the contacts of the breaker, a device for measuring the angle of the closed state of the contacts is required (see next section). Since not everyone has it, below we provide the procedure for adjustment using thickness gauge feeler gauges. This preliminary adjustment will allow you to get to the nearest workshop where the clearance will be adjusted precisely. Even if you have a device for measuring the angle of the contacts, you must first adjust the gap using feeler gauges before using it.

2. Release the distributor cap clamps and remove it. Wipe the cover with a dry, clean cloth and inspect the electrodes for excessive burning. Check to see if there are any cracks on the lid. If the electrodes are burnt or cracked, the cover must be replaced.

3. Inspect the "coal" in the center of the lid for damage. Press it a few times and check that it can move freely.

4. Carefully remove the runner from the cam and wipe it with a dry, clean cloth. A burnt or cracked runner must be replaced.
4. Carefully remove the runner from the cam and wipe it with a dry, clean cloth. A burnt or cracked…

5. Using a small screwdriver, carefully pry open the breaker contacts and inspect them carefully. If they are worn, burnt or dirty, they must be removed for cleaning or replacement (see section 4).


6. If the contacts are in good condition, turn the crankshaft in the direction of its rotation using a wrench placed on the crankshaft pulley bolt so that the back side of the movable contact rests on the top point of one of the cam contours.

7. Using feeler gauges of the required thickness (see Specifications) check the gap between the contacts. The probe should pass between the contacts with a slight tension, without spreading them apart. Be careful not to get any oil on the contacts during testing.

8. If adjustment is necessary, proceed as follows (depending on the brand of distributor).

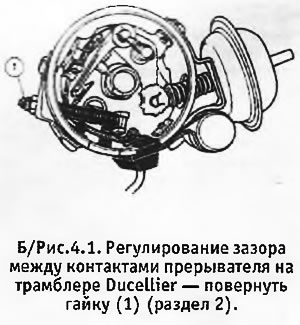
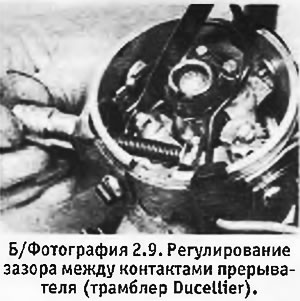
9. Ducellier. Using a 7 mm open-end or socket wrench, turn the adjusting nut on the side of the distributor to obtain the desired clearance (see photo).
9. Ducellier. Using a 7 mm open-end or socket wrench, turn the adjusting nut on the side of the…


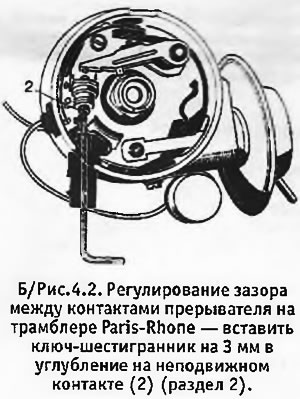
10. Paris-Rhone. Insert a 3 mm Allen key into the hole in the plastic plug on the side of the distributor until it fits into the recess on the fixed contact, and turn the key to obtain the desired clearance.

11. When finished, turn the crankshaft so that the back side of the sliding contact is at the top point of the next cam contour, and check the clearance again. Any changes in the gap size indicate that the distributor requires repair. If there are significant changes, the roller must be replaced.


12. Install the rotor and distributor cap in place. Secure the lid with clamps.

Source of the article is website PeugeotBook.ru
This article is available at russian, bulgarian, belarusian, ukrainian, serbian, croatian, romanian, polish, slovak, hungarian
Article reviewed by editor: Ostrovsky Fedor
Share information:
Previous
Peugeot 305: Ignition system
Next

General description of the contact ignition system
Ignition system specification
Angle of closed state of contacts — regulation
Breaker contacts — removal, tidying up and installation
Capacitor — removal, inspection and installation
Distributor — lubricant
Distributor — removal and installation
See similar information for other Peugeot models

➨ Idle speed and mixture check and adjustment Peugeot 106 (1991-2003)
➨ Headlight adjustment Peugeot 207 (2006-2014)
➨ Seat belts — description and adjustment Peugeot 405 (1987-1997)
➨ High pressure fuel pump — removal, installation and adjustment Peugeot 605 (1989-2000)
➨ Height adjustment of the seat belt fastening Peugeot 806 (1994-2002)
Link to this article in different formats
Comments and feedback from visitors
No comments yet


Add two numbers 11 + 33


Peugeot 307 (2001-2008) 
  • User manual
  • Keys, doors and alarm
  • Controls and instruments
  • Driving and operation
  • Maintenance
  • Power unit
  • Petrol engines TU3 and TU5
  • Petrol engines EW10
  • Diesel engines DV10
  • Diesel engines DW10
  • Transmission
  • Clutch and drive shafts
  • Mechanical gearbox
  • Automatic gearbox
  • Chassis, running gear
  • Front suspension
  • Rear suspension
  • Steering
  • Brake system
  • Body and interior
  • Exterior (external elements)
  • Interior (internal elements)
  • Doors, locks and windows
  • Heating and air conditioning
  • Electrical equipment
  • Equipment and devices
  • Power devices
  • Airbags
  • Electrical circuits
Peugeot 306 (1993-2002) 
  • General information
  • Introduction to manual
  • Specifications
  • Gasoline engine
  • Engine repair
  • Lubrication system
  • Cooling system
  • Fuel injection
  • Ignition system
  • Diesel engine
  • Engine repair
  • Lubrication system
  • Cooling system
  • Fuel injection
  • Transmission
  • Clutch
  • Gearbox
  • Drive shafts
  • Chassis, running gear
  • Steering system
  • Front suspension
  • Rear suspension
  • Brake system
  • Electrical equipment
  • Power devices
  • Electrical circuits
Peugeot 305 (1977-1989) 
  • General information
  • Maintenance
  • Power unit
  • Gasoline engines
  • Diesel engines
  • Cooling system (gasoline)
  • Cooling system (diesel)
  • Fuel system (gasoline)
  • Fuel system (diesel)
  • Ignition system
  • Transmission
  • Clutch
  • Mechanical gearbox BB8
  • Mechanical gearbox BE1
  • Automatic gearbox ZF4
  • Shafts, hubs and wheels
  • Chassis, running gear
  • Brake system
  • Car suspension
  • Steering
  • Body and interior
  • Exterior (external elements)
  • Interior (internal elements)
  • Electrical equipment
  • Equipment and devices
  • Headlights and lighting
  • Power devices
  • Electrical circuits
  • Wiring diagrams (diesel)
PeugeotBook.ru © 2018–2026 | Mobile version | Sitemap: EN BG BY UA RS HR RO PL SK HU | Write message | Site search | Add to bookmarks | Peugeot owners
106 (1991-2003) | 206 (1998-2012) | 207 (2006-2014) | 305 (1977-1989) | 306 (1993-2002) | 307 (2001-2008) | 405 (1987-1997) | 406 (1995-2004) | 605 (1989-2000) | Partner-I (1996-2008) | Eurovans-807 (2002-2014) | Eurovans-806 (1994-2002) | J5 (1981-1993) |
Cookies are used to ensure the correct display of pages on the site.