
English Русский
Български
Беларускі
Український
Српски
Hrvatski
Română
Polski
Slovenský
Magyar
Bookmark Articles Sitemap Contacts
Company Hyundai Company Opel Company Skoda Company Kia Company Mitsubishi Company LADA Company Audi
PeugeotBook.ru


Series 100   Series 200   Series 300   400-500   Series 600   Crossovers   Others
 
Peugeot 106 (1991-2003)

Exhaust manifold — removal and refitting (Peugeot 106)

  • Main
  • 10X
  • Peugeot 106 (1991-2003)
  • Power unit
  • Fuel system (carburetor)
  • Exhaust manifold — removal and refitting
0
Table of contents: Removal 🠇 Refitting 🠇

Removal


1. Disconnect the hot-air intake hose from the manifold shroud and remove it from the vehicle (see illustration).
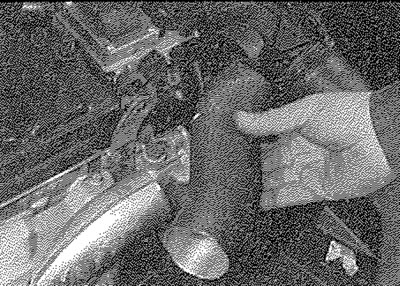
16.1. Remove the hot-air intake hose...
16.1. Remove the hot-air intake hose...


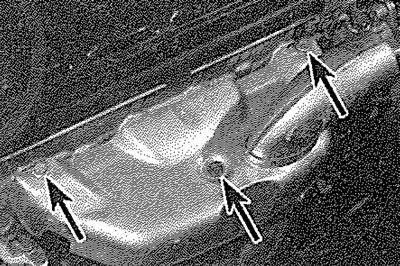
16.2. ... then undo the three retaining bolts (arrowed) and remove the exhaust manifold shroud

16.2. ... then undo the three retaining bolts (arrowed) and remove the exhaust manifold shroud


2. Slacken and remove the three retaining screws and remove the shroud from the top of the exhaust manifold (see illustration).

3. Chock the rear wheels then jack up the front of the vehicle and support it on axle stands (see "Jacking and vehicle support").

4. Undo the nuts securing the exhaust front pipe to the manifold, then remove the bolt securing the front pipe to its mounting bracket. Disconnect the front pipe from the manifold and recover the gasket. Note that on 1360 cc models, it may be necessary to remove the bolt securing the front pipe to its mounting bracket in order to disconnect the exhaust.


5. Undo the eight retaining nuts securing the manifold to the head (see illustration). Manoeuvre the manifold out of the engine compartment and collect the manifold gaskets.
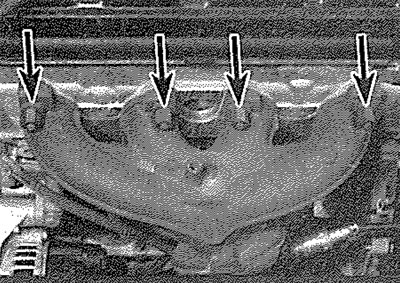
16.5. Exhaust manifold is retained by eight nuts (upper four arrowed)

16.5. Exhaust manifold is retained by eight nuts (upper four arrowed)


6. Examine the exhaust manifold and all the manifold studs and nuts for signs of damage and corrosion. Remove all traces of corrosion and repair or renew any damaged studs. Note that on later models the manifold retaining nuts have been modified and what are termed "short nuts" are now fitted in place of the earlier "long nuts". To determine the type fitted, temporarily refit the manifold and gaskets over the studs and screw on a retaining nut. If the long nuts are fitted, there will be virtually no stud thread protruding past the end of the nut. With the short nuts there will be two or three turns of stud thread visible. If any nuts are damaged, all eight should be replaced with the later type short nuts. Note also that the torque setting for each type is different (see Specifications).

7. Ensure that the manifold and cylinder head sealing faces are clean and flat and obtain new manifold gaskets prior to refitting. On early engines, fibre gaskets are used, whereas on later units, the gaskets are of stainless steel. Note that the two types must not be mixed on an engine.


Refitting


8. Refitting is the reverse of the removal procedure, noting the following points:
  • a) If the later type stainless steel gaskets are being used, ensure that the gasket is fitted with the raised sealing surface on the gasket face toward the manifold. Tighten the manifold retaining nuts to the specified torque.
  • b) Reconnect the front pipe to the manifold using the information given in Section 17.


(Original is located at: PEUGEOTBOOK)
This article is available at russian, bulgarian, belarusian, ukrainian, serbian, croatian, romanian, polish, slovak, hungarian
Article reviewed by editor: Matveev Demid
Share information:
Previous
Peugeot 106: Fuel system (carburetor)
Next

Inlet manifold — removal and refitting
Solex 32-34 Z2 and CISAC carburettor — fault finding, overhaul…
Solex 32 PBISA carburettor — fault finding, overhaul and…
Carburettor — removal and refitting
Carburettor — general information
Exhaust system — general information and component renewal
See similar information for other Peugeot models

➨ Removal the intake manifold and throttle valve (EP3, EP6 engines) Peugeot 207 (2006-2014)
➨ Intake and exhaust manifolds — inspection Peugeot 305 (1977-1989)
➨ Exhaust manifold — removal and installation Peugeot 405 (1987-1997)
➨ Intake Manifold — Removal Peugeot 605 (1989-2000)
➨ Exhaust manifold — removal and installation Peugeot Partner I (1996-2008)
Link to this article in different formats
Comments and feedback from visitors
No comments yet


Add two numbers 16 + 30


Peugeot 106 (1991-2003) 
  • General information
  • Introduction to manual
  • Weekly checks
  • Maintenance (petrol)
  • Maintenance (diesel)
  • Troubleshooting
  • Power unit
  • Petrol engines
  • Diesel engines
  • Engine overhaul
  • Cooling and heating
  • Fuel system (carburetor)
  • Single point injection (petrol)
  • Multipoint injection (petrol)
  • Fuel system (diesel)
  • Emission control system
  • Engine electrical equipment
  • Ignition system
  • Diesel heating
  • Transmission
  • Clutch
  • Manual gearbox
  • Automatic gearbox
  • Drive shafts
  • Chassis, running gear
  • Brake system
  • Car suspension
  • Steering
  • Body and interior
  • Exterior (external elements)
  • Interior (internal elements)
  • Doors, locks and windows
  • Electrical equipment
  • Equipment and devices
  • Electrical diagrams
PeugeotBook.ru © 2018–2026 | Mobile version | Sitemap: EN BG BY UA RS HR RO PL SK HU | Write message | Site search | Add to bookmarks | Peugeot owners
106 (1991-2003) | 206 (1998-2012) | 207 (2006-2014) | 305 (1977-1989) | 306 (1993-2002) | 307 (2001-2008) | 405 (1987-1997) | 406 (1995-2004) | 605 (1989-2000) | Partner-I (1996-2008) | Eurovans-807 (2002-2014) | Eurovans-806 (1994-2002) | J5 (1981-1993) |
Cookies are used to ensure the correct display of pages on the site.