
English Русский
Български
Беларускі
Український
Српски
Hrvatski
Română
Polski
Slovenský
Magyar
Bookmark Articles Sitemap Contacts
Company Hyundai Company Opel Company Skoda Company Kia Company Mitsubishi Company LADA Company Audi
PeugeotBook.ru


Series 100   Series 200   Series 300   400-500   Series 600   Crossovers   Others
 
Peugeot 206 (1998-2012) Peugeot 207 (2006-2014)

Disassembly and assembly of the power unit (Peugeot 206)

  • Main
  • 20X
  • Peugeot 206 (1998-2012)
  • Power unit
  • Gasoline engines
  • Disassembly and assembly of the power unit
0
Table of contents: Disassembly 🠇 Assembly 🠇
Note: Below is only the order of disassembling and assembling the power unit, a detailed description of each operation is given in the relevant sections of the manual.


Disassembly


Disassemble the power unit in the following order:

1. Mount the power unit on a stand or workbench.

2. On models with manual transmission:
  • remove the clutch housing cover (installed on vehicle parts).
  • unscrew the bolts securing the starter to the clutch housing and remove the starter. When removing the starter, be careful not to damage the starter guide pins;
  • loosen the gearbox mounting bolts and carefully remove it from the engine, being careful not to let the gearbox input shaft rest against the clutch pressure spring petals.

Note: The transmission mounting bolts are different and must be installed in the same locations during assembly.


3. On models with automatic transmission:
  • unscrew the bolts securing the starter to the clutch housing and remove the starter. When removing the starter, be careful not to damage the starter guide pins;
  • through the opening for the starter gear in the cylinder block, turning the crankshaft to the required angle (about 120°), alternately unscrew the torque converter mounting nuts;
  • secure the torque converter with a bolt and a bar to one of the holes for the starter mounting bolts;
  • loosen the bolts and remove the automatic transmission, taking into account that its weight should not be supported by the torque converter until it is removed from the drive disk.

Note: The transmission mounting bolts are different and must be installed in the same locations during assembly.


Assembly


Assemble the power unit in the following order:

View the original on the website: Peugeotbook.ru

1. Install the clutch housing with the driven disk on the flywheel using three centering pins and secure it with bolts.

2. Install centering bushings into the lower legs of the cylinder block (if they were filmed) and put the upper clutch housing cover on them.
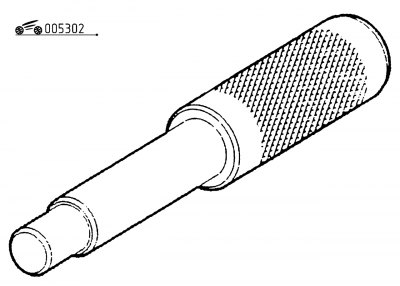
Figure 3.2. Mandrel for centering the driven clutch disc

Figure 3.2. Mandrel for centering the driven clutch disc


3. On models with manual transmission, center with drift 0213 (figure 3.2) clutch slave disc. Apply a thin coat of MOLYKOTE BR2 PLUS grease to the outer surface of the clutch release bearing guide sleeve.

Note: Do not apply grease to the splined end of the transmission input shaft.


4. On models with automatic transmission, apply a thin layer of MOLYKOTE BR2 PLUS grease to the centering part of the torque converter shaft. Replace the torque converter mounting nuts with new ones and tighten the nuts evenly in two stages as described in subsection "Automatic transmission".

5. Connect the gearbox to the engine without resting the gearbox input shaft on the clutch pressure spring petals. Attach the gearbox to the engine with bolts.


6. Replace the clutch housing cover and secure it with bolts.

7. Install and secure the starter.

8. Replace the axle shaft seals.
This article is available at russian, bulgarian, belarusian, ukrainian, serbian, croatian, romanian, polish, slovak, hungarian
Article reviewed by editor: Matveev Demid
Share information:
Previous
Peugeot 206: Gasoline engines
Next

Removal and installation of the power unit
Special tools and devices for engine disassembly
Disassembling the engine
Special tools and devices for engine assembly
Engine assembly
Running in the engine after major repairs
See similar information for other Peugeot models

➨ Power steering fluid level Peugeot 106 (1991-2003)
➨ Removal and installation of the power unit Peugeot 306 (1993-2002)
➨ Removal and installation of the power unit Peugeot 405 (1987-1997)
➨ Power unit — removal and installation Peugeot 605 (1989-2000)
➨ Removal and installation of the power unit Peugeot J5 (1981-1993)
Link to this article in different formats
Comments and feedback from visitors
No comments yet


Add two numbers 45 + 15


Peugeot 207 (2006-2014) 
  • General information
  • Car care
  • Governing bodies
  • Driving and operation
  • Power unit
  • Engine characteristics
  • Engine repair
  • Cooling system
  • Lubrication system
  • Ignition system
  • Control system (gasoline)
  • Fuel system (gasoline)
  • Control system (diesel)
  • Transmission
  • Clutch
  • Mechanical gearbox
  • Automatic gearbox
  • Drive shafts
  • Chassis, running gear
  • Car suspension
  • Steering
  • Brake system
  • Body and interior
  • Exterior (external elements)
  • Interior (internal elements)
  • Heating and air conditioning
  • Electrical equipment
  • Equipment and devices
  • Headlights and lighting
  • Power devices
  • Electrical circuits
Peugeot 206 (1998-2012) 
  • General information
  • User manual
  • Maintenance
  • Power unit
  • Gasoline engines
  • Diesel engines
  • Diesel power system
  • Engine management system
  • Transmission
  • Clutch
  • Mechanical gearbox
  • Automatic gearbox
  • Drive shafts
  • Chassis, running gear
  • Front suspension
  • Rear suspension
  • Steering
  • Brake system
  • Body and interior
  • Body elements
  • Doors, locks and windows
  • Electrical equipment
  • Equipment and devices
  • Electrical circuits
PeugeotBook.ru © 2018–2026 | Mobile version | Sitemap: EN BG BY UA RS HR RO PL SK HU | Write message | Site search | Add to bookmarks | Peugeot owners
106 (1991-2003) | 206 (1998-2012) | 207 (2006-2014) | 305 (1977-1989) | 306 (1993-2002) | 307 (2001-2008) | 405 (1987-1997) | 406 (1995-2004) | 605 (1989-2000) | Partner-I (1996-2008) | Eurovans-807 (2002-2014) | Eurovans-806 (1994-2002) | J5 (1981-1993) |
Cookies are used to ensure the correct display of pages on the site.