English Русский
Български
Беларускі
Український
Српски
Hrvatski
Română
Polski
Slovenský
Magyar
Bookmark Articles Sitemap Contacts
Company Hyundai Company Opel Company Skoda Company Kia Company Mitsubishi Company LADA Company Audi
PeugeotBook.ru


Series 100   Series 200   Series 300   400-500   Series 600   Crossovers   Others
 
Peugeot 305 (1977-1989) Peugeot 306 (1993-2002) Peugeot 307 (2001-2008)

Rear Combination Light — replacing bulbs (Peugeot 305)

  • Main
  • 30X
  • Peugeot 305 (1977-1989)
  • Electrical equipment
  • Headlights and lighting
  • Rear Combination Light — replacing bulbs
0
Table of contents: Replacing rear combination light…🠇 Replacing rear combination light…🠇
1. The rear combination light bulbs can be accessed through the trunk. All rear combination light bulbs are mounted on a printed circuit board, which can be easily removed for bulb replacement.

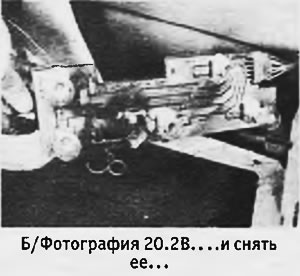
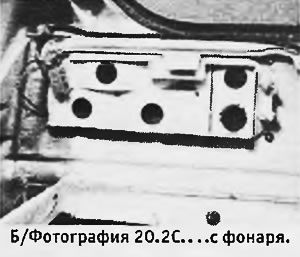
2. To remove the printed circuit board, squeeze the two latches and move the printed circuit board slightly towards the center of the machine. Release the retaining tabs and lift the printed circuit board. For its final removal (if necessary) the multi-pin connector on the outer edge of the printed circuit board should be disconnected (see photos).
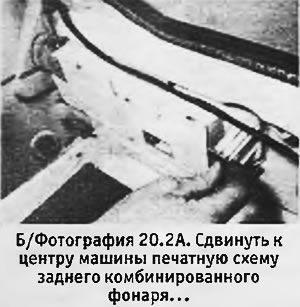
2. To remove the printed circuit board, squeeze the two latches and move the printed circuit board…

2. To remove the printed circuit board, squeeze the two latches and move the printed circuit board…


3. The rating of each lamp is indicated on the printed circuit diagram next to its socket. All lamps are single filament and generally have a bayonet fit (with the exception of the garland-type lamp in the right combination lamp, which is used to illuminate the trunk). This lamp does not have a separate switch, i.e. the trunk lighting turns on simultaneously with the parking lights.


4. Installation of the printed circuit board is carried out in reverse order. Upon completion, check the operation of the lamps.

Replacing rear combination light bulbs on Saloon models produced since 1983.


1. The lamps, as in the previous case, are installed on the printed circuit. The difference is that to remove the circuit you need to press on the tabs along its edges (see photo).
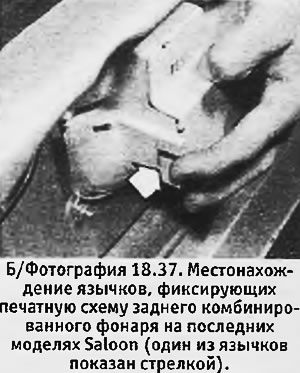
1. The lamps, as in the previous case, are installed on the printed circuit. The difference is that…


Replacing rear combination light bulbs on Estate models


1. Open the tailgate and remove the mounting screw at the top of the rear combination light (see photo).
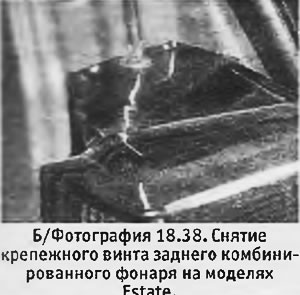
1. Open the tailgate and remove the mounting screw at the top of the rear combination light (see…


2. Pull the lantern outward and upward. Release the clamps holding the printed circuit board to gain access to the lamps.

3. Installation of the printed circuit is carried out in reverse order.
This article is available at russian, bulgarian, belarusian, ukrainian, serbian, croatian, romanian, polish, slovak, hungarian
Article reviewed by editor: Ostrovsky Fedor
Share information:
Previous
Peugeot 305: Headlights and lighting
Next

Dimmed (daytime) low beam headlights
Load-sensing headlight range control (Estate models) —…
Headlights — adjustment
Headlights — removal, replacement of bulbs and installation
Front Parking Lights and Direction Indicators — bulb replacement
Rear license plate light bulbs — removal and installation
Interior Lighting Lamps — removal and installation
See similar information for other Peugeot models

➨ Rear brake shoe condition check — models with rear drum brakes Peugeot 106 (1991-2003)
➨ Replacing the rear combination light (hatchback) Peugeot 207 (2006-2014)
➨ Replacing rear brake shoes on drum brakes Peugeot 405 (1987-1997)
➨ Engine Oil Level — Checking and Replacing Peugeot 605 (1989-2000)
➨ Lighting — replacement, removal and installation of light bulbs Peugeot 806 (1994-2002)
Link to this article in different formats
Comments and feedback from visitors
No comments yet


Add two numbers 28 + 28


Peugeot 307 (2001-2008) 
  • User manual
  • Keys, doors and alarm
  • Controls and instruments
  • Driving and operation
  • Maintenance
  • Power unit
  • Petrol engines TU3 and TU5
  • Petrol engines EW10
  • Diesel engines DV10
  • Diesel engines DW10
  • Transmission
  • Clutch and drive shafts
  • Mechanical gearbox
  • Automatic gearbox
  • Chassis, running gear
  • Front suspension
  • Rear suspension
  • Steering
  • Brake system
  • Body and interior
  • Exterior (external elements)
  • Interior (internal elements)
  • Doors, locks and windows
  • Heating and air conditioning
  • Electrical equipment
  • Equipment and devices
  • Power devices
  • Airbags
  • Electrical circuits
Peugeot 306 (1993-2002) 
  • General information
  • Introduction to manual
  • Specifications
  • Gasoline engine
  • Engine repair
  • Lubrication system
  • Cooling system
  • Fuel injection
  • Ignition system
  • Diesel engine
  • Engine repair
  • Lubrication system
  • Cooling system
  • Fuel injection
  • Transmission
  • Clutch
  • Gearbox
  • Drive shafts
  • Chassis, running gear
  • Steering system
  • Front suspension
  • Rear suspension
  • Brake system
  • Electrical equipment
  • Power devices
  • Electrical circuits
Peugeot 305 (1977-1989) 
  • General information
  • Maintenance
  • Power unit
  • Gasoline engines
  • Diesel engines
  • Cooling system (gasoline)
  • Cooling system (diesel)
  • Fuel system (gasoline)
  • Fuel system (diesel)
  • Ignition system
  • Transmission
  • Clutch
  • Mechanical gearbox BB8
  • Mechanical gearbox BE1
  • Automatic gearbox ZF4
  • Shafts, hubs and wheels
  • Chassis, running gear
  • Brake system
  • Car suspension
  • Steering
  • Body and interior
  • Exterior (external elements)
  • Interior (internal elements)
  • Electrical equipment
  • Equipment and devices
  • Headlights and lighting
  • Power devices
  • Electrical circuits
  • Wiring diagrams (diesel)
PeugeotBook.ru © 2018–2026 | Mobile version | Sitemap: EN BG BY UA RS HR RO PL SK HU | Write message | Site search | Add to bookmarks | Peugeot owners
106 (1991-2003) | 206 (1998-2012) | 207 (2006-2014) | 305 (1977-1989) | 306 (1993-2002) | 307 (2001-2008) | 405 (1987-1997) | 406 (1995-2004) | 605 (1989-2000) | Partner-I (1996-2008) | Eurovans-807 (2002-2014) | Eurovans-806 (1994-2002) | J5 (1981-1993) |
Cookies are used to ensure the correct display of pages on the site.