
English Русский
Български
Беларускі
Український
Српски
Hrvatski
Română
Polski
Slovenský
Magyar
Bookmark Articles Sitemap Contacts
Company Hyundai Company Opel Company Skoda Company Kia Company Mitsubishi Company LADA Company Audi
PeugeotBook.ru


Series 100   Series 200   Series 300   400-500   Series 600   Crossovers   Others
 
Partner I (1996-2008) Peugeot 807 (2002-2014) Peugeot 806 (1994-2002) Peugeot J5 (1981-1993)

Removal and installation the rear axle (Peugeot J5)

  • Main
  • Пежо
  • Peugeot J5 (1981-1993)
  • Chassis, running gear
  • Car suspension
  • Removal and installation the rear axle
0
  • Loosen the wheel nuts and raise the rear of the vehicle on stands. The vehicle must be raised high enough to allow the rear axle to be rolled under the vehicle with the wheels in place.
  • Trace the brake hose routing and unscrew the brake hose from the brake pipe. To do this, unscrew the union nut and disconnect the tube. Knock out the leaf spring and remove the hose together with the metal fastener. Figure 154 shows the connection of the brake hose to the tube. To prevent dirt from getting in, close the hose and tube with appropriate plugs.
  • Also using Figure 154, disconnect the brake force regulator valve rod (4) from the rod (5).
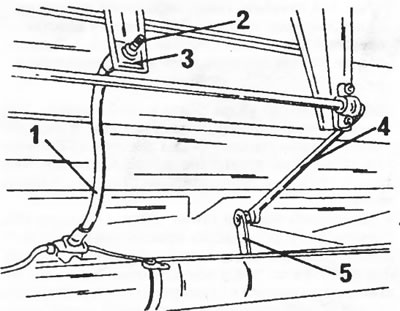
Figure 154. When removing the rear axle, the following parts are unscrewed. 1. Brake hose; 2. Brake…

Figure 154. When removing the rear axle, the following parts are unscrewed. 1. Brake hose; 2. Brake pipe; 3. Flat spring; 4. Brake force regulator control rod; 5. Brake force regulator actuator rod.

  • Loosen the nut at the end of the handbrake cable on the cable equalizer lever and release the cable.
  • Place a roller jack under the center of the axle and lift the rear axle until the shock absorbers are compressed. Unscrew the upper and lower shock absorber mounts and remove the shock absorbers.
  • Check the reliability of the rear axle installation on the jack and unscrew the bolts of the front spring consoles and the bolts securing the springs to the earrings from the frame. There is no need to unscrew the nuts of the spring pins and spring shackles.
  • Loosen the exhaust system fastening so that it does not interfere with the removal of the rear axle.
  • Lower the rear axle using a jack and roll it out from under the car using a roller jack. Have an assistant hold the rear axle to prevent it from tipping over from the jack.
  • Installation of the rear axle is made easier if you first unscrew the pin nuts and spring earring nuts.
  • Place the rear axle on a roller jack under the vehicle and lift it until the rear consoles (1) in Figure 155 are flush with the contact surface on the body. Screw in the console mounting bolts, but do not tighten them.
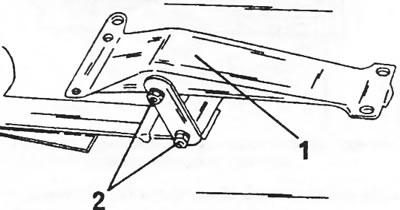
Figure 155. Rear spring console (1) with spring suspension on earrings (2).

Figure 155. Rear spring console (1) with spring suspension on earrings (2).


  • In this case, center the console. Figure 152 shows two holes "a" and "b", two rods of a certain diameter are required for centering. Insert a 16 mm diameter rod into hole "a" and a 12 mm diameter rod into hole "b". Once the console is properly seated, tighten the bolts (1) to a torque of 50 Nm.
  • Raise the bridge until the front spring console is flush with the body and tighten the bolts (1) in Figure 156 without tightening them. Check that all bolts are located in the middle of the slots and then tighten the bolts to a torque of 50 Nm.
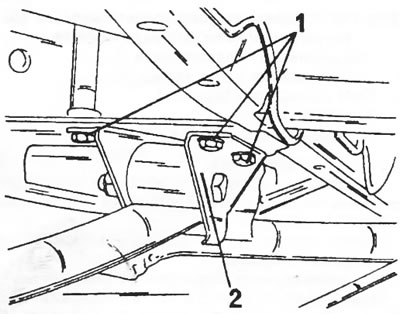
Figure 156. The front spring console is attached to the body with bolts (1).

Figure 156. The front spring console is attached to the body with bolts (1).

  • Install shock absorbers. Do not tighten the bolts and nuts yet.
  • Thread the brake hose through the hole in the corner and secure it with a clamp. Screw the union nut of the brake pipe into the hose and tighten it. Avoid twisting the hose. Connect the brake force regulator rods and the handbrake cable.
  • To tighten the front and rear spring mounts, the rear suspension must be loaded. To do this, place a load in the vehicle so that the dimension "h" in Figure 157 between the adjacent surface of the rubber bump stop (1) and the contact surface "b" on the bridge is 107 mm. Use a tape measure to measure this.
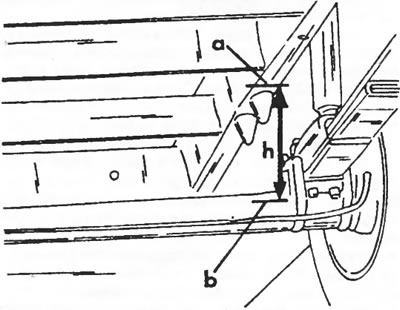
Figure 157. Before tightening the spring suspension, the height «h» between points «a» and «b» must…

Figure 157. Before tightening the spring suspension, the height "h" between points "a" and "b" must be set to a certain size.

  • Tighten the rear leaf spring hanger nuts to 120 Nm and the front leaf spring pin nuts to 150 Nm.
  • Unload the car. After installation is complete, the brake system must be bled. Adjust the handbrake. These work operations are described in the section "Brake system".
This article is available at russian, bulgarian, belarusian, ukrainian, serbian, croatian, romanian, polish, slovak, hungarian
Article reviewed by editor: Bespalov Alexey
Share information:
Previous
Peugeot J5: Car suspension
Next

Removal and installation the rear spring
Rear axle and rear wheel suspension
Front jet thrust
Front steering knuckle and wheel bearings
Disassembling and assembling the front wheel suspension
Removal and installation rear shock absorbers
Rear wheel hubs and bearings
Rear axles (all-wheel drive)
See similar information for other Peugeot models

➨ Rear brake shoe condition check — models with rear drum brakes Peugeot 106 (1991-2003)
➨ Rear axle Peugeot 207 (2006-2014)
➨ Rear axle assembly — removal and installation Peugeot 305 (1977-1989)
➨ Folding the rear seats Peugeot 405 (1987-1997)
➨ Rear Crankshaft Oil Seal (Flywheel Side) — Replacement Peugeot 605 (1989-2000)
Link to this article in different formats
Comments and feedback from visitors
No comments yet


Add two numbers 10 + 42


Partner I (1996-2008) 
  • General information
  • Introduction to the guide
  • Faults en route
  • Weekly checks
  • User manual
  • Maintenance (petrol)
  • Maintenance (diesel)
  • Power unit
  • Petrol engines
  • Diesel engines «XUD»
  • Diesel engines «DW»
  • Overhaul of petrol engines
  • Overhaul of diesel engines
  • Cooling and heating
  • Power and exhaust (petrol)
  • Power and exhaust (XUD diesels)
  • Power and exhaust (DW diesels)
  • Emission reduction
  • Starting and charging system
  • Transmission
  • Clutch
  • Mechanical gearbox
  • Drive shafts
  • Chassis, running gear
  • Brake system
  • Car suspension
  • Steering
  • Body and interior
  • Exterior (external elements)
  • Interior (internal elements)
  • Doors, locks and windows
  • Electrical equipment
  • Equipment and devices
  • Electrical circuits
Peugeot 807 (2002-2014) 
  • General information
  • Operating instructions
  • Maintenance
  • Troubleshooting
  • Power unit
  • Gasoline engines
  • Diesel engines
  • Cooling and heating
  • Fuel injection (petrol)
  • Fuel system (diesel)
  • Fuel system
  • Exhaust system
  • Ignition system
  • Transmission
  • Clutch
  • Manual gearbox
  • Automatic gearbox
  • Chassis, running gear
  • Brake system
  • Car suspension
  • Steering system
  • Body and interior
  • Exterior (external elements)
  • Interior (internal elements)
  • Electrical equipment
  • Power devices
  • Electrical circuits
Peugeot 806 (1994-2002) 
  • General information
  • User manual
  • Maintenance
  • Power unit
  • Petrol engines
  • Diesel engines
  • Lubrication system
  • Cooling system
  • Fuel injection (petrol)
  • Fuel system (diesel)
  • Ignition and exhaust systems
  • ECM Bosch Motronic MP 3.2
  • ECM Magneti-Marelli (MM)
  • Transmission
  • Clutch
  • Mechanical gearbox
  • Chassis, running gear
  • Brake system
  • Car suspension
  • Steering
  • Electrical equipment
  • Equipment and devices
  • Electrical circuits
Peugeot J5 (1981-1993) 
  • General information
  • Introduction to manual
  • Specifications
  • Gasoline engine
  • Engine repair
  • Lubrication system
  • Cooling system
  • Fuel system
  • Ignition system
  • Diesel engine
  • Engine repair (DB9)
  • Lubrication system (DB9)
  • Cooling system (DB9)
  • Fuel injection (DB9)
  • Engine repair (U25)
  • Lubrication system (U25)
  • Cooling system (U25)
  • Fuel injection (U25)
  • Transmission
  • Clutch
  • Gearbox
  • Drive shafts
  • Chassis, running gear
  • Steering system
  • Car suspension
  • Brake system
  • Electrical equipment
  • Power devices
  • Electrical circuits
PeugeotBook.ru © 2018–2026 | Mobile version | Sitemap: EN BG BY UA RS HR RO PL SK HU | Write message | Site search | Add to bookmarks | Peugeot owners
106 (1991-2003) | 206 (1998-2012) | 207 (2006-2014) | 305 (1977-1989) | 306 (1993-2002) | 307 (2001-2008) | 405 (1987-1997) | 406 (1995-2004) | 605 (1989-2000) | Partner-I (1996-2008) | Eurovans-807 (2002-2014) | Eurovans-806 (1994-2002) | J5 (1981-1993) |
Cookies are used to ensure the correct display of pages on the site.