



Note: Before starting work, refer to the warning at the beginning of Section 2 concerning the dangers of hydraulic fluid.
Removal
1. Remove the master cylinder fluid reservoir cap and syphon the hydraulic fluid from the reservoir.
Note: Do not syphon the fluid by mouth, as it is poisonous; use a syringe or an old poultry baster. Alternatively, open any convenient bleed screw in the system and gently pump the brake pedal to expel the fluid through a plastic tube connected to the screw (see Section 2). Disconnect the wiring connector from the brake fluid level sender unit (see illustration).
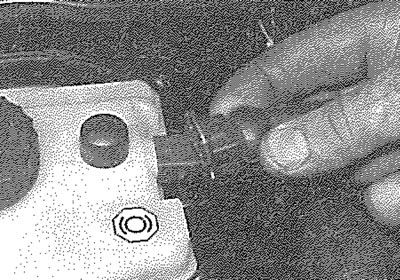
13.1. Disconnecting the brake fluid level sender wiring plug
2. Wipe clean the area around the brake pipe unions on the side of the master cylinder and place absorbent rags beneath the pipe unions to catch any surplus fluid. Make a note of the correct fitted positions of the unions, then unscrew the union nuts and carefully withdraw the pipes. Plug or tape over the pipe ends and master cylinder orifices, to minimise the loss of brake fluid and to prevent the entry of dirt into the system. Wash off any spilt fluid immediately with cold water.
3. Slacken and remove the two nuts securing the master cylinder to the vacuum servo unit, then withdraw the unit from the engine compartment.
4. Where applicable, recover the seal from the rear of the master cylinder and discard it.
Overhaul
5. Pull the fluid reservoir from the top of the master cylinder. Prise the reservoir seals from the reservoir or the master cylinder, as applicable (see illustration).
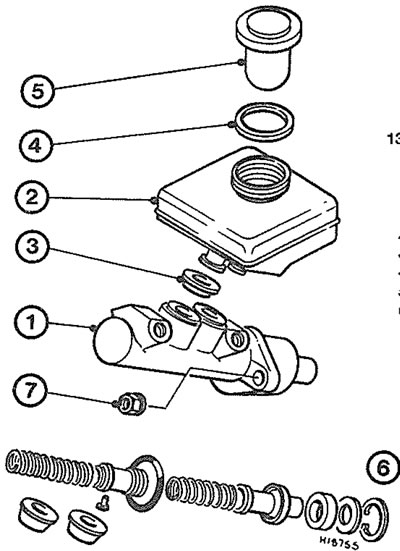
13.5. Exploded view of a typical master cylinder assembly 1. Master cylinder body; 2. Fluid reservoir; 3. Seal; 4. Seal; 5. Filler cap; 6. Seal/piston kit (primary and secondary); 7. Securing nut
6. Using a wooden dowel, press the piston assembly into the master cylinder body, then extract the circlip from the end of the master cylinder bore.
7. Noting the order of removal and the direction of fitting of each component, withdraw the washer and the piston assemblies with their springs and seals, tapping the body on to a clean wooden surface to dislodge them. If necessary, clamp the master cylinder body in a vice (fitted with soft jaw covers) and use compressed air (applied through the secondary circuit fluid port) to assist the removal of the secondary piston assembly.
Warning: Wear eye protection when using compressed air!
8. Thoroughly clean all components, using only methylated spirit, isopropyl alcohol or clean hydraulic fluid as a cleaning medium. Never use mineral-based solvents such as petrol or paraffin, as they will attack the hydraulic system's rubber components. Dry the components immediately, using compressed air or a clean, lint-free cloth.
9. Check all components and renew any that are worn or damaged. Check particularly the cylinder bores and pistons; the complete assembly should be renewed if these are scratched, worn or corroded. If there is any doubt about the condition of the assembly or of any of its components, renew it. Check that the cylinder body fluid passages are clear.
10. If the assembly is fit for further use, obtain a repair kit from your Peugeot deaier; the kit consists of both piston assemblies and springs, complete with all seals and washers. Never re-use the old components.
11. Before reassembly, soak the pistons and the new seals in clean hydraulic fluid. Smear clean fluid into the cylinder bore.
12. Insert the piston assemblies into the cylinder bore, using a twisting motion to avoid trapping the seal lips. Ensure that all components are refitted in the correct order and the right way round, then fit the washer to the end of the primary piston. Where applicable, follow the assembly instructions supplied with the repair kit.
13. Press the piston assemblies fully into the bore using a clean wooden dowel and secure them in position with the new circlip. Ensure that the circlip is correctly located in the groove in the cylinder bore.
14. Examine the fluid reservoir seals and if necessary renew them. Fit the reservoir seals to the master cylinder body, then refit the reservoir.
Refitting
15. Remove all traces of dirt from the master cylinder and servo unit mating surfaces and where applicable, fit a new seal between the master cylinder body and the servo.
(Data published on the website: www.peugeotbook.ru)
16. Fit the master cylinder to the servo unit, ensuring that the servo unit pushrod enters the master cylinder bore centrally. Refit the master cylinder mounting nuts and tighten them to the specified torque.
17. Wipe clean the brake pipe unions, then refit them to the correct master cylinder ports, as noted before removal and tighten the union nuts securely.
18. Refill the master cylinder reservoir with new fluid and bleed the complete hydraulic system as described in Section 2.