



Removal
1. Remove the brake drum as described in Section 9.
2. Using pliers, carefully unhook the brake shoe upper return spring and remove it from both brake shoes (note the orientation of the spring, to ensure correct refitting). Pull the upper ends of the shoes away from the wheel cylinder, to disengage them from the pistons.
3. Minimise fluid loss by first removing the master cylinder reservoir cap, then tightening it down onto a piece of polythene, to obtain an airtight seal. Alternatively, use a brake hose clamp, a G-clamp or a similar tool to clamp the flexible hose (connected between the metal pipe sections on the rear axle and trailing arm) at the nearest convenient point to the wheel cylinder (see illustration).
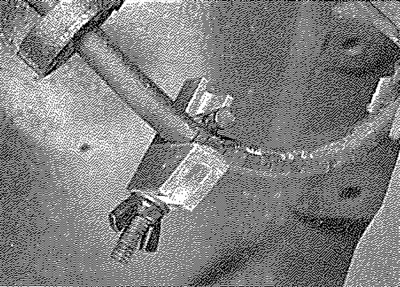
12.3. To minimise fluid loss, fit a brake hose clamp to the flexible hose
4. Wipe away all traces of dirt around the brake pipe union at the rear of the wheel cylinder and unscrew the union nut (see illustration). Carefully ease the pipe out of the wheel cylinder and plug or tape over its end to prevent dirt entry. Wipe off any spilt fluid immediately.
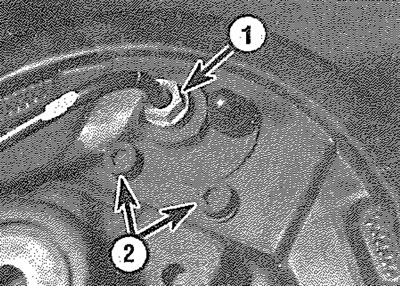
12.4. Wheel cylinder brake pipe union nut (1) and wheel cylinder retaining bolts (2)
5. Unscrew the two wheel cylinder retaining bolts from the rear of the backplate and remove the cylinder, taking great care not to allow surplus hydraulic fluid to contaminate the brake shoe linings.
Overhaul
Non-ABS models
6. On non-ABS models, the rear brake pressure-regulating valves are integral with the rear wheel cylinders and the cylinders must not be dismantled. No spare parts are available and if a cylinder is faulty or damaged, the complete assembly must be renewed.
ABS models
7. Clean the exterior of the cylinder to remove all traces of dirt and brake dust.
8. Pull the dust seals from the ends of the cylinder (see illustration).
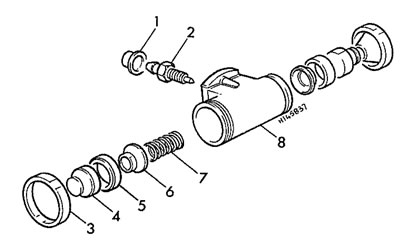
12.8. Exploded view of rear wheel cylinder - ABS model 1. Bleed screw dust cover; 2. Bleed screw; 3. Dust seal; 4. Piston; 5. Seal; 6. Spring seat; 7. Return spring; 8. Cylinder body
9. Extract the pistons, seals spring seats and return spring, noting the locations of all components to ensure correct refitting.
10. Examine the surfaces of the cylinder bore and pistons for signs of scoring and corrosion and if evident, renew the complete wheel cylinder. If the components are in good condition, discard the seals and obtain a repair kit, which will contain all the necessary renewable components.
11. Clean the pistons and the cylinder with methylated spirit or clean brake fluid and reassemble in the reverse order to dismantling, making sure that the components are fitted in the correct sequence and orientated correctly, as noted before removal. Ensure that the lips of the seals face into the cylinder.
12. On completion, wipe the outer surfaces of the dust seals to remove any excess brake fluid.
Refitting
13. Clean the backplate, then place the wheel cylinder in position and refit the securing bolts.
14. Reconnect the brake pipe to the rear of the wheel cylinder, taking care not to allow dirt into the system.
15. Where applicable, release the handbrake lever on the trailing shoe and reposition the upper ends of the shoes to engage them with the wheel cylinder pistons.
16. Refit the brake shoe upper return spring, ensuring that it is orientated as noted before removal.
17. Refit the brake drum as described in Section 9.
18. On completion, remove the brake hose clamp, or remove the polythene from the fluid reservoir, as applicable and bleed the hydraulic system as described in Section 2. Note that, providing the precautions described were taken to minimise brake fluid loss, it should only be necessary to bleed the relevant rear brake circuit.