



Note: Before starting work, refer to the note at the beginning of Section 2 concerning the dangers of hydraulic fluid and to the warning at the beginning of Section 5 concerning the dangers of asbestos dust.
Removal
1. Chock the front wheels, then jack up the rear of the vehicle and support on axle stands (see "Jacking and vehicle support"). Remove the relevant rear wheel.
2. Remove the brake pads (see Section 5).
3. Ensure that the handbrake is fully released, then free the handbrake inner cable from the caliper handbrake operating lever. Tap the outer cable out of its bracket on the caliper body (see illustrations).
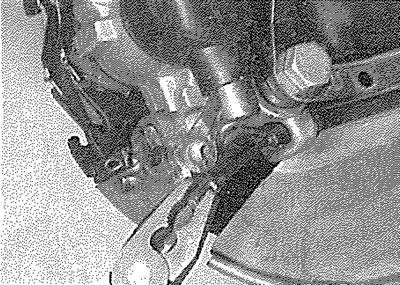
11.3a. Disconnect the handbrake inner cable from the caliper lever...
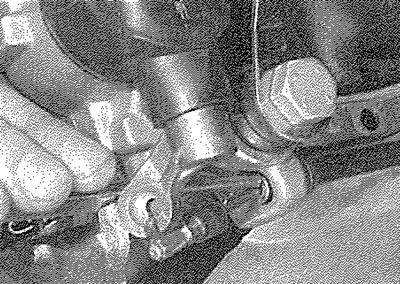
11.3b.... then tap the outer cable out from the caliper body
4. Minimise fluid loss by first removing the master cylinder reservoir cap and then tightening. It down onto a piece of polythene, to obtain an airtight seal. Alternatively, use a brake hose clamp, a G-clamp or a similar tool to clamp the flexible hose at the nearest convenient point to the brake caliper.
5. Wipe away all traces of dirt around the brake pipe union on the caliper and slacken the union nut
6. Slacken the two bolts securing the caliper assembly to the trailing arm and remove them along with the mounting plate, noting which way around the plate is fitted. Lift the caliper assembly away from the brake disc and unscrew it from the end of the brake hose.
Overhaul
7. The caliper can be overhauled after obtaining the relevant repair kit from a Peugeot dealer. Ensure that the correct repair kit is obtained for the caliper being worked on. Note the locations of all components (this applies particularly if the handbrake mechanism Is dismantled) to ensure correct refitting and lubricate the new seals using brake fluid (see illustration). Follow the assembly instructions supplied with the repair kit.
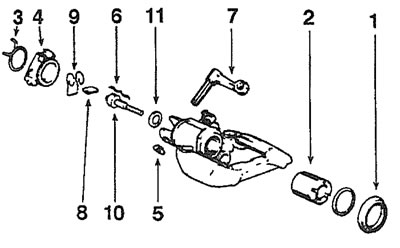
11.7. Exploded view of the rear brake caliper 1. Dust seal; 2. Piston; 3. Retaining clip; 4. Handbrake mechanism dust cover; 5. Circlip; 6. Spring washers; 7. Handbrake operating lever; 8. Plunger cam; 9. Return spring; 10. Adjusting screw; 11. Thrustwasher.
Refitting
8. Screw the caliper fully onto the brake hose, then position the caliper over the brake disc. If the threads of the new caliper mounting bolts are not already pre-coated with locking compound, apply a suitable locking compound to them. Install the new caliper mounting bolts and the mounting plate, noting that the mounting plate must be fitted so that its bend curves away from the caliper body. With the plate correctly positioned, tighten the caliper bolts to the specified torque.
9. Tighten the brake hose union securely, then remove the clamp from the flexible brake hose, or the polythene from the master cylinder reservoir (as applicable).
10. Insert the handbrake cable through Its bracket on the caliper and tap the outer cable into position using a hammer and suitable pin punch. Reconnect the inner cable to the caliper operating lever.
11. Refit the brake pads (see Section 5).
12. Bleed the hydraulic system as described in Section 2. Note that, providing the precautions described were taken to minimise brake fluid loss, it should only be necessary to bleed the relevant rear brake.
13. Repeatedly apply the brake pedal until normal (non-assisted) pedal pressure returns. Check and if necessary adjust the handbrake cable as described in Chapter 1A or 1B.
14. Refit the roadwheel, then lower the vehicle to the ground and tighten the wheel bolts to the specified torque. Finally, check the fluid level as described in "Weekly checks".