



Anti-roll bar
Note: On models where the anti-roll bar Is connected to the suspension struts by droplinks, new drop-link-to-anti-roll bar nuts must be used on re fitting.
Removal
1. Chock the rear wheels then jack up the front of the vehicle and support it on axle stands (see "Jacking and vehicle support"). Remove the front roadwheels.
2. On models where the anti-roll bar is mounted onto the lower arms, working at each end of the anti-roll bar, remove the screws and washers securing the anti-roll bar end clamps to the lower arms. Remove the clamps and the rubber bushes (see illustration).
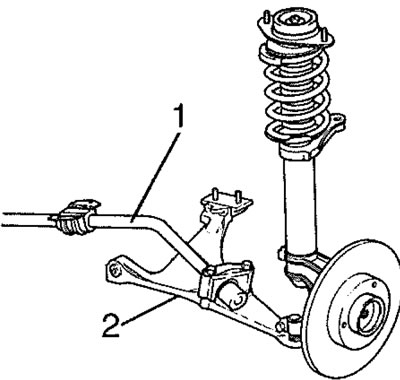
5.2. Front suspension layout for models with anti-roll bar mounted directly on lower arms 1. Anti-roll bar; 2. Lower arm
3. On models where the anti-roll bar has drop-links connecting the ends of the bar to the suspension struts, remove the nuts securing the lower ends of the drop-links to the anti-roll bar (see illustration).
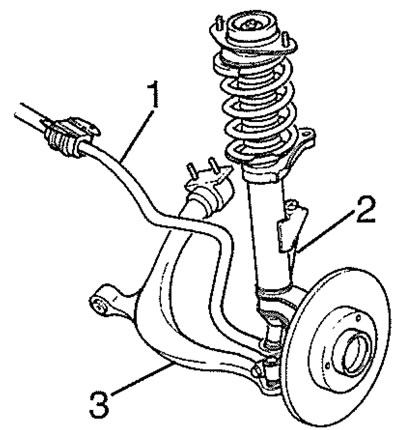
5.3. Front suspension layout for models with anti-roll bar incorporating drop-links 1. Anti-roll bar; 2. Drop link (to rear of suspension strut); 3. Lower arm
4. Remove the bolts securing the anti-roll bar mounting clamps to the body. Withdraw the clamps.
5. Manipulate the anti-roll bar out from under the vehicle.
Refitting
6. Examine the condition of the anti-roll bar mounting bushes and renew if necessary. The anti-roll bar-to-body clamp bushes can be renewed by sliding the old bushes from the bar and sliding the new bushes into position. Before removing the old bushes, mark their fitted positions on the bar, so that the new bushes can be fitted in the same position.
7. Manipulate the bar into position under the vehicle, then refit the mounting clamps. Fit the mounting clamp securing bolts, but do not fully tighten them at this stage.
8. On models where the anti-roll bar is connected to the suspension struts by droplinks, reconnect the drop-links to the ends of the bar and fit new securing nuts. Tighten the nuts to the specified torque.
Information posted on the website PeugeotBook.ru
9. On models where the anti-roll bar is mounted onto the lower arms, refit the rubber bushes and the clamps, then refit the washers and the screws. Tighten the screws to the specified torque.
10. Finally tighten the anti-roll bar clamp-to-body bolts to the specified torque.
11. Refit the roadwheels and lower the vehicle to the ground. Tighten the roadwheel bolts to the specified torque.
Drop-link (models with strutmounted anti-roll bar)
Note: New drop-link securing nuts must be used on refitting.
Removal
12. Chock the rear wheels then jack up the front of the vehicle and support it on axle stands (see "Jacking and vehicle support"). Remove the appropriate front roadwheel.
13. Unscrew the nut securing the lower end of the drop-link to the end of the anti-roll bar.
14. If necessary, using a suitable metal bar, carefully lever the end of the anti-roll bar down, to separate it from the end of the droplink.
15. Unscrew the nut securing the drop-link to the suspension strut and remove the drop-link from the vehicle.
Refitting
16. Check the drop-link balljoints for excessive wear and check the condition of the balljoint rubber gaiters. If the balljoints or gaiters are worn or damaged, the complete drop-link must be renewed, as the components cannot be renewed individually. Note that wear tn the drop-links is often indicated by a "cloaking" noise produced when driving over bumps or cornering.
17. Refitting is a reversal of removal, but use new securing nuts.