



Table of contents: Automatic drive belt tensioner 🠇 Manually adjustable belt tensioner 🠇
On a diesel engine, the alternator is driven by a single belt along with the power steering pump pulley and, if equipped, the air conditioning compressor. But these engines can be equipped with either an adjustable tensioner or an automatic drive belt tensioner.
Automatic drive belt tensioner
This device is installed if there is a power steering and air conditioning, its location is shown in Figure 398.
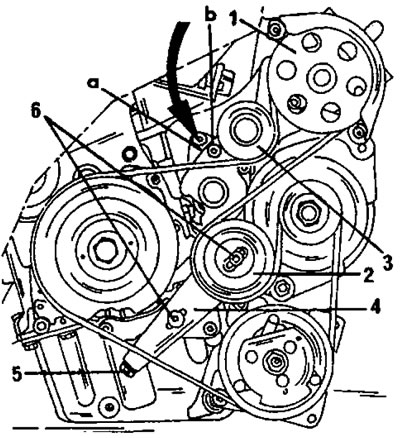
Figure 398. Routing the drive belt of units with power steering and air conditioning. 1. Power steering pump pulley; 2. Guide roller; 3. Automatic tension roller; 4. Tension roller bracket; 5. Adjusting bolt; 6. mounting bolts, 20 Nm
The drive belt is replaced as follows: (if the belt is broken, see instructions below):
- Remove the right front wheel and the wheel arch shield.
- Remove the power steering pump belt pulley cover (2, Figure 400).
- Loosen the bolts (6) without unscrewing them.
- Unscrew the adjusting bolt (5) so that the locking rod in Figure 399 can be inserted, until holes "a" and "b" in Figure 398 align. This fixes the position of the tension roller (3).
- Tighten the bolt (5) until it stops and remove the belt.
- Check the free rotation of the roller (2) and the tensioner roller (3). They should not have any play or jam.
- Place the drive belt on the belt pulleys. The belt should be placed in the middle of the pulleys, that is, it should fit well into the recesses of the belt pulleys. The belt is applied in the following sequence: power steering pump, automatic tensioner roller, crankshaft, compressor and guide roller.
- Tighten the two bolts (6) to a torque of 20 Nm.
- All other work is carried out in reverse order. Tighten the wheel bolts.
(Original is located at PEUGEOTBOOK.ru)
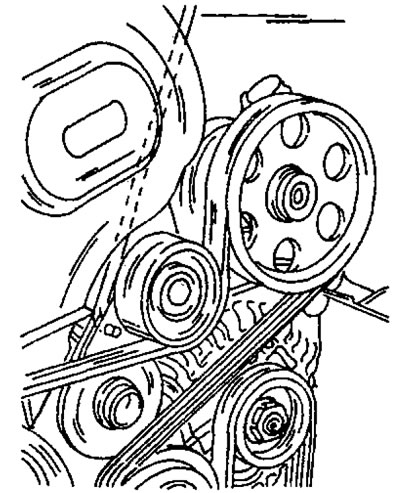
Figure 399. The automatic tension roller must be locked with the appropriate rod before removing the belt.
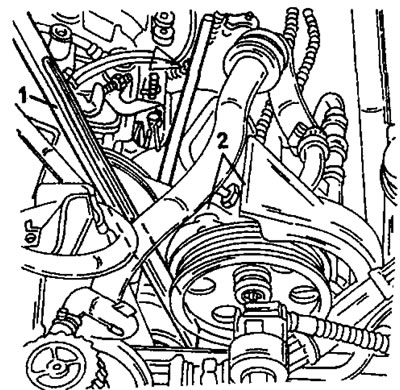
Figure 400. Retracting the tension roller. Insert the screwdriver (1) as shown in the figure and press in the direction shown until the roller can be locked. The cover is fixed in place (2).
If the belt is broken:
- If the belt breaks while the engine is running, the tension roller adjustment becomes lost and it must be reset to the correct position.
- To loosen the guide roller (4), loosen the bolts (b).
- Insert a strong screwdriver between the pump belt pulley and the tension roller (3), as shown in Fig. 400, and push the roller to the side so that the locking rod can be inserted (Figure 399).
- After this, apply the belt in the above sequence and, by moving the bolt (5), move the guide roller (4) to the belt.
- After this, tighten the belt so that the locking rod can be pulled out.
Manually adjustable belt tensioner
A manual belt tensioner is installed on vehicles with only power steering or only air conditioning. The belt drives the alternator and the power steering pump or air conditioning compressor. At the service station, a special measuring device is used to adjust the belt. Since it is highly likely that it is not available, the belt should be tensioned so that it does not bend more than approximately 2 mm when pressed from the bottom.
- After removing the right front wheel and the wheel arch shield, unscrew the two bolts (2) and (3) in Figure 401 and tighten the bolt (1) until it stops. Then remove the belt.
- Check the ability of the roller (4) to rotate freely.
- Place the belt on the pulleys. Check the position of the belt in the middle of the pulleys.
- Tighten bolts (2) and (3) and loosen bolt (1) until the belt is tensioned. After this, tighten the two bolts to a torque of 30 Nm.
- Turn the crankshaft four revolutions and check the belt tension again. If necessary, make further adjustments using bolt (1).
- All other work is carried out in reverse order. Tighten the wheel bolts to 85 Nm.
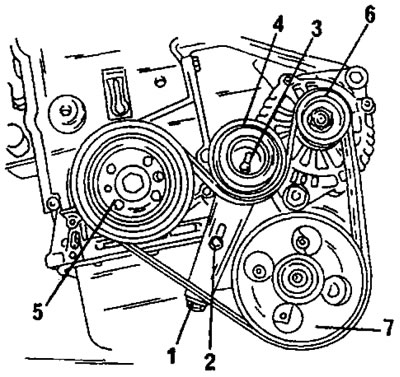
Figure 401. Tensioning the drive belt with a manual belt tensioner. 1. Adjusting bolt; 2. Set bolt; 3. Set bolt; 4. Tension roller; 5. Crankshaft; 6. Generator; 7. Compressor/Pump