
2. Measure 125mm down from the top edge of the new timing case gasket and cut off the top of the gasket with a blade to get a clean cut. Install the gasket on the casing on the sealant (the gasket will protrude above the casing). Fill two unused holes in the bottom of the gasket with sealant.
3. Lightly lubricate the walls of the 4 sleeves with clean engine oil and, if necessary and if the strips holding the sleeves are installed, turn the crankshaft so that the pistons NN 2 and 3 are in the TDC position. (piston N 2 on the compression stroke). In this position, check that the distributor slider is looking at the right wing. If this is not the case, turn the crankshaft one more full turn and align the timing marks on the pulley and timing scale (see chapter 4).
4. Remove the strips holding the sleeves and clean off the excess sealant at the corners of the connection between the casing of the timing mechanism and the cylinder head.
5. Wipe clean the contact surfaces of the head and cylinder block, install a new dry cylinder head gasket on the block.
6. Clean the threads of the cylinder head bolts and nuts. Apply oil to the threads of the bolts and under their heads.
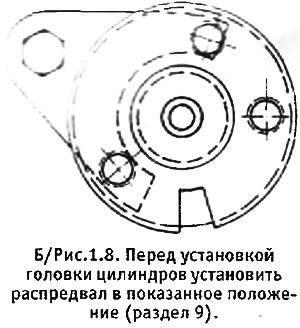
7. Turn the camshaft to the position shown in fig. 1.8, in which both valves in cylinder No. 3 are open, and its piston is in the TDC position. If this is not done, the pistons may hit the valves, and besides, it will not be possible to install the camshaft sprocket.
8. Wipe rocker surfaces and spray lightly with Molykote 321 R lubricant or equivalent.
9. Carefully lower the cylinder head onto the block and then install the rocker mechanism on the head. Insert 10 cylinder head bolts and tack them with nuts until tight.
10. Insert a ground bolt into the top front hole in the timing case and two bolts into the top rear holes in the case. On some models, the bottom of the top two rear bolts may be under the engine support bracket (early models). In this case, the lower bolt must be immediately tightened to the desired torque. Install the motor support bracket, but first coat the bottom bolt in the bracket with threadlocker. Tighten bolts to 0.5 kg m (these bolts are finally tightened after the cylinder head bolts have been tightened).
11. Gradually, in the right sequence (see section 35) tighten the cylinder head bolts. Tightening is done in 2 stages. Tighten all bolts first to the torque specified for step 1 and then to the torque specified for step 2.
12. After that, tighten the bolts of the casing of the gas distribution mechanism and 4 bolts securing the engine support bracket to the required torque.
13. Place a clean, lint-free rag in the timing housing under the sprocket holding tool to prevent any parts from falling into the housing. Install one of the sprocket mounting bolts in a hole not blocked by the tool, but do not tighten it yet. Install sprocket to camshaft (the sprocket should fit onto the shaft without effort). Pull out the rag and check that the timing chain fits correctly on the tensioner plate. Put the cloth back in the cover.
14. Remove the 2 bolts in the sprocket holding tool and remove the bolts and tool. Insert the remaining two mounting bolts into the sprocket and tighten all 3 bolts to the correct torque. Bend the tabs on the lock plate to secure the bolts and pull the rag out of the timing case.
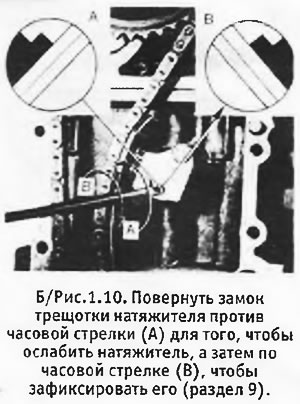
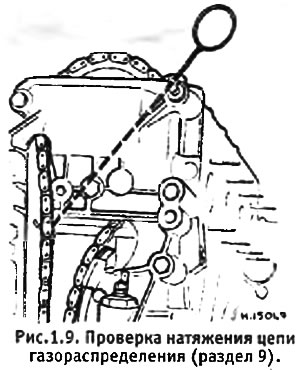
15. To check the tension of the timing chain, you need a long tool with a bent end, which you can make yourself. Insert the tool into the casing and hook the fifth free link under the sprocket (on the rear span of the chain - the front span passes through the tensioner plate). Pull hard on the tool to deflect the chain. After releasing the tool, this span of chain must remain loose. If this is not the case, it is necessary to remove the casing and loosen the tensioner (see fig. 1.10).
16. Carefully trim excess timing case gasket flush with valve cover mounting surface.
17. Adjust intake and exhaust valve clearances (see section 39).
18. Installation of the remaining parts is carried out in reverse order. Pay attention to the following points:
- A. Where necessary, tighten fasteners to the torque specified in the Specifications.
- b. Install new gaskets on the exhaust manifold and check that they are ribbed against the manifold and not the cylinder head.
- V. Before installing the valve cover, check that there are no loose parts in the mechanism and remove the rag from the timing mechanism. Install valve cover with new gasket.
19. Before starting the engine, add liquid to the cooling system and check the oil level in the engine. After starting the engine, inspect it for leaks and let it run until the fan turns on. Stop the engine and, when it cools down, add fluid to the cooling system.
20. After at least 2 hours after turning off the engine, it is necessary to retighten the cylinder head bolts. Remove the valve cover and in the sequence shown in fig. 1.19, loosen the first bolt and then tighten it to the torque indicated for step 2, then loosen and tighten the second bolt, etc. until all bolts are retightened.
21. After re-tightening the cylinder head bolts, the intake and exhaust valve clearances should be adjusted again.
22. After the first 1500-2500 km of run, the cylinder head bolts should be re-tightened and the valve clearances adjusted.