
English Русский
Български
Беларускі
Український
Српски
Hrvatski
Română
Polski
Slovenský
Magyar
Bookmark Articles Sitemap Contacts
Company Hyundai Company Opel Company Skoda Company Kia Company Mitsubishi Company LADA Company Audi
PeugeotBook.ru


Series 100   Series 200   Series 300   400-500   Series 600   Crossovers   Others
 
Peugeot 305 (1977-1989) Peugeot 306 (1993-2002) Peugeot 307 (2001-2008)

Clutch installation (Peugeot 306)

  • Main
  • 30X
  • Peugeot 306 (1993-2002)
  • Transmission
  • Clutch
  • Clutch installation
0
The clutch is installed in reverse order. In this case, it is necessary to pay special attention to the following points:
  • Place the driven disk into the flywheel with the long side of the disk hub facing outward and insert the centering rod into the disk and into the hole in the flywheel. This rod must fit into the splined portion of the driven disk and have a neck that fits into the crankshaft guide. An old gearbox shaft can also be used for this purpose (remember that TU and XU type engines have different gearboxes). An experienced mechanic can center the driven disk by eye.
  • Place the clutch basket on the centering rod and attach it to the driven disk. When reinstalling the old clutch, the marks made with a punch must match. The new clutch can be installed in any way. The installed driven disk and clutch are shown in Figure 180.
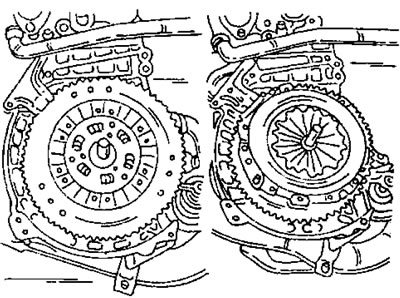
Figure 180. Installed driven disk (left) and clutch basket (right). Both views have a centering…

Figure 180. Installed driven disk (left) and clutch basket (right). Both views have a centering shaft installed.

  • Tighten the new clutch bolts evenly and crosswise to a tightening torque of 15 Nm (tU type engines) or 20 nm (xU type engines). In this case, it is necessary to hold the flywheel from turning. In this case, you should insert and remove the centering rod from time to time to ensure centering.
  • Install the gearbox (section 8). On the MA type gearbox (tU type engine) lightly lubricate the splined joints of the clutch shaft and the outer surfaces of the clutch release bearing guide sleeve with graphite grease (molykote BR2 Plus lubricant is recommended), on a VEZ type gearbox (xU type engine) lubricate the outer surfaces of the clutch release bearing guide sleeve.
  • After installing the gearbox, adjust the clutch cable (tU type engine). To adjust, move the adjusting nut (1) in Fig. 181 at the end of the clutch cable until the clutch pedal travel is set to 141 mm.
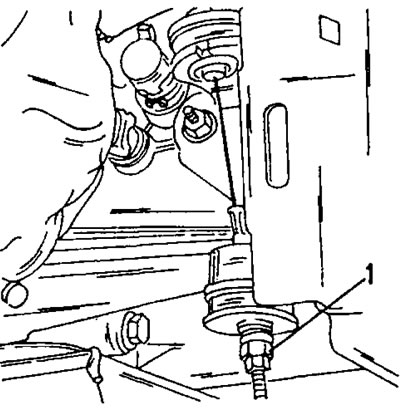
Figure 181. On the TU type engine, the clutch pedal is adjusted by two nuts (1).

Figure 181. On the TU type engine, the clutch pedal is adjusted by two nuts (1).

  • When measuring, first measure the distance from the floor to the released pedal, and then measure the distance from the floor to the fully depressed pedal. The difference between the two measurements is the clutch pedal stroke.

(Source of the article is posted at: «www.PEUGEOTBOOK.ru»)
This article is available at russian, bulgarian, belarusian, ukrainian, serbian, croatian, romanian, polish, slovak, hungarian
Article reviewed by editor: Shirokov Arseny
Share information:
Previous
Peugeot 306: Clutch
Next

Clutch repair
Removal the clutch
Checking the clutch in the installed position
Clutch — general description
Replacing the clutch cable
Clutch release bearing
Clutch malfunctions
See similar information for other Peugeot models

➨ Clutch adjustment check and control mechanism lubrication Peugeot 106 (1991-2003)
➨ Brake and Clutch Hydraulic Fluid Peugeot 207 (2006-2014)
➨ Checking, adjusting and lubricating the clutch (20,000 km/12… Peugeot 405 (1987-1997)
➨ General information about the clutch Peugeot 605 (1989-2000)
➨ Clutch specifications Peugeot 806 (1994-2002)
Link to this article in different formats
Comments and feedback from visitors
No comments yet


Add two numbers 47 + 44


Peugeot 307 (2001-2008) 
  • User manual
  • Keys, doors and alarm
  • Controls and instruments
  • Driving and operation
  • Maintenance
  • Power unit
  • Petrol engines TU3 and TU5
  • Petrol engines EW10
  • Diesel engines DV10
  • Diesel engines DW10
  • Transmission
  • Clutch and drive shafts
  • Mechanical gearbox
  • Automatic gearbox
  • Chassis, running gear
  • Front suspension
  • Rear suspension
  • Steering
  • Brake system
  • Body and interior
  • Exterior (external elements)
  • Interior (internal elements)
  • Doors, locks and windows
  • Heating and air conditioning
  • Electrical equipment
  • Equipment and devices
  • Power devices
  • Airbags
  • Electrical circuits
Peugeot 306 (1993-2002) 
  • General information
  • Introduction to manual
  • Specifications
  • Gasoline engine
  • Engine repair
  • Lubrication system
  • Cooling system
  • Fuel injection
  • Ignition system
  • Diesel engine
  • Engine repair
  • Lubrication system
  • Cooling system
  • Fuel injection
  • Transmission
  • Clutch
  • Gearbox
  • Drive shafts
  • Chassis, running gear
  • Steering system
  • Front suspension
  • Rear suspension
  • Brake system
  • Electrical equipment
  • Power devices
  • Electrical circuits
Peugeot 305 (1977-1989) 
  • General information
  • Maintenance
  • Power unit
  • Gasoline engines
  • Diesel engines
  • Cooling system (gasoline)
  • Cooling system (diesel)
  • Fuel system (gasoline)
  • Fuel system (diesel)
  • Ignition system
  • Transmission
  • Clutch
  • Mechanical gearbox BB8
  • Mechanical gearbox BE1
  • Automatic gearbox ZF4
  • Shafts, hubs and wheels
  • Chassis, running gear
  • Brake system
  • Car suspension
  • Steering
  • Body and interior
  • Exterior (external elements)
  • Interior (internal elements)
  • Electrical equipment
  • Equipment and devices
  • Headlights and lighting
  • Power devices
  • Electrical circuits
  • Wiring diagrams (diesel)
PeugeotBook.ru © 2018–2026 | Mobile version | Sitemap: EN BG BY UA RS HR RO PL SK HU | Write message | Site search | Add to bookmarks | Peugeot owners
106 (1991-2003) | 206 (1998-2012) | 207 (2006-2014) | 305 (1977-1989) | 306 (1993-2002) | 307 (2001-2008) | 405 (1987-1997) | 406 (1995-2004) | 605 (1989-2000) | Partner-I (1996-2008) | Eurovans-807 (2002-2014) | Eurovans-806 (1994-2002) | J5 (1981-1993) |
Cookies are used to ensure the correct display of pages on the site.