



- disconnect the ground wire from the battery;
- remove the B-pillar trim panels;
- remove the sun visor. For a sun visor with a lighted mirror, remove the plug with the hole for the wire;
- remove the sun visor hooks;
- remove the front ceiling handles;
- remove the decorative frame of the sliding and lifting roof panel;
- remove the ceiling console support;
- with the sliding roof panel closed, remove the sliding roof panel;
Caution! If the electric drive malfunctions, close the sliding/tilting roof panel with an Allen key inserted into hole A (figure 9.53) drive.
- disconnect electrical connector 1 from the roof sliding panel drive motor;
- loosen the mounting screws and remove motor 3 from the roof sliding panel drive.
To install the electric motor for the sliding and lifting roof panel:
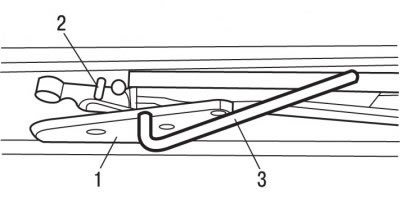
Figure 9.54. Setting the carriage (1) and slider (2) of the lift-and-slide roof panel drive to the zero position
- set the drive mechanisms of the lifting and sliding roof panel to the zero position, for which move the slider 2 (figure 9.54) to the front stop, and move carriage 1 in such a way as to align the holes (diameter 3 mm) in the carriage and slider;
- fix the relative position of the carriage and the slider by inserting a self-made device 3 into the hole (see Figure 9.54), a drawing of which is shown in the figure 9.55;
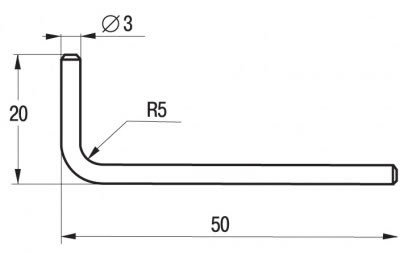
Figure 9.55. Dimensions of the device required to fix the relative position of the carriage and the slider
- install the electric motor for the sliding and lifting roof panel;
- remove the homemade device that fixes the relative position of the carriage and the slider;
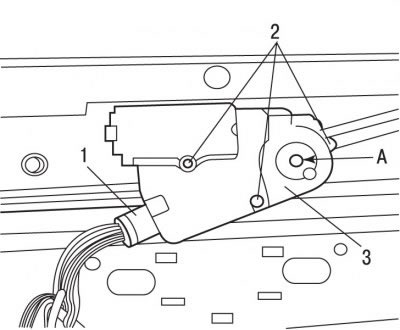
Figure 9.53. Sliding and lifting roof panel drive: 1 - electrical connector; 2 - screws; 3 - electric motor; A - hole for installing a hex key
[Data published on the website: www.PeugeotBook.ru]
- secure the electric motor with screws 2 (see Figure 9.53), tightening them to a torque of 3.5 Nm;
- connect electrical connector 1 to the roof sliding panel drive motor;
- perform initiation and training of the lift/slide roof panel positions;
- check the operation of the sliding and lifting roof panel drive several times;
- further installation is carried out in the reverse order of removal, taking into account the following;
- initiate all electronic systems.
Sequence of actions for initiating the lifting and sliding roof panel:
- set the switch to the position to raise the sliding/tilting roof panel;
- press and hold the switch, the sliding/tilting roof panel will do one of the following:
- the movable panel will begin to rise continuously;
- the movable panel will reach the maximum mechanical lifting position;
- the movable panel will be slightly covered by a few millimeters.
Sequence for programming the positions of the sliding and lifting roof panel:
- initiate the lift-and-slide roof panel;
- after a delay of less than 6 seconds, release the switch;
- press and hold the switch for less than 6 seconds after it has been released, the sliding/tilting roof panel will do one of the following:
- the sliding panel will begin to close 4 seconds after the switch is pressed;
- then the sliding panel will open completely;
- then the sliding panel will close completely.