English Русский
Български
Беларускі
Український
Српски
Hrvatski
Română
Polski
Slovenský
Magyar
Bookmark Articles Sitemap Contacts
Company Hyundai Company Opel Company Skoda Company Kia Company Mitsubishi Company LADA Company Audi
PeugeotBook.ru


Series 100   Series 200   Series 300   400-500   Series 600   Crossovers   Others
 
Peugeot 305 (1977-1989) Peugeot 306 (1993-2002) Peugeot 307 (2001-2008)

Replacing the torque converter sealing ring (Peugeot 307)

  • Main
  • 30X
  • Peugeot 307 (2001-2008)
  • Transmission
  • Automatic gearbox
  • Replacing the torque converter sealing ring
0
To remove the torque converter O-ring:
  • remove the gearbox;

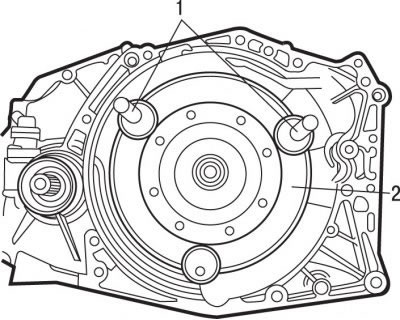
Figure 5.62. Location of handles 0338-B (1) for removing and installing the torque converter (2)

Figure 5.62. Location of handles 0338-B (1) for removing and installing the torque converter (2)

  • install handles 0338-B 1 (figure 5.62) for removing and installing torque converter 2;
  • remove the torque converter by pulling the handles 0338-B;

Caution! The torque converter contains a significant amount of oil.


Original published on the portal [peugeotbook.ru]
  • using hook 0338-G or wire with a bent end, remove the torque converter sealing ring.

To install the torque converter O-ring:
  • clean the installation area of the sealing rings;
  • lubricate the working lips of the new sealing ring with oil before installing it in place;
  • using the 0338-F tool, install the torque converter sealing ring;
  • visually check:
    • torque converter centering element on the crankshaft and torque converter side;
    • the supporting surface of the sealing ring on the torque converter;
    • three torque converter mounting points;
    • oil pump drive chamfers;
    • turbine and torque converter shaft splines;

Caution: Before installing a new torque converter, which is part of a new pair of components, partially fill it with oil.


  • lubricate the inner bearing surface of the sealing ring on the torque converter with oil;
  • using handles 0338-B 1, slowly install the torque converter, turning it slightly in different directions to facilitate the entry of the splines into the grooves;
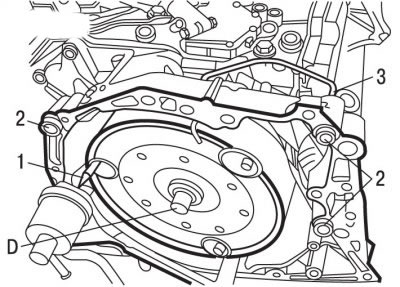
Figure 5.56. Location of fastening elements of the 0338-A gearbox with the EW10J4 engine: 1 - feed…

Figure 5.56. Location of fastening elements of the 0338-A gearbox with the EW10J4 engine: 1 - feed pin; 2 - centering pins; 3 - hairpins; D - place where MOLYCOTE BR2 grease is applied to the front cone of the gearbox

  • check the correct installation of the torque converter using pin 3 (see Figure 5.56), holding the torque converter;
  • install the gearbox;
  • bring the gearbox oil level up to normal;
  • initialize the oil aging counter.
This article is available at russian, bulgarian, belarusian, ukrainian, serbian, croatian, romanian, polish, slovak, hungarian
Article reviewed by editor: Sidorov Timofey
Share information:
Previous
Peugeot 307: Automatic gearbox
Next

Replacing axle shaft sealing rings
Replacing the gear selector lever shaft sealing ring
Replacing the multifunction switch
Replacing the gear selector mechanism
Replacing the AL4 automatic transmission
Replacing the heat exchanger
Checking the level and replacing the oil in the gearbox
See similar information for other Peugeot models

➨ Catalytic converter — general information and precautions Peugeot 106 (1991-2003)
➨ Removal and installation of the torque converter Peugeot 207 (2006-2014)
➨ Replacing the selector shaft sealing ring Peugeot 405 (1987-1997)
➨ Torque Converter — Removal Peugeot 605 (1989-2000)
➨ Torque converter — removal and installation Peugeot 807 (2002-2014)
Link to this article in different formats
Comments and feedback from visitors
No comments yet


Add two numbers 49 + 31


Peugeot 307 (2001-2008) 
  • User manual
  • Keys, doors and alarm
  • Controls and instruments
  • Driving and operation
  • Maintenance
  • Power unit
  • Petrol engines TU3 and TU5
  • Petrol engines EW10
  • Diesel engines DV10
  • Diesel engines DW10
  • Transmission
  • Clutch and drive shafts
  • Mechanical gearbox
  • Automatic gearbox
  • Chassis, running gear
  • Front suspension
  • Rear suspension
  • Steering
  • Brake system
  • Body and interior
  • Exterior (external elements)
  • Interior (internal elements)
  • Doors, locks and windows
  • Heating and air conditioning
  • Electrical equipment
  • Equipment and devices
  • Power devices
  • Airbags
  • Electrical circuits
Peugeot 306 (1993-2002) 
  • General information
  • Introduction to manual
  • Specifications
  • Gasoline engine
  • Engine repair
  • Lubrication system
  • Cooling system
  • Fuel injection
  • Ignition system
  • Diesel engine
  • Engine repair
  • Lubrication system
  • Cooling system
  • Fuel injection
  • Transmission
  • Clutch
  • Gearbox
  • Drive shafts
  • Chassis, running gear
  • Steering system
  • Front suspension
  • Rear suspension
  • Brake system
  • Electrical equipment
  • Power devices
  • Electrical circuits
Peugeot 305 (1977-1989) 
  • General information
  • Maintenance
  • Power unit
  • Gasoline engines
  • Diesel engines
  • Cooling system (gasoline)
  • Cooling system (diesel)
  • Fuel system (gasoline)
  • Fuel system (diesel)
  • Ignition system
  • Transmission
  • Clutch
  • Mechanical gearbox BB8
  • Mechanical gearbox BE1
  • Automatic gearbox ZF4
  • Shafts, hubs and wheels
  • Chassis, running gear
  • Brake system
  • Car suspension
  • Steering
  • Body and interior
  • Exterior (external elements)
  • Interior (internal elements)
  • Electrical equipment
  • Equipment and devices
  • Headlights and lighting
  • Power devices
  • Electrical circuits
  • Wiring diagrams (diesel)
PeugeotBook.ru © 2018–2026 | Mobile version | Sitemap: EN BG BY UA RS HR RO PL SK HU | Write message | Site search | Add to bookmarks | Peugeot owners
106 (1991-2003) | 206 (1998-2012) | 207 (2006-2014) | 305 (1977-1989) | 306 (1993-2002) | 307 (2001-2008) | 405 (1987-1997) | 406 (1995-2004) | 605 (1989-2000) | Partner-I (1996-2008) | Eurovans-807 (2002-2014) | Eurovans-806 (1994-2002) | J5 (1981-1993) |
Cookies are used to ensure the correct display of pages on the site.