



- turn off the ignition and disconnect the ground wire from the battery;
- disconnect the electrical connector from the engine management computer;
- remove the air filter housing;
- remove the front left wheel;
- remove the decorative battery cover;
- remove the left front wheel arch mudguard;
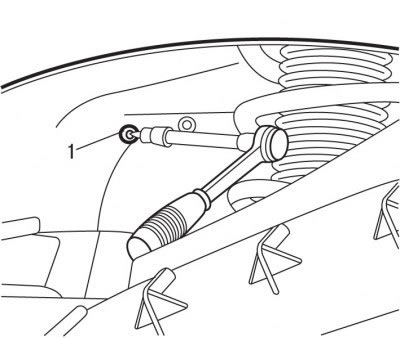
Figure 5.20. Unscrewing the bolt (1) securing the battery support
- unscrew bolt 1 from under the left front wheel arch (see Figure 5.20) battery support fastenings;
- remove the battery;
- remove the battery support;
- use special clamps to clamp the hoses going to the heat exchanger;
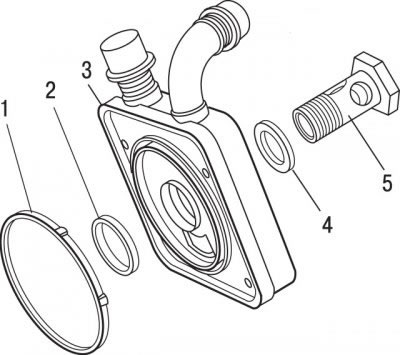
Figure 5.63. Heat exchanger: 1 - sealing ring; 2 - sealing ring; 3 - heat exchanger; 4 - sealing washer; 5 - hollow bolt
- unscrew the hollow bolt 5 (figure 5.63) heat exchanger fastenings;
- remove the sealing washer from the bolt 4;
- loosen the clamps and remove the hoses from the heat exchanger;
- remove heat exchanger 3;
- remove sealing rings 1 and 2 from the heat exchanger.
To install the heat exchanger:
Important: If the heat exchanger is not immediately reinstalled, install protective plugs on the rear crankcase and on the heat exchanger.
- install new sealing rings 1 and 2 on the heat exchanger;
- install a new sealing washer 4 on the hollow bolt;
- install heat exchanger 3 and secure it with a hollow bolt, tightening it to a torque of 50 Nm;
- place the hoses on the heat exchanger pipes and secure them with clamps;
- install the battery support;
- install the battery;
- install the left front wheel arch mudguard;
- install the front left wheel;
- install the air filter housing;
- connect the electrical connector to the engine management computer;
- connect the ground wire to the battery;
- check the coolant level and top it up if necessary.
Data published on the website (peugeotbook.ru)