
English Русский
Български
Беларускі
Український
Српски
Hrvatski
Română
Polski
Slovenský
Magyar
Bookmark Articles Sitemap Contacts
Company Hyundai Company Opel Company Skoda Company Kia Company Mitsubishi Company LADA Company Audi
PeugeotBook.ru


Series 100   Series 200   Series 300   400-500   Series 600   Crossovers   Others
 
Peugeot 305 (1977-1989) Peugeot 306 (1993-2002) Peugeot 307 (2001-2008)

Headlights — removal and installation (Peugeot 307)

  • Main
  • 30X
  • Peugeot 307 (2001-2008)
  • Electrical equipment
  • Equipment and devices
  • Headlights — removal and installation
0
To remove the headlights:
  • disconnect the ground wire from the battery;
  • remove the front bumper;

Attention! In certain weather and climate conditions (for example, low temperature, high humidity, etc.) the short-term appearance of condensation on the inner surface of the headlight glass is not abnormal. It disappears within a few minutes after the headlights are turned on.


Please note: The headlight lenses are made of polycarbonate and have a protective coating. Do not clean them from dirt with a dry cloth or a substance containing an abrasive, or using detergents or solvents. To do this, use a soft sponge soaked in soapy water.

  • disconnect the electrical connectors from the headlight;
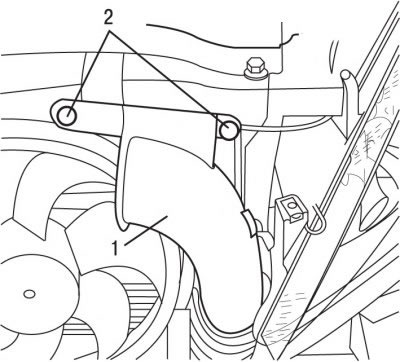
Figure 9.10. Location of fasteners (2) of the air intake pipe (1)

Figure 9.10. Location of fasteners (2) of the air intake pipe (1)

  • when removing the left headlight, release the clips 2 and remove the air intake pipe 1 (figure 9.10);
  • release the headlight washer nozzle from the clips;
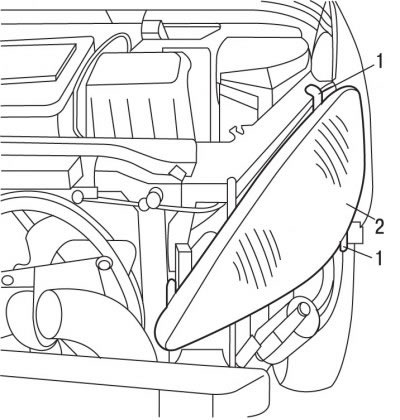
Figure 9.11. Location of screws (1) for mounting the headlight (2)

Figure 9.11. Location of screws (1) for mounting the headlight (2)


  • unscrew screws 1 and remove headlight 2 (figure 9.11) from the car.

To install headlights:
  • install the headlight. Before tightening the headlight mounting screws, adjust the gaps around the headlight perimeter;
  • further installation is carried out in the reverse order of removal, taking into account the following;
  • install the front bumper;
  • connect the ground wire to the battery;
  • check the functionality of the headlights;
  • initiate all electronic systems.
This article is available at russian, bulgarian, belarusian, ukrainian, serbian, croatian, romanian, polish, slovak, hungarian
Article reviewed by editor: Sidorov Timofey
Share information:
Previous
Peugeot 307: Equipment and devices
Next

Intelligent Switch Box — removal and installation
Fuses — description, location, and replacement
Detecting faults in electrical circuits
Electrical circuits — general information
General information about electrical equipment
Replacing the rear light
Replacing the high brake light
Replacing the license plate light
Replacing exterior lighting bulbs
Replacing the instrument cluster
See similar information for other Peugeot models

➨ Controlled headlights Peugeot 207 (2006-2014)
➨ Headlights and direction indicators — removal and installation Peugeot 405 (1987-1997)
➨ Headlights — removal and installation Peugeot 605 (1989-2000)
➨ Peugeot Partner: Diagram 3. Fog lights, brake lights, side… Peugeot Partner I (1996-2008)
Link to this article in different formats
Comments and feedback from visitors
No comments yet


Add two numbers 24 + 45


Peugeot 307 (2001-2008) 
  • User manual
  • Keys, doors and alarm
  • Controls and instruments
  • Driving and operation
  • Maintenance
  • Power unit
  • Petrol engines TU3 and TU5
  • Petrol engines EW10
  • Diesel engines DV10
  • Diesel engines DW10
  • Transmission
  • Clutch and drive shafts
  • Mechanical gearbox
  • Automatic gearbox
  • Chassis, running gear
  • Front suspension
  • Rear suspension
  • Steering
  • Brake system
  • Body and interior
  • Exterior (external elements)
  • Interior (internal elements)
  • Doors, locks and windows
  • Heating and air conditioning
  • Electrical equipment
  • Equipment and devices
  • Power devices
  • Airbags
  • Electrical circuits
Peugeot 306 (1993-2002) 
  • General information
  • Introduction to manual
  • Specifications
  • Gasoline engine
  • Engine repair
  • Lubrication system
  • Cooling system
  • Fuel injection
  • Ignition system
  • Diesel engine
  • Engine repair
  • Lubrication system
  • Cooling system
  • Fuel injection
  • Transmission
  • Clutch
  • Gearbox
  • Drive shafts
  • Chassis, running gear
  • Steering system
  • Front suspension
  • Rear suspension
  • Brake system
  • Electrical equipment
  • Power devices
  • Electrical circuits
Peugeot 305 (1977-1989) 
  • General information
  • Maintenance
  • Power unit
  • Gasoline engines
  • Diesel engines
  • Cooling system (gasoline)
  • Cooling system (diesel)
  • Fuel system (gasoline)
  • Fuel system (diesel)
  • Ignition system
  • Transmission
  • Clutch
  • Mechanical gearbox BB8
  • Mechanical gearbox BE1
  • Automatic gearbox ZF4
  • Shafts, hubs and wheels
  • Chassis, running gear
  • Brake system
  • Car suspension
  • Steering
  • Body and interior
  • Exterior (external elements)
  • Interior (internal elements)
  • Electrical equipment
  • Equipment and devices
  • Headlights and lighting
  • Power devices
  • Electrical circuits
  • Wiring diagrams (diesel)
PeugeotBook.ru © 2018–2026 | Mobile version | Sitemap: EN BG BY UA RS HR RO PL SK HU | Write message | Site search | Add to bookmarks | Peugeot owners
106 (1991-2003) | 206 (1998-2012) | 207 (2006-2014) | 305 (1977-1989) | 306 (1993-2002) | 307 (2001-2008) | 405 (1987-1997) | 406 (1995-2004) | 605 (1989-2000) | Partner-I (1996-2008) | Eurovans-807 (2002-2014) | Eurovans-806 (1994-2002) | J5 (1981-1993) |
Cookies are used to ensure the correct display of pages on the site.