



Note: Do not touch the glass bulb of the lamp with bare hands. If the lamp has just been lit, it may be too hot.
Grease stains on the lamp lead to darkening of the bulb and rapid failure of the lamp. Be sure to replace defective lamps with lamps of the same type. Wipe off any grease stains that may appear due to carelessness with a clean, lint-free cloth or alcohol.
High pressure H7 incandescent bulbs may burst when replaced, so wear gloves and safety glasses when replacing these bulbs.
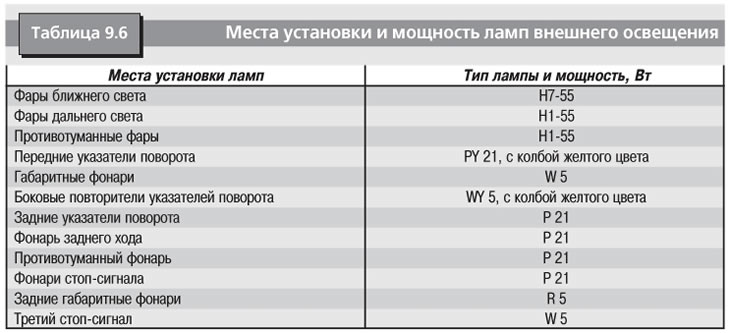
The installation locations and power of external lighting lamps are given in the table. 9.6.
Note: To replace the lamps on the right side, remove the protective cover, which is secured with two plastic clips.
To replace the low beam, high beam and fog light bulbs:
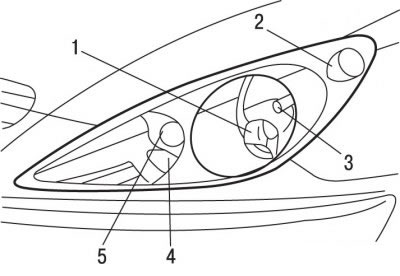
Figure 9.16. Location of lamps in the front headlight: 1 - fog light bulb (H155 W); 2 - direction indicator lamp (PY 21 W, with a yellow bulb); 3 - low beam lamp (H755 W); 4 - high beam lamp (H155 W); 5 - side light lamp (W 5 W)
- turn a quarter turn and remove the protective cover corresponding to the burnt-out lamp (figure 9.16);
- disconnect the electrical connector from the lamp;
- press the end of the latch to open it. Replace the lamp;
- when reinstalling, make sure the guide tabs are correctly oriented and the latch is securely locked in place;
- connect the electrical connector;
- place the protective cover with the arrow facing up and turn it to the right a quarter turn.
To replace the parking light bulb:
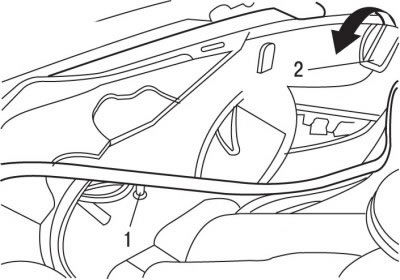
Figure 9.17. Location of lamp holders for side light (1) and turn signal (2)
(Source can be seen at: PeugeotBook)
- pull the cartridge 1 (figure 9.17) and take it out;
- replace the lamp.
To replace the turn signal bulb:
- turn cartridge 2 a quarter turn and remove it;
- replace the lamp.
To replace the side turn signal repeater bulb:
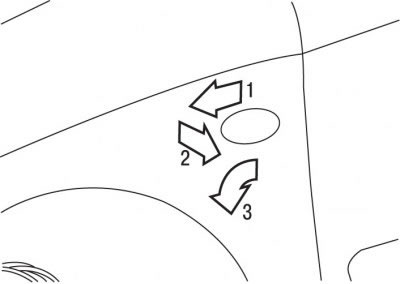
Figure 9.18. Replacing the side turn signal repeater bulb: 1, 2 - direction of movement of the lamp for replacement; 3 - direction of rotation of the lamp for replacement
- slide the light forward and remove it (figure 9.18);
- holding the flashlight by the electrical connector, rotate the lens a quarter turn;
- replace the lamp.
Note: Lamps with yellow bulbs (used in direction indicators and side repeaters) should be replaced with lamps with similar technical parameters and bulbs of the same color.
To replace taillight bulbs on sedan type vehicles:
- lift, move aside and secure the cargo area carpet;
- release the two plastic clips and remove the trim panel;
- press the latch and remove the board with lamps;
- replace the burnt-out light bulb;
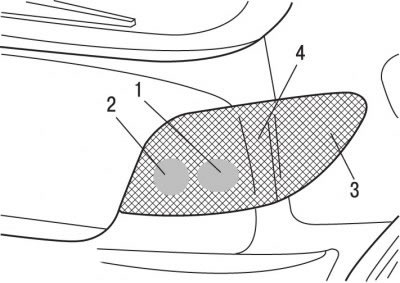
Figure 9.19. Location of lamps in the rear light on sedan type vehicles: 1 - direction indicator lamp (P 21 W); 2 - reversing light bulb (P 21 W), on the left - fog light (P 21 W); 3 - brake light bulb (P 21 W); 4 - side light bulb (R 5 W)
- when reinstalling, make sure that the edge of the trim panel is covered with a sealing gasket.
Note: Replacing all lamps (figure 9.19) produced from the luggage compartment.
For replacing high-mounted brake light bulbs on sedan type vehicles (4 x 5W bulbs):
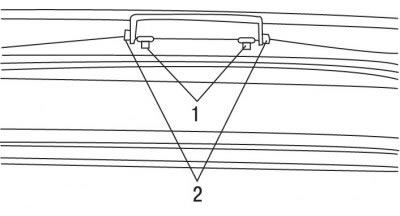
Figure 9.20. Location of nuts (1) for fastening the high brake light and clamps (2) for the board with lamps
- two fastening nuts 1 (figure 9.20) unscrew the upper brake light using a 10 mm tubular wrench;
- remove the lamp assembly by pushing it out;
- press the tabs of the two clamps 2 and remove the board with the lamps;
- replace the burnt-out light bulb;
- when reinstalling, make sure the lamp assembly sealing gasket is properly seated.
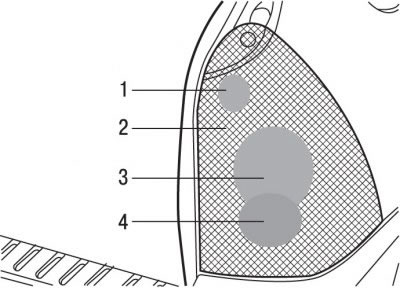
Figure 9.21. Location of lamps in the rear light on station wagons: 1 - brake light bulb (P 21 W); 2 - side light bulb (R 5 W); 3 - direction indicator lamp (P 21 W); 4 - reversing light bulb (P 21 W), on the right - fog light (P 21 W)
To replace the taillight bulbs on station wagons:
Note: Replacing all lamps (figure 9.21) is produced on a lamp removed from a vehicle.
- remove the side trim of the luggage compartment on the corresponding side;
- unscrew and remove the nut securing the light from inside the luggage compartment;
- unscrew and remove the nut securing the light from the outside of the luggage compartment;
- remove the lantern;
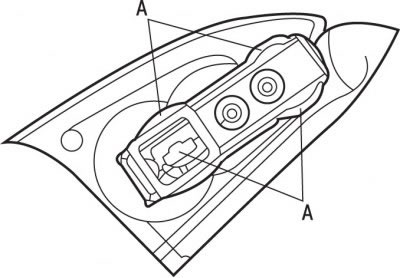
Figure 9.22. Location of the fasteners (A) on the lamp board
- press the clamps A (figure 9.22) and remove the board with the lamps;
- replace the burnt-out light bulb.
To replace the license plate light bulb:
- insert a thin screwdriver into one of the outer holes of the diffuser;
Important! When reinstalling, make sure the board with the lamps and the light are firmly in place.
- push it out to release it from the clips;
- remove the diffuser;
- replace the burnt-out light bulb.
To replace the high-mounted brake light bulb on station wagons (4 x 5W bulbs):
- carefully remove the upper trim of the tailgate by pulling it on both sides simultaneously in a perpendicular direction to release the clips;
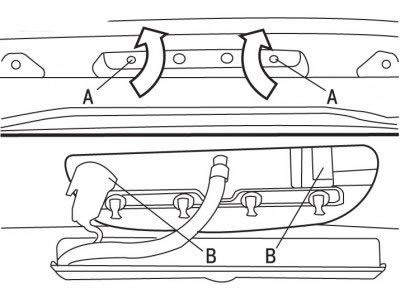
Figure 9.23. Location of holes (A) for access to the high-mounted brake light bulb unit clips on station wagons
- insert a screwdriver from the outside into the holes A (figure 9.23) and press on the tabs of the two clamps B;
- while continuing to press on the tabs, push the lamp unit outward;
- pull the block while simultaneously pushing it outward;
- replace the burnt-out light bulb;
- when reinstalling, make sure that the latch tabs and the door trim are correctly positioned.