English Русский
Български
Беларускі
Український
Српски
Hrvatski
Română
Polski
Slovenský
Magyar
Bookmark Articles Sitemap Contacts
Company Hyundai Company Opel Company Skoda Company Kia Company Mitsubishi Company LADA Company Audi
PeugeotBook.ru


Series 100   Series 200   Series 300   400-500   Series 600   Crossovers   Others
 
Peugeot 206 (1998-2012) Peugeot 207 (2006-2014)

Removal and installation fuel injectors (Peugeot 207)

  • Main
  • 20X
  • Peugeot 207 (2006-2014)
  • Power unit
  • Fuel system (gasoline)
  • Removal and installation fuel injectors
0
Table of contents: Removal 🠇 Replacing the injector sealing washer 🠇 Installation 🠇

Removal


Disconnect the negative battery terminal.

Connect the pressure measuring hose to the bleed valve (1) of the fuel supply circuit.

Drain the fuel into a suitable container.
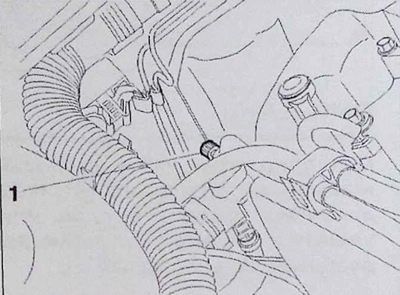
Drain the fuel into a suitable container.


Release the wire harness (2) from the clamps.

Disconnect the connectors (3).

Disconnect the EGR valve pipe (4).

Unscrew bolts (5) and (6) and nuts TU.

Remove:
  • hose kit (8);
  • air supply pipe (9);
  • vacuum supply tube;
  • electrical connector located under the intake manifold;
  • intake manifold (see the corresponding operation).

Clean the high pressure hoses before unscrewing them.
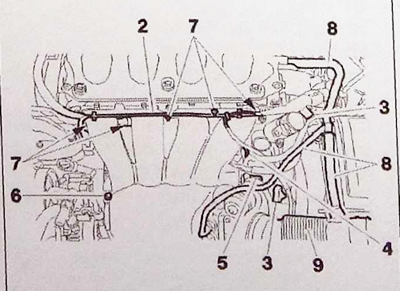
Clean the high pressure hoses before unscrewing them.


Cover the generator and starter.

Using "Sodimac" or similar, clean the zones "a "(see picture).
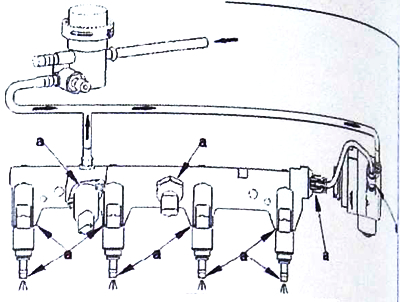


Using «Sodimac» or similar, clean the zones «a »(see picture).


Caution: After opening the fuel injection circuit, no cleaning is permitted.


Disconnect the fuel supply pipe (11).

Unscrew the nuts (10) of the noise-insulating gasket.

Remove the tube (12) and soundproofing element (13) of the fuel distribution rail.
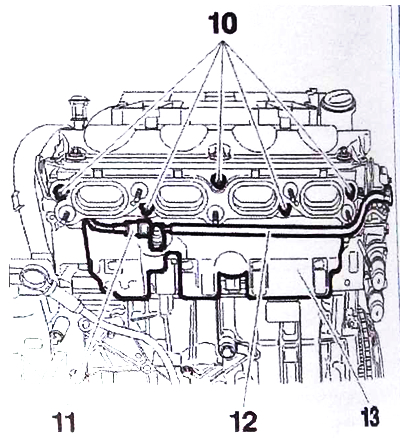
Remove the tube (12) and soundproofing element (13) of the fuel distribution rail.


Close the fasteners on the pipes (11) of the fuel distribution rail (12) and the high-pressure fuel pump with plugs. Unscrew the fastening bolts (14) and remove the fuel distribution rail (remove manually by pulling several times).

Note: Move the injectors by turning them several times to break the layer of deposits that has formed between the injector and the combustion chamber.


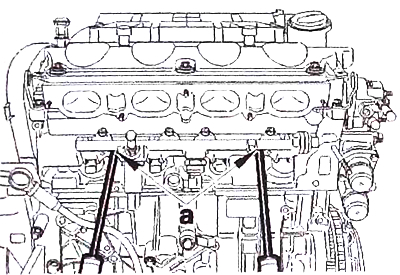
If the fuel injection rail cannot be removed by hand, insert two flat-head screwdrivers into area "a" to lift it up.
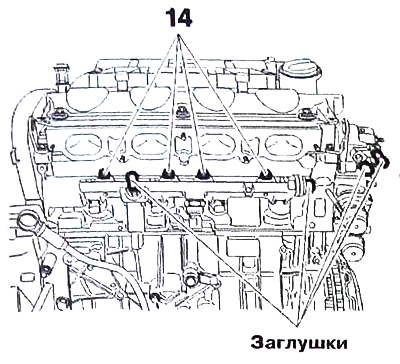


If the fuel injection rail cannot be removed by hand, insert two flat-head screwdrivers into area…


Close the holes in the injectors with plugs.

Remove the clamps (15) and injectors (16) using a screwdriver.

Plug all open holes in the high pressure circuit.
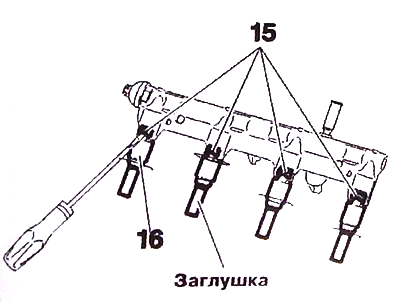
Plug all open holes in the high pressure circuit.


Replacing the injector sealing washer


Remove the sealing washer (17), being careful not to scratch the injector (using snap ring pliers).

Clean the injector nozzles with a brush using Sodimac/Mecanet degreaser.
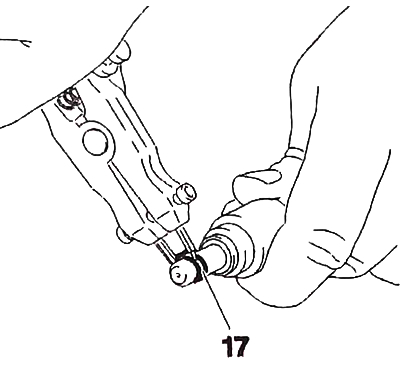


Clean the injector nozzles with a brush using Sodimac/Mecanet degreaser.


Caution: Do not clean the injectors with a rag or compressed air.


Install the new gasket into the injector groove, having first placed it onto the tool sleeve.
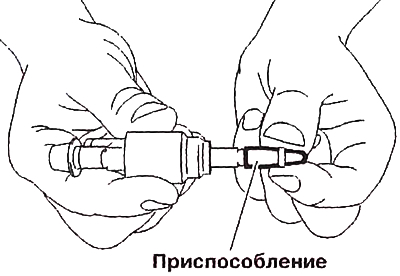
Install the new gasket into the injector groove, having first placed it onto the tool sleeve.


Insert the nozzle into the body of the device.

Note: Once the gasket is placed on the injector body, it must be installed in place as quickly as possible.
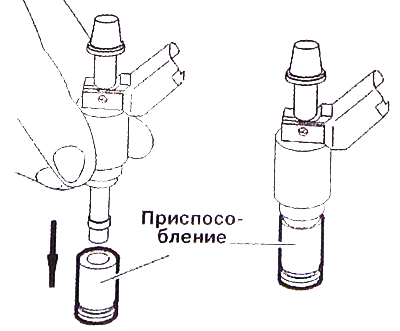

Note: Once the gasket is placed on the injector body, it must be installed in place as quickly as…


Installation


Note: Replace the gaskets (18) - (19), clamps (15) and high pressure pipe (20).


[View the original on the website PeugeotBook]
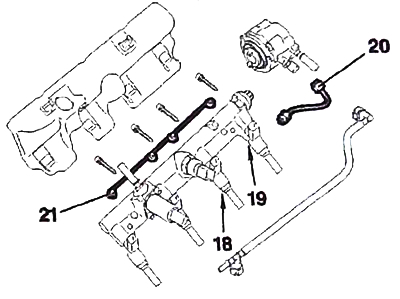
Note: Replace the gaskets (18) - (19), clamps (15) and high pressure pipe (20).


Reinstall:
  • injectors on the fuel distribution rail;
  • new injector retainers;
  • fuel distribution rail and its gasket (21).

Check the high pressure fuel circuit for leaks.

Reinstall:
  • new high pressure tube;
  • soundproofing element (13) of the fuel distribution rail;
  • injector connectors.

Install the remaining parts in reverse order.

Check the high pressure fuel circuit for leaks using a leak detector.
This article is available at russian, bulgarian, belarusian, ukrainian, serbian, croatian, romanian, polish, slovak, hungarian
Article reviewed by editor: Matveev Demid
Share information:
Previous
Peugeot 207: Fuel system (gasoline)
Next

Checking for leaks
Cleaning the fittings on the high-pressure fuel rail
Measuring fuel pressure
Fuel injectors
Pressure regulator
Replacing the high pressure sensor (EP6DT engines)
Replacing the fuel pump/fuel level sensor assembly
Replacing the high pressure fuel pump (EP6DT engines)
Replacing the vacuum pump
Removal and installation the fuel tank (all engines)
See similar information for other Peugeot models

➨ Fuel filter renewal — carburetor models Peugeot 106 (1991-2003)
➨ Fuel injectors — removal, inspection and installation Peugeot 305 (1977-1989)
➨ Fuel injectors — removal, inspection and installation Peugeot 406 (1995-2004)
➨ Replacing the fuel filter Peugeot 605 (1989-2000)
➨ Fuel injectors — removal and installation Peugeot Partner I (1996-2008)
Link to this article in different formats
Comments and feedback from visitors
No comments yet


Add two numbers 29 + 40


Peugeot 207 (2006-2014) 
  • General information
  • Car care
  • Governing bodies
  • Driving and operation
  • Power unit
  • Engine characteristics
  • Engine repair
  • Cooling system
  • Lubrication system
  • Ignition system
  • Control system (gasoline)
  • Fuel system (gasoline)
  • Control system (diesel)
  • Transmission
  • Clutch
  • Mechanical gearbox
  • Automatic gearbox
  • Drive shafts
  • Chassis, running gear
  • Car suspension
  • Steering
  • Brake system
  • Body and interior
  • Exterior (external elements)
  • Interior (internal elements)
  • Heating and air conditioning
  • Electrical equipment
  • Equipment and devices
  • Headlights and lighting
  • Power devices
  • Electrical circuits
Peugeot 206 (1998-2012) 
  • General information
  • User manual
  • Maintenance
  • Power unit
  • Gasoline engines
  • Diesel engines
  • Diesel power system
  • Engine management system
  • Transmission
  • Clutch
  • Mechanical gearbox
  • Automatic gearbox
  • Drive shafts
  • Chassis, running gear
  • Front suspension
  • Rear suspension
  • Steering
  • Brake system
  • Body and interior
  • Body elements
  • Doors, locks and windows
  • Electrical equipment
  • Equipment and devices
  • Electrical circuits
PeugeotBook.ru © 2018–2026 | Mobile version | Sitemap: EN BG BY UA RS HR RO PL SK HU | Write message | Site search | Add to bookmarks | Peugeot owners
106 (1991-2003) | 206 (1998-2012) | 207 (2006-2014) | 305 (1977-1989) | 306 (1993-2002) | 307 (2001-2008) | 405 (1987-1997) | 406 (1995-2004) | 605 (1989-2000) | Partner-I (1996-2008) | Eurovans-807 (2002-2014) | Eurovans-806 (1994-2002) | J5 (1981-1993) |
Cookies are used to ensure the correct display of pages on the site.