
English Русский
Български
Беларускі
Український
Српски
Hrvatski
Română
Polski
Slovenský
Magyar
Bookmark Articles Sitemap Contacts
Company Hyundai Company Opel Company Skoda Company Kia Company Mitsubishi Company LADA Company Audi
PeugeotBook.ru


Series 100   Series 200   Series 300   400-500   Series 600   Crossovers   Others
 
Peugeot 305 (1977-1989) Peugeot 306 (1993-2002) Peugeot 307 (2001-2008)

Removal and installation the heater (models produced since 1983) (Peugeot 305)

  • Main
  • 30X
  • Peugeot 305 (1977-1989)
  • Body and interior
  • Interior (internal elements)
  • Removal and installation the heater (models produced since 1983)
0
1. Disconnect the ground cable from the battery.

2. Remove the trim around the gear shift lever by lifting up the new cover and sliding the trim back. Underneath it are 2 screws that secure the rear of the center console. Remove the screws.

3. Remove 2 screws (one on each side), securing the front part of the center console. Remove the console by disconnecting the corresponding wiring.

4. Disconnect and remove the heater control panel as described in the relevant section. Unscrew 5 screws and remove the rheostat, disconnecting the wiring from it.

5. Clamp the water hoses at the heater core connections and disconnect the hoses (be prepared for some coolant to spill when doing this). Disconnect the control cable from the core valve.

6. Disconnect the vacuum tubes from the damper actuators; the tubes are different colors and marked to prevent confusion:
  • J — yellow
  • N — black
  • R — red
  • V - green

7. Remove the heater air ducts and disconnect the power wires of the blower motor. Disconnect the green wire harness from its common connector on the left side of the heater (the order in which these wires are connected to the connector contacts does not matter).

8. Remove the console mounting bracket located at the bottom of the heater and unscrew the bolt located under the bracket.

9. Unscrew 2 nuts (one on each side), securing the top of the heater.

10. Disconnect the remaining wires, tubes, cables, etc. and pull the heater out.

11. Now, if desired, you can remove the heater core or actuators (see photo).
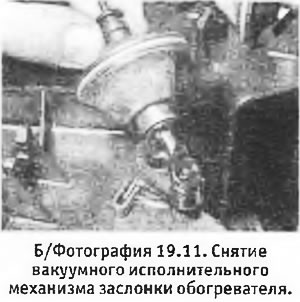


11. Now, if desired, you can remove the heater core or actuators (see photo).


12. The heater is installed in reverse order. Upon completion, add coolant to the system and bleed it.
This article is available at russian, bulgarian, belarusian, ukrainian, serbian, croatian, romanian, polish, slovak, hungarian
Article reviewed by editor: Ostrovsky Fedor
Share information:
Previous
Peugeot 305: Interior (internal elements)
Next

Interior heater — removal and installation
Windshield — removal and installation
Torpedo — removal and installation
Glove Compartment Latch Repair (Pre-1983 Models)
Modification of front seat belt anchorages (all models)
Plastic parts
See similar information for other Peugeot models

➨ Fuel filter renewal — carburetor models Peugeot 106 (1991-2003)
➨ Removal and installation the heater fan Peugeot 207 (2006-2014)
➨ Rear Wiper/Washer, Heater Fan and Rear Defroster Diagram (Late… Peugeot 405 (1987-1997)
➨ Heater Switch Block Peugeot 605 (1989-2000)
➨ Induction Changeover Valve (ICOV) (non-turbocharged models only) Peugeot 806 (1994-2002)
Link to this article in different formats
Comments and feedback from visitors
No comments yet


Add two numbers 36 + 13


Peugeot 307 (2001-2008) 
  • User manual
  • Keys, doors and alarm
  • Controls and instruments
  • Driving and operation
  • Maintenance
  • Power unit
  • Petrol engines TU3 and TU5
  • Petrol engines EW10
  • Diesel engines DV10
  • Diesel engines DW10
  • Transmission
  • Clutch and drive shafts
  • Mechanical gearbox
  • Automatic gearbox
  • Chassis, running gear
  • Front suspension
  • Rear suspension
  • Steering
  • Brake system
  • Body and interior
  • Exterior (external elements)
  • Interior (internal elements)
  • Doors, locks and windows
  • Heating and air conditioning
  • Electrical equipment
  • Equipment and devices
  • Power devices
  • Airbags
  • Electrical circuits
Peugeot 306 (1993-2002) 
  • General information
  • Introduction to manual
  • Specifications
  • Gasoline engine
  • Engine repair
  • Lubrication system
  • Cooling system
  • Fuel injection
  • Ignition system
  • Diesel engine
  • Engine repair
  • Lubrication system
  • Cooling system
  • Fuel injection
  • Transmission
  • Clutch
  • Gearbox
  • Drive shafts
  • Chassis, running gear
  • Steering system
  • Front suspension
  • Rear suspension
  • Brake system
  • Electrical equipment
  • Power devices
  • Electrical circuits
Peugeot 305 (1977-1989) 
  • General information
  • Maintenance
  • Power unit
  • Gasoline engines
  • Diesel engines
  • Cooling system (gasoline)
  • Cooling system (diesel)
  • Fuel system (gasoline)
  • Fuel system (diesel)
  • Ignition system
  • Transmission
  • Clutch
  • Mechanical gearbox BB8
  • Mechanical gearbox BE1
  • Automatic gearbox ZF4
  • Shafts, hubs and wheels
  • Chassis, running gear
  • Brake system
  • Car suspension
  • Steering
  • Body and interior
  • Exterior (external elements)
  • Interior (internal elements)
  • Electrical equipment
  • Equipment and devices
  • Headlights and lighting
  • Power devices
  • Electrical circuits
  • Wiring diagrams (diesel)
PeugeotBook.ru © 2018–2026 | Mobile version | Sitemap: EN BG BY UA RS HR RO PL SK HU | Write message | Site search | Add to bookmarks | Peugeot owners
106 (1991-2003) | 206 (1998-2012) | 207 (2006-2014) | 305 (1977-1989) | 306 (1993-2002) | 307 (2001-2008) | 405 (1987-1997) | 406 (1995-2004) | 605 (1989-2000) | Partner-I (1996-2008) | Eurovans-807 (2002-2014) | Eurovans-806 (1994-2002) | J5 (1981-1993) |
Cookies are used to ensure the correct display of pages on the site.