English Русский
Български
Беларускі
Український
Српски
Hrvatski
Română
Polski
Slovenský
Magyar
Bookmark Articles Sitemap Contacts
Company Hyundai Company Opel Company Skoda Company Kia Company Mitsubishi Company LADA Company Audi
PeugeotBook.ru


Series 100   Series 200   Series 300   400-500   Series 600   Crossovers   Others
 
Peugeot 305 (1977-1989) Peugeot 306 (1993-2002) Peugeot 307 (2001-2008)

Windshield — removal and installation (Peugeot 305)

  • Main
  • 30X
  • Peugeot 305 (1977-1989)
  • Body and interior
  • Interior (internal elements)
  • Windshield — removal and installation
0
1. It is recommended to entrust the replacement of the windshield to a specialist. If you still want to do this work on your own, please read the instructions below.

2. Cover the hood, dashboard and front seats with plastic to avoid damaging them during the work. Remove the wiper blades and arms (see Chapter 10, Section 26).

3. If the old glass is broken, remove the fragments from the seal. Remove the seal.

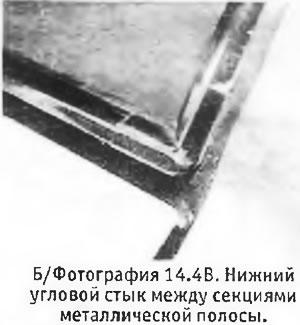
4. Remove the metal strip from the seal. It consists of 3 sections, connected to each other in three places.

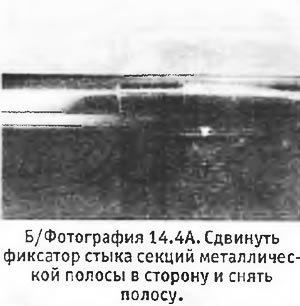
Move the top center seam fastener to the side and carefully pull the strip out of the rubber molding, being careful not to bend it. Reach the bottom corner seam and remove the section. Repeat the above procedure on the second side section and then remove the bottom section (see photos).
Move the top center seam fastener to the side and carefully pull the strip out of the rubber…

5. If the old glass is intact, at this stage it must be pressed out of the opening flange. You will need an assistant for this job. Sit on the left seat and rest your feet on it (placing a rag under my feet) into the corner of the windshield. Gradually increase the pressure on the glass. At this time, an assistant located outside should pry the glass with the seal using a blunt screwdriver or knife and carefully pull it out of the opening flange. Work gradually and take your time. Once the top and edges of the glass have been pulled out of the flange, the glass and seal can be carefully removed from the car.


6. Inspect the opening flange to ensure that it is not damaged. Clean it from traces of old sealant. Clean and inspect the seal. If it is damaged or hardened, it should be replaced.

7. Fill the inner groove of the seal with fresh sealant and install the seal on the new glass, remembering that the groove for the metal strip should be on the outside.

8. You will need a strong enough string, long enough to be laid along the outer groove of the seal so that the ends of the string overlap by approximately 1 m. Place the string in the grooves so that its ends overlap at the bottom in the center and hang down freely.

9. Install the glass with the seal on the lower flange of the opening and insert the free ends of the twine into the interior. To make installation easier, you can lubricate the seal with a soap solution.

10. The assistant should be outside and press on the glass. At this time, you begin to pull on one end of the string to lift the seal onto the flange. Gradually pull the string until the glass is halfway into the flange on one side, after which you should begin pulling on the other end of the string. Continue doing this until all the string is pulled into the interior and the glass, together with the seal, fits into the flange of the opening. If necessary, you can guide the glass into the flange using a screwdriver.

11. Apply a suitable sealant between the seal and the outer surface of the flange around the entire perimeter of the opening.

12. Install the metal strip in place, starting with its bottom section. Place the side sections in place and slide the retainer onto the top seam. Clean off excess sealant and reinstall the wiper arms and blades.


12. Install the metal strip in place, starting with its bottom section. Place the side sections in…


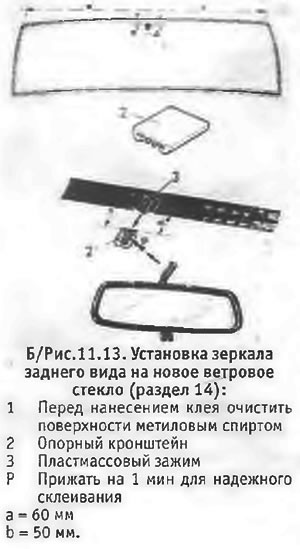
13. Glue the new rearview mirror support bracket onto the new glass (a special 2-component adhesive is required). The installation dimensions are shown in B/Figure 11.13. Install the rearview mirror on the support and secure it with a plastic clamp.
This article is available at russian, bulgarian, belarusian, ukrainian, serbian, croatian, romanian, polish, slovak, hungarian
Article reviewed by editor: Ostrovsky Fedor
Share information:
Previous
Peugeot 305: Interior (internal elements)
Next

Torpedo — removal and installation
Glove Compartment Latch Repair (Pre-1983 Models)
Modification of front seat belt anchorages (all models)
Seat belts — description and maintenance
Removal and installation seats
Interior heater — removal and installation
Removal and installation the heater (models produced since 1983)
Plastic parts
See similar information for other Peugeot models

➨ Diagnostics of the windshield wiper and washer control system Peugeot 207 (2006-2014)
➨ Windshield and rear glass Peugeot 405 (1987-1997)
➨ Identifying and troubleshooting windshield wiper problems Peugeot 605 (1989-2000)
➨ Windshield wiper Peugeot 806 (1994-2002)
Link to this article in different formats
Comments and feedback from visitors
No comments yet


Add two numbers 20 + 28


Peugeot 307 (2001-2008) 
  • User manual
  • Keys, doors and alarm
  • Controls and instruments
  • Driving and operation
  • Maintenance
  • Power unit
  • Petrol engines TU3 and TU5
  • Petrol engines EW10
  • Diesel engines DV10
  • Diesel engines DW10
  • Transmission
  • Clutch and drive shafts
  • Mechanical gearbox
  • Automatic gearbox
  • Chassis, running gear
  • Front suspension
  • Rear suspension
  • Steering
  • Brake system
  • Body and interior
  • Exterior (external elements)
  • Interior (internal elements)
  • Doors, locks and windows
  • Heating and air conditioning
  • Electrical equipment
  • Equipment and devices
  • Power devices
  • Airbags
  • Electrical circuits
Peugeot 306 (1993-2002) 
  • General information
  • Introduction to manual
  • Specifications
  • Gasoline engine
  • Engine repair
  • Lubrication system
  • Cooling system
  • Fuel injection
  • Ignition system
  • Diesel engine
  • Engine repair
  • Lubrication system
  • Cooling system
  • Fuel injection
  • Transmission
  • Clutch
  • Gearbox
  • Drive shafts
  • Chassis, running gear
  • Steering system
  • Front suspension
  • Rear suspension
  • Brake system
  • Electrical equipment
  • Power devices
  • Electrical circuits
Peugeot 305 (1977-1989) 
  • General information
  • Maintenance
  • Power unit
  • Gasoline engines
  • Diesel engines
  • Cooling system (gasoline)
  • Cooling system (diesel)
  • Fuel system (gasoline)
  • Fuel system (diesel)
  • Ignition system
  • Transmission
  • Clutch
  • Mechanical gearbox BB8
  • Mechanical gearbox BE1
  • Automatic gearbox ZF4
  • Shafts, hubs and wheels
  • Chassis, running gear
  • Brake system
  • Car suspension
  • Steering
  • Body and interior
  • Exterior (external elements)
  • Interior (internal elements)
  • Electrical equipment
  • Equipment and devices
  • Headlights and lighting
  • Power devices
  • Electrical circuits
  • Wiring diagrams (diesel)
PeugeotBook.ru © 2018–2026 | Mobile version | Sitemap: EN BG BY UA RS HR RO PL SK HU | Write message | Site search | Add to bookmarks | Peugeot owners
106 (1991-2003) | 206 (1998-2012) | 207 (2006-2014) | 305 (1977-1989) | 306 (1993-2002) | 307 (2001-2008) | 405 (1987-1997) | 406 (1995-2004) | 605 (1989-2000) | Partner-I (1996-2008) | Eurovans-807 (2002-2014) | Eurovans-806 (1994-2002) | J5 (1981-1993) |
Cookies are used to ensure the correct display of pages on the site.