
English Русский
Български
Беларускі
Український
Српски
Hrvatski
Română
Polski
Slovenský
Magyar
Bookmark Articles Sitemap Contacts
Company Hyundai Company Opel Company Skoda Company Kia Company Mitsubishi Company LADA Company Audi
PeugeotBook.ru


Series 100   Series 200   Series 300   400-500   Series 600   Crossovers   Others
 
Peugeot 305 (1977-1989) Peugeot 306 (1993-2002) Peugeot 307 (2001-2008)

Connecting rods, pistons and piston rings — inspection and cleaning (Peugeot 305)

  • Main
  • 30X
  • Peugeot 305 (1977-1989)
  • Power unit
  • Gasoline engines
  • Connecting rods, pistons and piston rings — inspection and cleaning
0
1. Remove the pistons and connecting rods from the sleeves and clean them thoroughly with kerosene. Use a scraper to scrape off any carbon deposits from the piston crowns, being careful not to damage them. Carefully remove the old rings from the pistons and arrange them in order. Clean the piston grooves with a piece of old ring, being careful not to scratch or widen the grooves.

2. The grooves for the upper rings will most likely be the most worn. Once the grooves are clean, install the top rings into their grooves and check the side clearances with feeler gauges.

3. Carefully inspect the pistons for wear and damage. Check for fine hairline cracks around the piston pin holes.

4. If any of the pistons are obviously worn, damaged or burnt, the pistons must be replaced. A badly worn top piston ring groove on an otherwise good piston may need to be reamed to accept a thicker ring. If necessary, this can be a ring with a ledge so as not to touch the protrusion at the top of the sleeve. New pistons must match the class of their liners (see previous section). Disconnecting the pistons and connecting rods must be performed by a specialist, since the piston pin has an interference fit in the upper head of the connecting rod.

5. If the engine has not seized or has no serious damage, the connecting rods do not require special attention. It is enough to clean them and inspect them for obvious defects. If there is damage or uneven wear on the pistons, liners or bearings, it is advisable to check the connecting rods for warpage. This work requires special tools and should be performed by a specialist.


6. Before installing new rings on the pistons, it is necessary to measure their clearance in the lock. In principle, the gap should be adjusted at the factory, but if in doubt, you can insert the ring into the sleeve approximately to the middle of its height, check that it is positioned correctly and measure the gap in the lock using feeler gauges. A gap in the range of 0.254-1.016 mm is considered acceptable.

7. When installing new pistons with new piston rings in new liners, the ring gaps can be measured at the top of the liners, since new liners have no taper.

8. Install the lower oil scraper ring on the piston first, and then the second compression ring. This ring has a special chamfer, so it is necessary to ensure that it is installed in the correct position. The mark on the top surface of the ring should point towards the bottom of the piston. The next ring (the top one) can be installed in any position. The rings are installed in the reverse order of their removal. Be very careful, as compression rings are fragile and break easily.
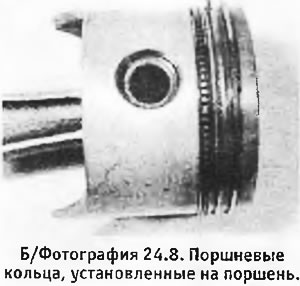
8. Install the lower oil scraper ring on the piston first, and then the second compression ring.…
This article is available at russian, bulgarian, belarusian, ukrainian, serbian, croatian, romanian, polish, slovak, hungarian
Article reviewed by editor: Ostrovsky Fedor
Share information:
Previous
Peugeot 305: Gasoline engines
Next

Cylinder liners — inspection and maintenance
Connecting rod and main bearings — inspection and maintenance
Cylinder head — disassembly, inspection and installation
Oil filter — removal and installation
Lubrication system — description
Timing chain and sprockets — inspection and maintenance
Camshaft and rockers — inspection and maintenance
Oil pump — inspection and maintenance
Intake and exhaust manifolds — inspection
Engine mounts — inspection
See similar information for other Peugeot models

➨ Piston/connecting rod assembly — removal Peugeot 106 (1991-2003)
➨ Connecting rod and piston group — design features Peugeot 206 (1998-2012)
➨ Removal pistons with connecting rods Peugeot 406 (1995-2004)
➨ Pistons and connecting rods — disassembly, inspection and… Peugeot 806 (1994-2002)
Link to this article in different formats
Comments and feedback from visitors
No comments yet


Add two numbers 11 + 42


Peugeot 307 (2001-2008) 
  • User manual
  • Keys, doors and alarm
  • Controls and instruments
  • Driving and operation
  • Maintenance
  • Power unit
  • Petrol engines TU3 and TU5
  • Petrol engines EW10
  • Diesel engines DV10
  • Diesel engines DW10
  • Transmission
  • Clutch and drive shafts
  • Mechanical gearbox
  • Automatic gearbox
  • Chassis, running gear
  • Front suspension
  • Rear suspension
  • Steering
  • Brake system
  • Body and interior
  • Exterior (external elements)
  • Interior (internal elements)
  • Doors, locks and windows
  • Heating and air conditioning
  • Electrical equipment
  • Equipment and devices
  • Power devices
  • Airbags
  • Electrical circuits
Peugeot 306 (1993-2002) 
  • General information
  • Introduction to manual
  • Specifications
  • Gasoline engine
  • Engine repair
  • Lubrication system
  • Cooling system
  • Fuel injection
  • Ignition system
  • Diesel engine
  • Engine repair
  • Lubrication system
  • Cooling system
  • Fuel injection
  • Transmission
  • Clutch
  • Gearbox
  • Drive shafts
  • Chassis, running gear
  • Steering system
  • Front suspension
  • Rear suspension
  • Brake system
  • Electrical equipment
  • Power devices
  • Electrical circuits
Peugeot 305 (1977-1989) 
  • General information
  • Maintenance
  • Power unit
  • Gasoline engines
  • Diesel engines
  • Cooling system (gasoline)
  • Cooling system (diesel)
  • Fuel system (gasoline)
  • Fuel system (diesel)
  • Ignition system
  • Transmission
  • Clutch
  • Mechanical gearbox BB8
  • Mechanical gearbox BE1
  • Automatic gearbox ZF4
  • Shafts, hubs and wheels
  • Chassis, running gear
  • Brake system
  • Car suspension
  • Steering
  • Body and interior
  • Exterior (external elements)
  • Interior (internal elements)
  • Electrical equipment
  • Equipment and devices
  • Headlights and lighting
  • Power devices
  • Electrical circuits
  • Wiring diagrams (diesel)
PeugeotBook.ru © 2018–2026 | Mobile version | Sitemap: EN BG BY UA RS HR RO PL SK HU | Write message | Site search | Add to bookmarks | Peugeot owners
106 (1991-2003) | 206 (1998-2012) | 207 (2006-2014) | 305 (1977-1989) | 306 (1993-2002) | 307 (2001-2008) | 405 (1987-1997) | 406 (1995-2004) | 605 (1989-2000) | Partner-I (1996-2008) | Eurovans-807 (2002-2014) | Eurovans-806 (1994-2002) | J5 (1981-1993) |
Cookies are used to ensure the correct display of pages on the site.