
The system is based on the use of a cartographic database and a global satellite navigation system (GPS), which allows you to determine the location of the vehicle using a system of satellites.
The onboard navigation system consists of the following elements:
- remote control;
- display;
- computer;
- buttons to recall the last audio message;
- CD;
- multipurpose antenna.
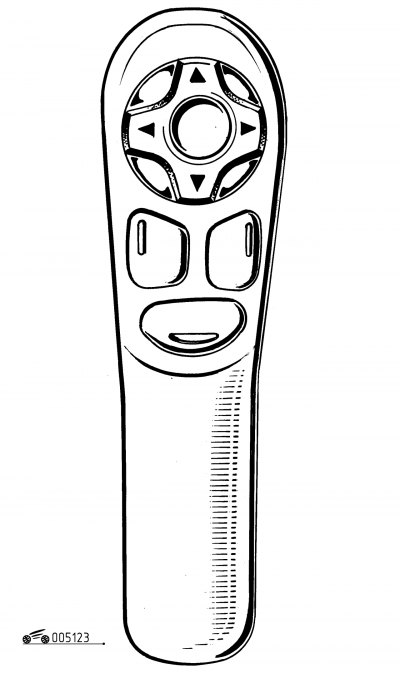
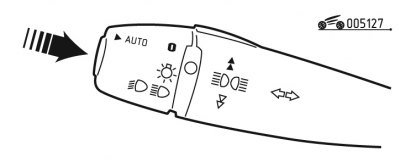
Pic. 1.23. Remote control
Remote control (pic. 1.23) when directed to the display screen, allows you to select the information contained on it in various menus.
The pushbutton arrows allow you to move around the screen and select the desired function.
When the screen is in the arrow receiving mode «up» And «down» allow you to adjust the brightness of the screen. Arrows «to the left» And «right» in hover mode, they allow you to display the full name of the street if it does not fit on the screen.
Button menu allows you to access the main menu. It can be used at any moment.
Button esc when pressed briefly, it allows you to exit the current function and return to the previous screen. By long pressing it (more than 2 s) returns to the receive mode screen.
Button mod allows you to switch modes. When it is pressed briefly, it switches between the modes of entering the date, navigation and receiving a radio signal.
Button val confirms the selected function.
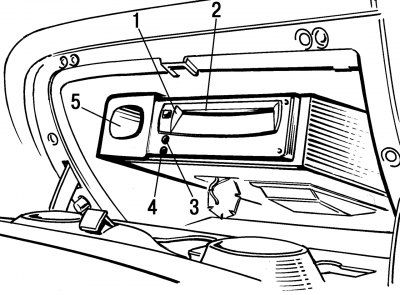
Pic. 1.26. Computer: 1 - CD eject button; 2 - CD-ROM slot; 3 - indicator «ON» («Included»); 4 - indicator «CD» (CD); 5 - a niche for storing the remote control
The remote control is powered by two elements (1.5 V) type LR03. Remote control storage location - glove box niche (see fig. 1.26).
The CD contains map data and is inserted into the computer label side up.
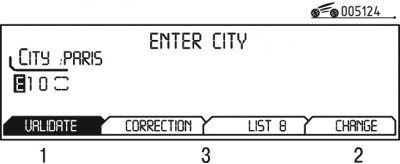
Pic. 1.24. Selecting a function on the display
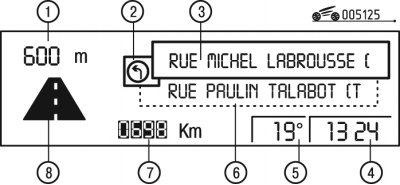
Pic. 1.25. Finding a route on the display: 1 - distance to the nearest maneuver; 2 - the next maneuver to be performed; 3 - name of the traffic street after the maneuver; 4 - current time; 5 - outdoor air temperature; 6 - the name of the street of the current process of movement; 7 - distance to the destination; 8 - maneuver to be performed
The navigation system display picture is shown in fig. 1.24 and 1.25.
When operating the various menus, the functions that appear at the bottom of the screen (pic. 1.24), can have different meanings:
- 1 - selected function;
- 2 - a function that is not available in this situation;
- 3 - features that are available.
Option List («List») allows you to store up to 80 addresses.
Display 10 (see fig. 1.11) on-board computer displayed on the dashboard of the cabin. The computer itself is located in the glove box (pic. 1.26).
Pic. 1.27. Calling up the last audio message
The computer only works when the ignition is on. When the ignition is turned on (ignition key in position «A») and pressing the button (arrow, fig. 1.27) the last voice message is replayed.
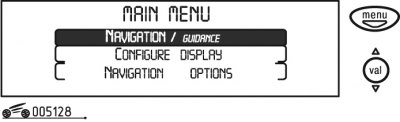
Main menu. To exit to the main menu, turn on the ignition (position «A») and press the Menu button («Menu»).
Pic. 1.28. Selecting the Navigator/Guidance function
Pic. 1.29. Navigator Mode
Choose the desired function (Navigator / Guidance — «Navigation / route search») using the search direction arrows on the remote control, and then confirm the selection by pressing the val button (pic. 1.28).
After selecting the Navigator/Guidance menu, the display changes to Guidance mode (pic. 1.29).
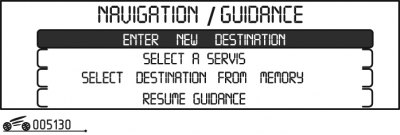
Pic. 1.30. Menu Navigator/ Guidance
To move to the next screen, press the Val button to open the Navigator/Guidance menu (pic. 1.30), which offers various features to enable hover:
- enter the address of the new destination (Enter new destination);
- select the location of services in this city (train station, hotel, airport, etc.) — Select a service;
- select an address stored in memory (Select destination from memory);
- resume route search (Resume guidance), if it was interrupted;
- abort route search (Stop guidance).
Note. Radio operation is temporarily disabled when the system is in the guidance mode.
Entering a new destination. Enter a new destination in the following order:

Pic. 1.31. Destination set
1) select the Enter new destination mode - the last entered city name is displayed on the screen (pic. 1.31);
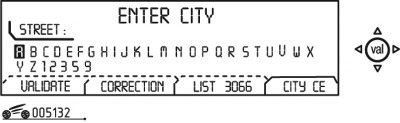
Pic. 1.32. Entering a destination
2) to enter the name of a new city, write its name by selecting letters from the alphabet using the search direction arrows and confirming each selected letter by pressing the Val button. In case of an error, use the Correct function («To correct») to erase the last letter entered (pic. 1.32);
3) List function («List») as you enter the name will show the number of cities whose name begins with the entered letters. When the list is reduced to five names, these cities will automatically be displayed on the display screen. Select the desired city and confirm by pressing the Val button;
4) change function («Change») allows you to completely erase the typed name of the city;
5) after the full name of the city is displayed on the screen, select the Validate function («Confirm») and press the Val button;
Note. In the process of typing the name of the city, after each correctly typed letter, only those letters that are in the name of existing cities will appear.
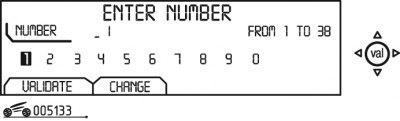
Pic. 1.33. Entering the track number
6) enter the number of the highway, for which select the Validate function («Confirm»), and press Val (pic. 1.33);
Note. You can search for a route automatically - after typing the city, press the Town center function («City center»).
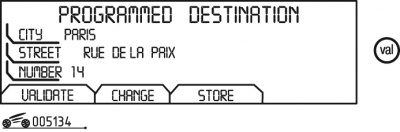
Pic. 1.34. Destination address
7) the full address of the destination appears on the display screen (pic. 1.34);
8) select the Validate function («Confirm») and press the Val button. The name of the entered destination is displayed on the screen;
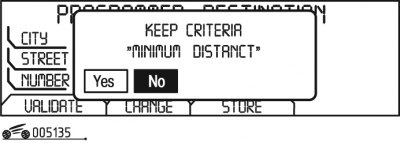
Pic. 1.35. Entering a route search instruction into the system
9) the route search process starts automatically if no button is pressed within 5 s («No») (pic. 1.35). To cancel the route search command, select Yes («Yes») and press the Val button;
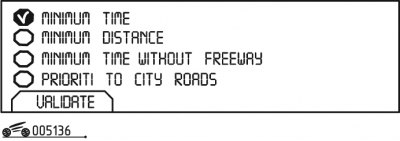
Pic. 1.36. List of criteria
10) while entering a destination, a list of criteria appears on the display screen (pic. 1.36);
11) select one of the criteria given in the list by setting «tick» and pressing the Val button. After the appearance «ticks» select the Validate function («Confirm») and press the Val button;
12) the system completes the entry of the new destination according to the set parameters.
Finding places to provide various services. Search in the following order:
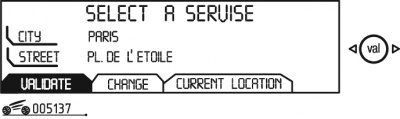
Pic. 1.37. Choice of the place of provision of services
1) select the Select a service mode - the last entered city name is displayed on the screen (pic. 1.37);
2) indicate the name of the place where you need to receive the service; There are three options for this:
- select the last dialed address using the Validate function («Confirm»);
- enter the name of the new city (locality) destination, then the name of the street or select the function Town center («City center»), for which you need to select the Change function («Change»);
- use the location where the car is currently located by selecting the Current location function («Location»);
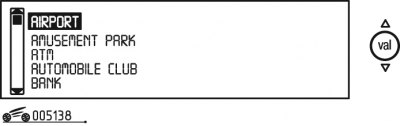
Pic. 1.38. Services provided
3) after confirming the correctness of the address, select the location of the service using the search direction arrows on the remote control (pic. 1.38) and confirm by pressing Val. The cursor on the left side of the screen will indicate where you are in the list;
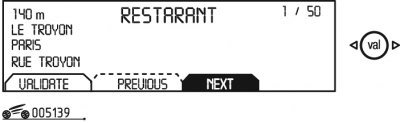
Pic. 1.39. Service point
4) the address of the place where the service was received will appear on the display screen. If there are multiple places (no more than 50) receiving this service within a radius of about 50 km, this is confirmed by the number in the upper right part of the screen (pic. 1.39);
5) using the Next function («Next») or Previous («previous») you can view the proposed list;
6) after the address that suits you is displayed on the screen, select the Validate function («Confirm») and press the Val button;
7) the on-board navigation system starts up following the instructions entered.
Adding a new address to the list. Entering a new address in the list is carried out in the following order:
1) select the Select destination from memory mode, on the display screen in the main menu (see fig. 1.30) the last entered city name is displayed (see fig. 1.31);
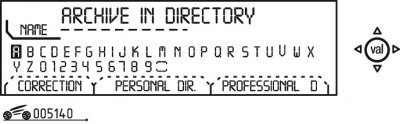
Pic. 1.40. Entering a new address
2) enter the name of the new destination (pic. 1.40) and select the Store function («Save to memory») (see fig. 1.33);
3) select a title for the address entry. If a header for an address entry already exists with some other address, then you can replace the old address with the new one;
4) select Personal dir. (» Personal List») or Professional dir. («Professional List»), and then press the Val button;
5) after that the address will be memorized in the selected list (up to 100 addresses).
Selecting an address from the list. Search for an address in the following order:
1) select the Select destination from memory mode, on the display screen in the main menu (see fig. 1.30) Personal dir is displayed. (» Personal List») or Professional dir. («Professional List»);
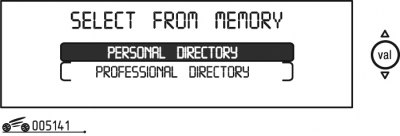
Pic. 1.41. Address list
2) select the required list (pic. 1.41) and press the Val button;
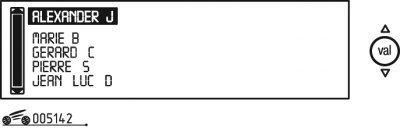
Pic. 1.42. Subscriber addresses
3) a specific list of subscribers' addresses will be displayed on the screen (pic. 1.42), entered into memory. The cursor on the left side of the screen will tell you which part of the list you are on;
4) select the destination and press the Val button, the full address will be displayed on the screen;
5) select the Validate function («Confirm») and press the Val button;
6) the on-board navigation system begins to work on laying the route according to the received data.
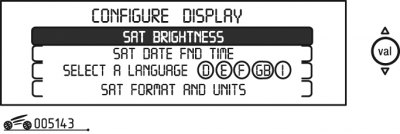
Pic. 1.43. Configure display menu («Display configuration»)
Display configuration. In addition to the main menu, there is also a Configure display menu («Display configuration») (pic. 1.43), which allows you to do the following:
- adjust screen brightness;
- set the date and time;
- select the language for displaying messages on the screen and sound messages;
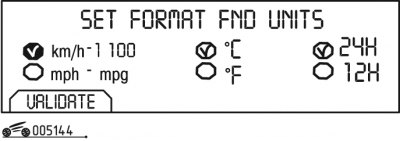
Pic. 1.44. Formats and units
- - set formats and units of measurement (pic. 1.44).
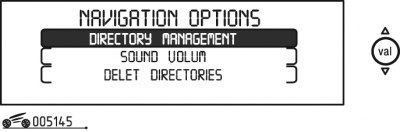
Pic. 1.45. Navigator options menu («Additional navigation options»)
Additional navigation options. When moving from the main menu to the Navigator options menu («Additional navigation options») (pic. 1.45) you can do the following:
- enter new data in both lists;
- adjust the volume level of the speech synthesizer;
- erase data from both lists.
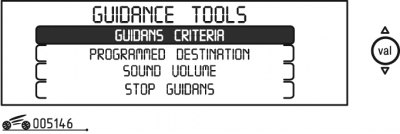
Pic. 1.46. Guidance tools menu («Route finders»)
Route search tools. To access the Guidance tools menu («Route finders») (pic. 1.46) press the Val button during the pointing process.
Entering the Guidance tools menu «Route finders» allows:
- 1) change the current route search criterion - Guidance criteria;
- 2) display or change the specified destination - Programmed destination;
- 3) adjust the volume level of the speech synthesizer - Sound volume;
- 4) stop the current guidance process - Stop guidance.