
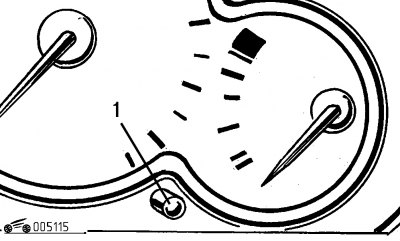
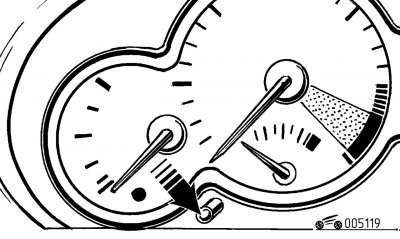
Pic. 1.15. Turning on the odometer
The odometer displays the readings on the instrument panel display when the ignition key is turned to «A» and pressing button 1 (pic. 1.15) in the instrument cluster. By alternately pressing the button, the display shows the total or daily mileage of the vehicle.
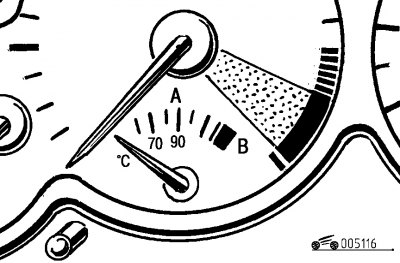
Pic. 1.16. Coolant temperature gauge
Analog coolant temperature gauge (turnout) type (pic. 1.16)
Two sectors are highlighted on the instrument scale - common A and red B. When the arrow is in sector A, the engine has a normal operating temperature. The presence of the arrow in the red sector B indicates that the engine is overheated.
The central fault indicator also serves to monitor the thermal state of the engine «Stop», which starts flashing when the coolant overheats.
Stop the vehicle, let the engine cool down, check the coolant level and find the cause of the coolant overheating.

Pic. 1.17. Oil temperature gauge
Analog engine oil temperature gauge (turnout) type (pic. 1.17).
Two sectors are highlighted on the instrument scale - common C and red D. When the arrow is in sector C, the engine has a normal operating oil temperature. The movement should occur at normal revolutions and speeds. The presence of the arrow in the red sector D indicates that the oil in the engine is overheated.
Reduce the speed of the vehicle or stop it, let the engine cool down, check the oil level and identify the cause of its overheating.
Multifunction display 10 (see fig. 1.11) located on the instrument panel, after turning on the ignition, it is designed to sequentially perform three functions:
- mileage indicator until the next maintenance (THAT);
- engine oil level indicator;
- odometer (general and daily).
After the ignition is turned on, the oil level indicator lights up for about 10 seconds, following the mileage indicator until the next MOT.
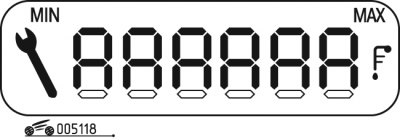
Pic. 1.18. Oil gauge
Display shows (pic. 1.18):
- maximum oil level to be checked with the dipstick (Exceeding the maximum level can lead to engine failure);
- the minimum oil level that must be checked with a dipstick, while after stopping the engine, 10-15 minutes should pass (lowering the minimum level can also lead to engine failure);
- oil level sensor failure is confirmed by six flashing segments.
Tachometer 24 (see fig. 1.12) analog (turnout) type allows you to visually control the speed of the engine crankshaft.
Attention! Avoid finding the arrow in the red range of the instrument scale.
Fuel gauge 26 (see fig. 1.12) analog (turnout) type. To check the operability of the device, an indicator is provided that lights up for a while when the ignition is turned on. If the lamp is constantly on, this indicates that about 5 liters of fuel remain in the car's tank.
The accuracy of the readings of the device depends on the inclination of the car, so you must always have a supply of fuel and do not use it up to «dry» tank, which can lead to failure of the engine power supply system.
Pic. 1.19. Dashboard lighting intensity control
Instrument cluster lighting intensity control - changes the brightness of the lighting in the instrument cluster and multifunction display. To do this, turn on the outdoor lighting and press the button (pic. 1.19).
Upon reaching the minimum (or maximum) release the button and then press it again to increase (or reduce) lighting. Release the button when the desired result is achieved.
By pressing the 9 key (see fig. 1.11.) The hazard warning light turns on all direction indicators, which start flashing after it is pressed.
Information acquisition system
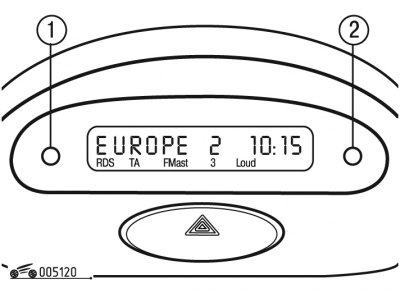
Pic. 1.20. Type A display
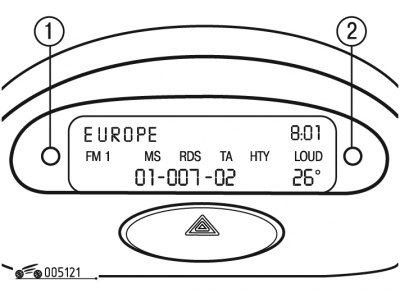
Pic. 1.21. Type B display
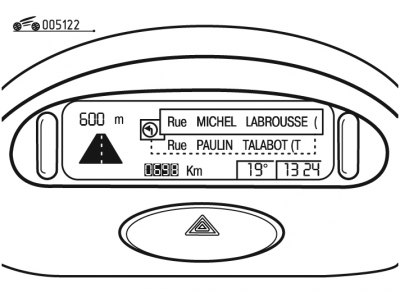
Pic. 1.22. Type C display
Several types of displays are installed on the Peugeot 206 car - A (pic. 1.21) and C (pic. 1.22).
The parameter status is displayed in both alphanumeric and graphic form.
Type A display
The information acquisition system works with the ignition on and allows you to get the following information:
- time;
- date of;
- ambient air temperature;
- indicator of the operating mode of the car radio;
- body door position (their discovery);
- alarm message.
Each press of button 1 (see fig. 1.20) allows «flip through» parameters in the following order:
- the language of the displayed information;
- watch (12 or 24 hour display mode);
- minutes;
- year;
- month;
- day;
- temperature (Fahrenheit or Celsius).
By holding down button 1 for 2 seconds, you can access the adjustments, the selected parameter starts flashing and can be changed.
A short press on button 2 allows you to change the value of the selected parameter. To quickly change the value, hold down button 2, and after reaching the maximum value, the adjustable parameter returns to zero and starts increasing again.
If no action is taken within 7 seconds, the display will return to normal mode with all new adjustments stored in memory.
A short press on button 2 allows you to get information about the outside temperature within a few seconds.
Type B display
The information acquisition system works with the ignition on and allows you to get the following information:
- time;
- date of;
- ambient air temperature;
- indicator of the operating mode of the car radio;
- body door position (their discovery);
- alarm message;
- on-board computer information.
Each press of button 1 (see fig. 1.21) allows «flip through» parameters in the following order to adjust:
- the language of the displayed information;
- speed units (km/h or mph);
- temperature (Fahrenheit or Celsius);
- time format (12 or 24 hour display mode);
- watch;
- minutes;
- year;
- month;
- number.
By holding down button 1 for 2 seconds, you can access the settings; the selected parameter starts flashing and can be changed.
A short press of button 2 allows you to change the value of the selected parameter in steps. To quickly change the value, it is necessary to keep button 2 pressed, after reaching the maximum value, the adjustable parameter returns to zero and starts increasing again.
If no action is taken within 7 seconds, the display will return to normal mode with all new adjustments stored in memory.
Type C display
The information acquisition system works with the ignition on and allows you to get the following information:
- time;
- date of;
- ambient air temperature;
- indicator of the operating mode of the car radio;
- body door position (opening is indicated by a pictogram);
- alarm message;
- on-board computer information;
- information from the onboard navigation system.
Adjustments are made using the remote control. Alarm messages can be cleared by pressing the acknowledge button on the remote control.