
English Русский
Български
Беларускі
Український
Српски
Hrvatski
Română
Polski
Slovenský
Magyar
Bookmark Articles Sitemap Contacts
Company Hyundai Company Opel Company Skoda Company Kia Company Mitsubishi Company LADA Company Audi
PeugeotBook.ru


Series 100   Series 200   Series 300   400-500   Series 600   Crossovers   Others
 
Peugeot 305 (1977-1989) Peugeot 306 (1993-2002) Peugeot 307 (2001-2008)

Injectors — checking, removal and installation (Peugeot 306)

  • Main
  • 30X
  • Peugeot 306 (1993-2002)
  • Diesel engine
  • Fuel injection
  • Injectors — checking, removal and installation
0
Injectors are tested under pressure and repaired in a specialized workshop. These works should never be carried out independently, since in addition to the need for a special tool, there is a risk of injury from the injection pressure of the injectors if your fingers get caught in the injection cone.

Depending on the engine type and fuel injection device, different types of injectors are installed. Bosch fuel injection system injectors are not the same for all engine types. The nozzles are color-coded on the holders. Injectors operating in the Lucas system are marked green. If the engine has an exhaust gas recirculation system, then the injectors have a green plastic ring on the top side (which cannot be removed). Bosch fuel injection device injectors are also not the same on all engine types and may have silver, purple or blue markings on the injector holder. The marking is visible even without removing the injector. Figure 419 shows the Lucas injector markings. The Bosch injector is color-coded only at location (1).
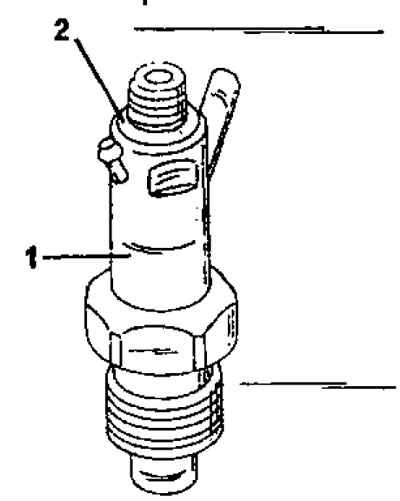
Figure 419. Lucas injector markings (Rato-Diesel or Con-Diesel) in place (1). The plastic ring is…

Figure 419. Lucas injector markings (Rato-Diesel or Con-Diesel) in place (1). The plastic ring is installed only on vehicles with an exhaust gas recirculation system. On the Bosch injector, the color marking is applied only in place (1).


To identify a faulty injector, you should disconnect the injection tubes one by one and start the engine. If removing a specific injection pipe does not change the engine operation, the corresponding injector is not working.

The injector is removed as follows:
  • Unscrew the injection pipe. The most convenient way to loosen the union nut is with a slotted open-end wrench. Disconnect the fuel return hose from the injector.
  • Screw in the nozzle rod. This can be done with either a 27mm socket or a special tool used at Peugeot service stations. A special Citroen 7007-T tool is also suitable. Remove the spark arrestor washer and copper washer (see Figure 420). During installation, both washers must be replaced.
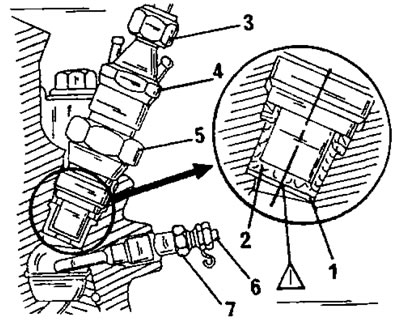
Figure 420. Installed injector. 1. Copper washer; 2. Spark arrester washer; 3. Union nut; 4. Nozzle…

Figure 420. Installed injector. 1. Copper washer; 2. Spark arrester washer; 3. Union nut; 4. Nozzle rod; 5. Hexagon 27 mm, 90 nm; 6. Glow plug, 22 nm; 7. Glow plug hexagon


Installation is carried out in reverse order. The spark arrester washer (2) in Figure 420 is installed with the rounded side facing up. Install the copper washer (1). Tighten the injector stem to a torque of 90 Nm; the union nut of the injection tube with a tightening torque of 20 Nm.
This article is available at russian, bulgarian, belarusian, ukrainian, serbian, croatian, romanian, polish, slovak, hungarian
Article reviewed by editor: Shirokov Arseny
Share information:
Previous
Peugeot 306: Fuel injection
Next

Removal and installation a Bosch pump
Removal and installation a Lucas pump
High pressure fuel pump
Fuel filter
Precautions when working with fuel injection devices
Glow plugs
Adjusting the high-pressure fuel pump
Bosch high-pressure fuel pump (except turbodiesel engines)
Bosch high-pressure fuel pump (turbo diesel engine)
Lucas high pressure fuel pump
See similar information for other Peugeot models

➨ Valve clearances (8-valve engines) — checking and adjustment Peugeot 106 (1991-2003)
➨ Checking tire pressure Peugeot 207 (2006-2014)
➨ Checking the transmission oil level (10,000 km/6 months) Peugeot 405 (1987-1997)
➨ Engine Oil Level — Checking and Replacing Peugeot 605 (1989-2000)
➨ Injectors — checking, removal and installation Peugeot J5 (1981-1993)
Link to this article in different formats
Comments and feedback from visitors
No comments yet


Add two numbers 30 + 17


Peugeot 307 (2001-2008) 
  • User manual
  • Keys, doors and alarm
  • Controls and instruments
  • Driving and operation
  • Maintenance
  • Power unit
  • Petrol engines TU3 and TU5
  • Petrol engines EW10
  • Diesel engines DV10
  • Diesel engines DW10
  • Transmission
  • Clutch and drive shafts
  • Mechanical gearbox
  • Automatic gearbox
  • Chassis, running gear
  • Front suspension
  • Rear suspension
  • Steering
  • Brake system
  • Body and interior
  • Exterior (external elements)
  • Interior (internal elements)
  • Doors, locks and windows
  • Heating and air conditioning
  • Electrical equipment
  • Equipment and devices
  • Power devices
  • Airbags
  • Electrical circuits
Peugeot 306 (1993-2002) 
  • General information
  • Introduction to manual
  • Specifications
  • Gasoline engine
  • Engine repair
  • Lubrication system
  • Cooling system
  • Fuel injection
  • Ignition system
  • Diesel engine
  • Engine repair
  • Lubrication system
  • Cooling system
  • Fuel injection
  • Transmission
  • Clutch
  • Gearbox
  • Drive shafts
  • Chassis, running gear
  • Steering system
  • Front suspension
  • Rear suspension
  • Brake system
  • Electrical equipment
  • Power devices
  • Electrical circuits
Peugeot 305 (1977-1989) 
  • General information
  • Maintenance
  • Power unit
  • Gasoline engines
  • Diesel engines
  • Cooling system (gasoline)
  • Cooling system (diesel)
  • Fuel system (gasoline)
  • Fuel system (diesel)
  • Ignition system
  • Transmission
  • Clutch
  • Mechanical gearbox BB8
  • Mechanical gearbox BE1
  • Automatic gearbox ZF4
  • Shafts, hubs and wheels
  • Chassis, running gear
  • Brake system
  • Car suspension
  • Steering
  • Body and interior
  • Exterior (external elements)
  • Interior (internal elements)
  • Electrical equipment
  • Equipment and devices
  • Headlights and lighting
  • Power devices
  • Electrical circuits
  • Wiring diagrams (diesel)
PeugeotBook.ru © 2018–2026 | Mobile version | Sitemap: EN BG BY UA RS HR RO PL SK HU | Write message | Site search | Add to bookmarks | Peugeot owners
106 (1991-2003) | 206 (1998-2012) | 207 (2006-2014) | 305 (1977-1989) | 306 (1993-2002) | 307 (2001-2008) | 405 (1987-1997) | 406 (1995-2004) | 605 (1989-2000) | Partner-I (1996-2008) | Eurovans-807 (2002-2014) | Eurovans-806 (1994-2002) | J5 (1981-1993) |
Cookies are used to ensure the correct display of pages on the site.