English Русский
Български
Беларускі
Український
Српски
Hrvatski
Română
Polski
Slovenský
Magyar
Bookmark Articles Sitemap Contacts
Company Hyundai Company Opel Company Skoda Company Kia Company Mitsubishi Company LADA Company Audi
PeugeotBook.ru


Series 100   Series 200   Series 300   400-500   Series 600   Crossovers   Others
 
Peugeot 305 (1977-1989) Peugeot 306 (1993-2002) Peugeot 307 (2001-2008)

Replacing the steering rod (Peugeot 307)

  • Main
  • 30X
  • Peugeot 307 (2001-2008)
  • Chassis, running gear
  • Steering
  • Replacing the steering rod
0
To remove the steering rod:
  • place the car on a lift and remove the front wheels;
  • loosen the wheel alignment nut on the valve timing gear side;
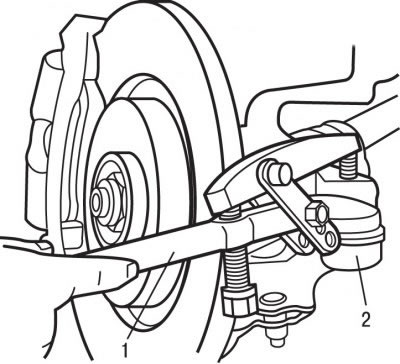
Figure 7.21. Using a puller (1) to remove the ball joint (2) of the tie rod end from the steering…

Figure 7.21. Using a puller (1) to remove the ball joint (2) of the tie rod end from the steering knuckle

  • unscrew nut 2 (see Figure 7.21) fastening the ball joint journal of the tie rod end to the steering knuckle, being careful not to damage the protective boot of the constant velocity joint of the drive shaft;
  • using puller 1, remove the ball joint from the steering knuckle;
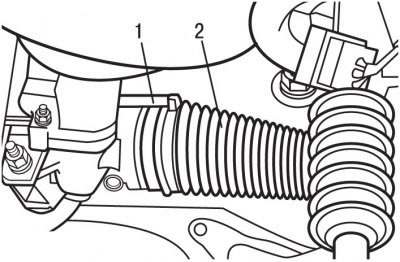
Figure 7.22. Connection point of the ventilation tube (1) to the protective cover (2)

Figure 7.22. Connection point of the ventilation tube (1) to the protective cover (2)

  • disconnect the ventilation tube 1 from the protective cover 2 (see Figure 7.22);
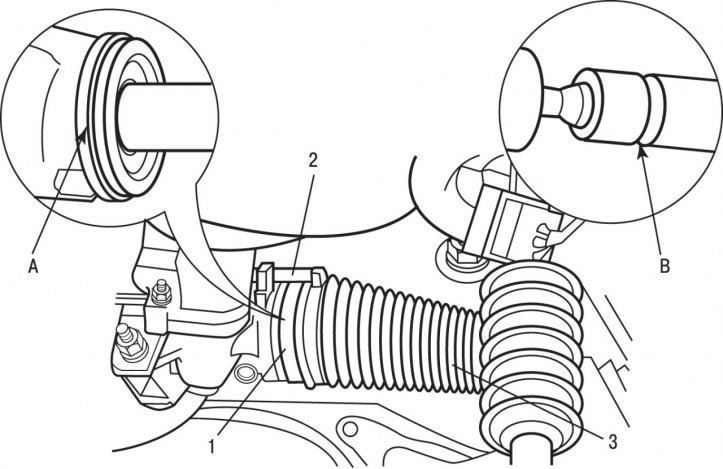
Figure 7.27. Fastening the steering rod protective cover: 1 - clamp; 2 - ventilation tube; 3 -…

Figure 7.27. Fastening the steering rod protective cover: 1 - clamp; 2 - ventilation tube; 3 - protective cover; A - supporting surface of the protective cover on the steering gear; B - supporting surface of the protective cover on the steering rod


  • remove clamp 1 (see Figure 7.27) fastening the protective cover to the steering rod;
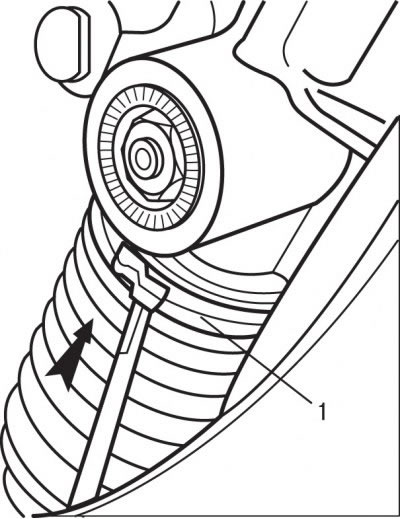
Figure 7.24. Location of the clamp (1) securing the protective cover to the steering gear

Figure 7.24. Location of the clamp (1) securing the protective cover to the steering gear

  • remove clamp 1 (see Figure 7.24) fastening the protective cover to the steering gear;
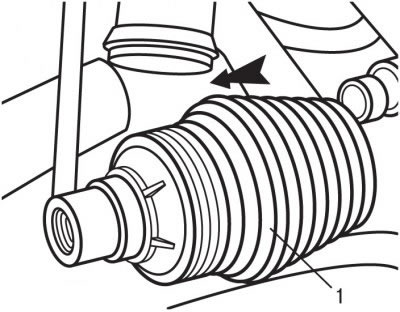
Figure 7.25. Removing the protective cover (1) of the steering rod

Figure 7.25. Removing the protective cover (1) of the steering rod

  • remove protective cover 1 by sliding it along the steering rod (see Figure 7.25). To make it easier to slide the protective cover, apply a thin layer of TOTAL N3924/N3945 grease to the steering rod;
  • turn the front wheels all the way to the left, then turn the steering wheel back about 1/8 of a turn;
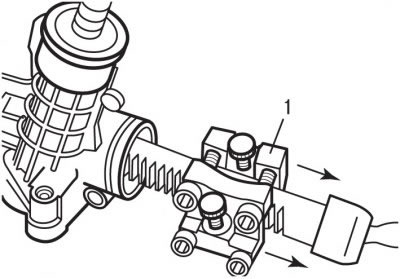
Figure 7.28. Special device 0721-B (1) installed on the toothed rack

Figure 7.28. Special device 0721-B (1) installed on the toothed rack


  • install special tool 0721-B 1 (figure 7.28) as close to the edge of the rack as possible and so that the hinge supports rest on the mechanical elements (sub-frame, anti-roll bar, etc.). Device 1 protects the steering gear from damage during removal of the steering rod;
  • remove the tie rod end;

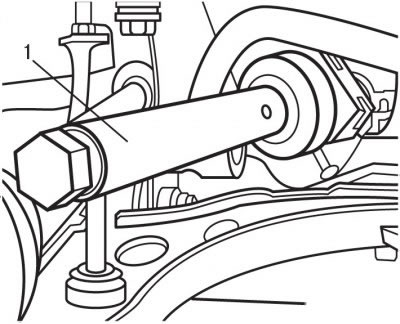
Figure 7.29. Installing the 0721-A roller wrench (1) instead of the tie rod end to remove the tie…

Figure 7.29. Installing the 0721-A roller wrench (1) instead of the tie rod end to remove the tie rod

  • instead of the steering rod end, install the key with roller 0721-A 1 (figure 7.29) and remove the steering rod.

Attention! On left-hand drive vehicles, special tool 0721-B should be installed on the rack teeth on the left side.


To install the steering rod:
  • secure the steering rod to the toothed rack;
  • instead of the tie rod end, install the 0721-A roller wrench and tighten the tie rod to a torque of 80 Nm;
  • remove the 0721-A roller wrench from the steering rod;
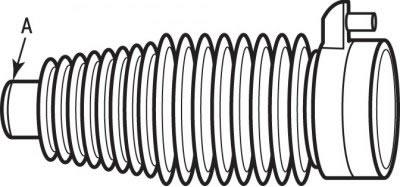
Figure 7.26. Support surface (A) of the protective cover installed on the steering rod

Figure 7.26. Support surface (A) of the protective cover installed on the steering rod


  • apply a thin layer of TOTAL N3924/TOTAL N3945 grease to the surface of the protective cover A (see Figure 7.26), mounted on the steering rod;
  • by placing it through the steering rod, install the protective cover on the steering gear. Align the supporting surfaces of the protective boot 3 on the steering gear A and steering rod B (see Figure 7.27);
  • secure with clamp 1 (see Figure 7.27) protective cover on the steering gear;
  • connect the ventilation tube 2 (see Figure 7.27) to the protective case;
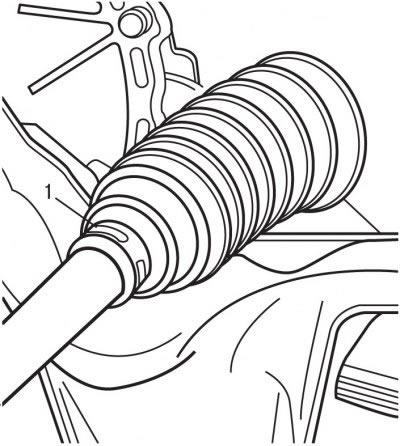
Figure 7.23. Location of the clamp (1) securing the protective cover to the steering rod

Figure 7.23. Location of the clamp (1) securing the protective cover to the steering rod

  • secure the protective cover with a clamp 1 (see Figure 7.23) on the steering rod;
  • further installation is carried out in the reverse order of removal;
  • adjust the wheel alignment;
  • using the DIAG 2000 diagnostic tool, adjust the steering wheel angle sensor.
This article is available at russian, bulgarian, belarusian, ukrainian, serbian, croatian, romanian, polish, slovak, hungarian
Article reviewed by editor: Sidorov Timofey
Share information:
Previous
Peugeot 307: Steering
Next

Replacing the steering rod protective boot
Replacing the distribution valve
Adjusting the rack stop
Replacing the rack stop
Replacing the steering gear
Replacing the electric power steering pump unit
Replacing fluid and bleeding air from the power steering…
Front wheel alignment angles
See similar information for other Peugeot models

➨ Steering and suspension check Peugeot 106 (1991-2003)
➨ Replacing the battery Peugeot 207 (2006-2014)
➨ Replacing the steering gear protective covers Peugeot 405 (1987-1997)
➨ Steering wheel Peugeot 605 (1989-2000)
➨ Replacing the steering shaft Peugeot J5 (1981-1993)
Link to this article in different formats
Comments and feedback from visitors
No comments yet


Add two numbers 19 + 17


Peugeot 307 (2001-2008) 
  • User manual
  • Keys, doors and alarm
  • Controls and instruments
  • Driving and operation
  • Maintenance
  • Power unit
  • Petrol engines TU3 and TU5
  • Petrol engines EW10
  • Diesel engines DV10
  • Diesel engines DW10
  • Transmission
  • Clutch and drive shafts
  • Mechanical gearbox
  • Automatic gearbox
  • Chassis, running gear
  • Front suspension
  • Rear suspension
  • Steering
  • Brake system
  • Body and interior
  • Exterior (external elements)
  • Interior (internal elements)
  • Doors, locks and windows
  • Heating and air conditioning
  • Electrical equipment
  • Equipment and devices
  • Power devices
  • Airbags
  • Electrical circuits
Peugeot 306 (1993-2002) 
  • General information
  • Introduction to manual
  • Specifications
  • Gasoline engine
  • Engine repair
  • Lubrication system
  • Cooling system
  • Fuel injection
  • Ignition system
  • Diesel engine
  • Engine repair
  • Lubrication system
  • Cooling system
  • Fuel injection
  • Transmission
  • Clutch
  • Gearbox
  • Drive shafts
  • Chassis, running gear
  • Steering system
  • Front suspension
  • Rear suspension
  • Brake system
  • Electrical equipment
  • Power devices
  • Electrical circuits
Peugeot 305 (1977-1989) 
  • General information
  • Maintenance
  • Power unit
  • Gasoline engines
  • Diesel engines
  • Cooling system (gasoline)
  • Cooling system (diesel)
  • Fuel system (gasoline)
  • Fuel system (diesel)
  • Ignition system
  • Transmission
  • Clutch
  • Mechanical gearbox BB8
  • Mechanical gearbox BE1
  • Automatic gearbox ZF4
  • Shafts, hubs and wheels
  • Chassis, running gear
  • Brake system
  • Car suspension
  • Steering
  • Body and interior
  • Exterior (external elements)
  • Interior (internal elements)
  • Electrical equipment
  • Equipment and devices
  • Headlights and lighting
  • Power devices
  • Electrical circuits
  • Wiring diagrams (diesel)
PeugeotBook.ru © 2018–2026 | Mobile version | Sitemap: EN BG BY UA RS HR RO PL SK HU | Write message | Site search | Add to bookmarks | Peugeot owners
106 (1991-2003) | 206 (1998-2012) | 207 (2006-2014) | 305 (1977-1989) | 306 (1993-2002) | 307 (2001-2008) | 405 (1987-1997) | 406 (1995-2004) | 605 (1989-2000) | Partner-I (1996-2008) | Eurovans-807 (2002-2014) | Eurovans-806 (1994-2002) | J5 (1981-1993) |
Cookies are used to ensure the correct display of pages on the site.