
English Русский
Български
Беларускі
Український
Српски
Hrvatski
Română
Polski
Slovenský
Magyar
Bookmark Articles Sitemap Contacts
Company Hyundai Company Opel Company Skoda Company Kia Company Mitsubishi Company LADA Company Audi
PeugeotBook.ru


Series 100   Series 200   Series 300   400-500   Series 600   Crossovers   Others
 
Peugeot 305 (1977-1989) Peugeot 306 (1993-2002) Peugeot 307 (2001-2008)

Removal and installation rear wheel suspension (Peugeot 306)

  • Main
  • 30X
  • Peugeot 306 (1993-2002)
  • Chassis, running gear
  • Rear suspension
  • Removal and installation rear wheel suspension
0
  • Remove the handbrake lever cover from the vehicle interior, unscrew the lock nuts and adjusting nuts from the ends of the handbrake cables, and pull the handbrake cables out of the swivel rollers. Figure 235 shows the fastening of the handbrake lining and cables.
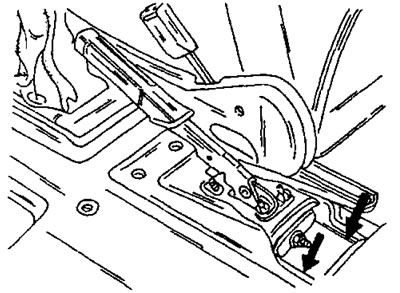
Figure 235. Removing the handbrake cables. Unscrew both cables from the cable equalizer lever.
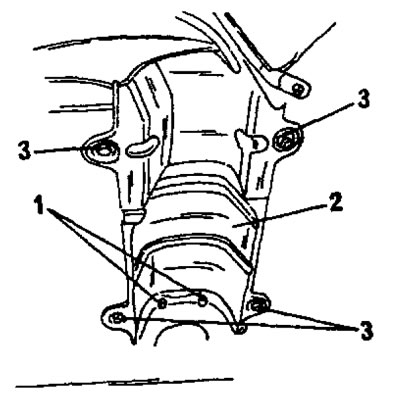
Figure 235. Removing the handbrake cables. Unscrew both cables from the cable equalizer lever.


Figure 236. Rear section of the exhaust system. Unscrew the specified parts. 1. Nuts; 2. Thermal…

Figure 236. Rear section of the exhaust system. Unscrew the specified parts. 1. Nuts; 2. Thermal insulation shield; 3. Nuts

  • Remove the floor mat in the luggage compartment and use a screwdriver to remove the plugs on the left and right sides of the luggage compartment floor.
  • If possible, drive onto an overpass or into a pit and remove the entire rear section of the exhaust system. The parts to be removed are shown in Figure 236. Otherwise, raise the vehicle as high as possible to allow work underneath the vehicle. Unscrew the heat-insulating shield. Release the outer ends of the handbrake cables from the guides at the same time.
  • Knock out the spring clips securing the brake hoses on the right and left sides and unscrew the hoses from the brake pipes. Close the ends of the hoses and tubes with appropriate plugs.
  • Unscrew the nuts and remove the large heat-insulating shield.
  • Place a jack under the center of the rear axle and lift the axle, tightening the wheel suspension.
  • Unscrew the nuts and washers securing the rear wheel suspension from the luggage compartment side. This work must be carried out on both sides of the bridge. The bridge is secured on both sides as shown in Figure 237.
  • After this, slowly lower the jack until the studs come out of the axle mount and rubber support and pull the rear axle back.
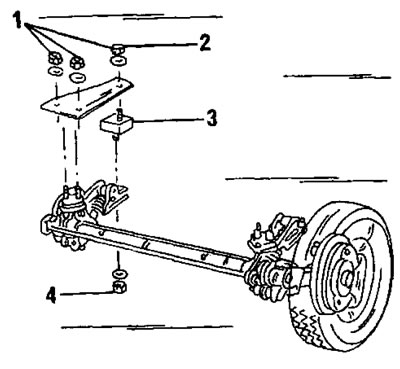
Figure 237. Rear wheel suspension mounting. 1. Nuts, 55 nm; 2. Nuts, 45 nm; 3. Rubber support; 4.…

Figure 237. Rear wheel suspension mounting. 1. Nuts, 55 nm; 2. Nuts, 45 nm; 3. Rubber support; 4. Nuts


Source of the article is website (peugeotbook.ru)

The installation of the assembled rear wheel suspension is carried out as follows:
  • If necessary, replace and secure the rubber support (3) in Figure 237 with the lower nut (4).
  • Place the rear axle on a roller jack, move it under the car and slowly lift it. When raising the axle, make sure that the brake pipes are not pinched between the axle and the body. Raise the bridge until the studs come out from the inside of the luggage compartment. The body must fit tightly against the rear axle linings.
  • Place washers on the studs in the luggage compartment.
  • Screw the nuts onto the studs and tighten them one by one. Two adjacent nuts are tightened to a torque of 45 Nm, and a single nut is tightened to a torque of 55 Nm. To avoid errors, refer to Figure 238.
  • Connect the brake hoses to the brake pipes. When tightening the union nut, hold the hexagon of the brake hose. Secure the brake pipes to the body on both sides with spring clips.
  • Install the exhaust system.
  • Secure the outer ends of the handbrake cables to the bottom. To ensure that the tips are securely fastened to the bottom, pull them back firmly. If the cables are not securely fastened, problems may arise later when adjusting the handbrake,
  • Connect the handbrake cables to the handbrake lever and adjust the handbrake following the instructions section 13.8.
  • Remove air from the brake system (section 13.7).
  • Lower the vehicle and tighten the wheel nuts to 85 Nm.
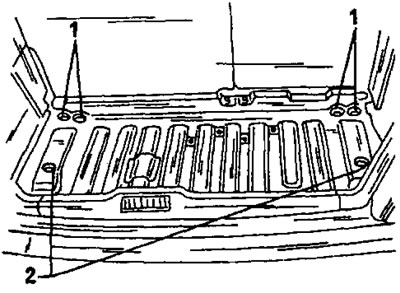
Figure 238. Tightening of the rear wheel suspension mount is carried out in the luggage…

Figure 238. Tightening of the rear wheel suspension mount is carried out in the luggage compartment. The tightening torque for nuts (1) is 55 Nm, and for nuts (2) – 45 Nm.
This article is available at russian, bulgarian, belarusian, ukrainian, serbian, croatian, romanian, polish, slovak, hungarian
Article reviewed by editor: Shirokov Arseny
Share information:
Previous
Peugeot 306: Rear suspension
Next

Rear wheel hubs and wheel bearings
Rear axle and rear wheel suspension
Trailing arms — removal and installation
Torsion bars — removal and installation
Vehicle clearance
Shock absorbers — removal and installation
Anti-roll bar
See similar information for other Peugeot models

➨ Rear suspension assembly — general Peugeot 106 (1991-2003)
➨ Features of front suspension wheel bearings Peugeot 207 (2006-2014)
➨ Rear suspension — design description Peugeot 405 (1987-1997)
➨ Rear wheel suspension — removal and installation Peugeot 605 (1989-2000)
➨ Rear axle and rear wheel suspension Peugeot J5 (1981-1993)
Link to this article in different formats
Comments and feedback from visitors
No comments yet


Add two numbers 45 + 32


Peugeot 307 (2001-2008) 
  • User manual
  • Keys, doors and alarm
  • Controls and instruments
  • Driving and operation
  • Maintenance
  • Power unit
  • Petrol engines TU3 and TU5
  • Petrol engines EW10
  • Diesel engines DV10
  • Diesel engines DW10
  • Transmission
  • Clutch and drive shafts
  • Mechanical gearbox
  • Automatic gearbox
  • Chassis, running gear
  • Front suspension
  • Rear suspension
  • Steering
  • Brake system
  • Body and interior
  • Exterior (external elements)
  • Interior (internal elements)
  • Doors, locks and windows
  • Heating and air conditioning
  • Electrical equipment
  • Equipment and devices
  • Power devices
  • Airbags
  • Electrical circuits
Peugeot 306 (1993-2002) 
  • General information
  • Introduction to manual
  • Specifications
  • Gasoline engine
  • Engine repair
  • Lubrication system
  • Cooling system
  • Fuel injection
  • Ignition system
  • Diesel engine
  • Engine repair
  • Lubrication system
  • Cooling system
  • Fuel injection
  • Transmission
  • Clutch
  • Gearbox
  • Drive shafts
  • Chassis, running gear
  • Steering system
  • Front suspension
  • Rear suspension
  • Brake system
  • Electrical equipment
  • Power devices
  • Electrical circuits
Peugeot 305 (1977-1989) 
  • General information
  • Maintenance
  • Power unit
  • Gasoline engines
  • Diesel engines
  • Cooling system (gasoline)
  • Cooling system (diesel)
  • Fuel system (gasoline)
  • Fuel system (diesel)
  • Ignition system
  • Transmission
  • Clutch
  • Mechanical gearbox BB8
  • Mechanical gearbox BE1
  • Automatic gearbox ZF4
  • Shafts, hubs and wheels
  • Chassis, running gear
  • Brake system
  • Car suspension
  • Steering
  • Body and interior
  • Exterior (external elements)
  • Interior (internal elements)
  • Electrical equipment
  • Equipment and devices
  • Headlights and lighting
  • Power devices
  • Electrical circuits
  • Wiring diagrams (diesel)
PeugeotBook.ru © 2018–2026 | Mobile version | Sitemap: EN BG BY UA RS HR RO PL SK HU | Write message | Site search | Add to bookmarks | Peugeot owners
106 (1991-2003) | 206 (1998-2012) | 207 (2006-2014) | 305 (1977-1989) | 306 (1993-2002) | 307 (2001-2008) | 405 (1987-1997) | 406 (1995-2004) | 605 (1989-2000) | Partner-I (1996-2008) | Eurovans-807 (2002-2014) | Eurovans-806 (1994-2002) | J5 (1981-1993) |
Cookies are used to ensure the correct display of pages on the site.