



Recommendations for removing the power unit
Please read this section carefully before you begin.
If the engine is removed for repair, it is necessary to select a location for the work, provide space for servicing and storing spare parts. It is recommended that repairs be carried out at a service station or in a garage with a level, horizontal floor covered with a clean, hard surface.
Before removal, clean and wash the engine and engine compartment. To remove, use a lifting mechanism that allows you to safely lift the power unit.
If you are removing the power unit for the first time, you should invite an experienced specialist. Some jobs should be done with an assistant.
All clamps and clips that are damaged or cut during engine removal are replaced with new ones during engine assembly.
Depending on the year of manufacture and the vehicle's configuration, electrical wires, pipes, and hoses may be located differently in the engine compartment. Therefore, before disconnecting contact connectors and disconnecting pipes or hoses, it is recommended to mark them with adhesive tape.
The drained coolant must be collected and disposed of.
Removal
Place the vehicle on a two-post lift.
Open the hood to the service position and secure it with the bolt and nut.
Disconnect the wires from the battery.
Remove the decorative covers.
Remove the engine compartment soundproofing panels.
Remove the plastic cross member of the amplifier.
Remove the two wheel arch mudguards.
From under the left front wheel arch, unscrew the battery support mounting bolt.
Remove the battery.
Remove the battery support.
Drain the coolant from the engine cooling system.
Drain the oil from the gearbox.
Drain the engine oil from the engine.
Remove the front bumper.
Remove the headlights.
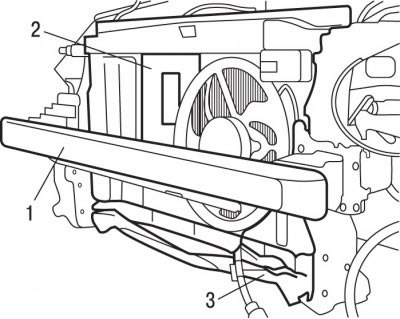
Figure 4.1. Location of the front panel crossbar (1), the cooling cassette assembly (2) together with the radiator and the lower crossbar (3) of the front panel
Remove cross member 1 (figure 4.1) front panel.
Remove the cooling cassette 2 assembly together with the radiator.
Remove the air conditioning compressor mounting bolts and move it to the side without disconnecting the pipes from it.
Caution! Do not open the air conditioning system cooling circuit.
Remove the lower cross member 3 of the front panel
Do not allow the sound signal to hang on its wire.
Remove the front catalytic converter heat shield.
Caution! The flexible element of the exhaust system must not be bent more than 20°, as this will result in its destruction and will require replacement.
Disconnect the connectors from the transmission and generator oil pressure sensors.
Release the wiring harness from the mounting brackets and move it away from the timing belt.
Disconnect the fuel supply and return lines. To prevent dirt from entering the fuel system, close the ends of the pipes with suitable plugs.
Disconnect the engine wiring harness from the fuse box.
Disconnect the air conditioning radiator hoses.
Disconnect the gearbox control drive.
Loosen, move aside and temporarily secure the clutch slave cylinder.
Remove the constant velocity joints.
Remove the engine mount torque bracket.
Place a jack with a platform under the power unit.
Secure the engine to the platform.
Remove the upper right engine mount.
Loosen the gearbox support mounting nut. When removing the support axle, be careful not to damage it or the silent block.
Make sure all electrical wires, hoses, pipes and lines are disconnected from the engine.
Remove the power unit, being careful not to touch any surrounding parts or components.
If necessary, disconnect the gearbox from the engine.
Installation
Replace the seals at the gearbox outlet using a special tool.
Lift and install the power unit into the engine compartment of the vehicle.
Install the upper engine mounts and tighten them to 60 Nm.
Unfasten the power unit from the jack platform and remove the jack from under the vehicle.
Tighten the stabilizer bar link to 55 Nm.
Install the wheel drives.
Connect the gearbox control mechanism.
Connect the air conditioning radiator hoses.
Connect the engine wiring harness to the fuse box.
Connect the connectors to the transmission oil pressure sensor and the generator.
Connect the fuel supply and return lines.
Fill the gearbox and engine with oil.
Reinstall the front catalytic converter heat shield.
Place the air conditioner condenser and compressor in the correct position and secure them.
Reinstall the cooling cassette assembly together with the radiator, the front panel cross member, the headlights and the front bumper.
Fill with coolant and bleed it.
Reinstall the engine bay sound insulation panels, the plastic booster cross member, the battery and its support, the decorative covers, the two wheel arch mudguards and the wheels.
Connect the battery.