Table of contents: Teves brakes 🠇 DBA brakes 🠇 Brakes of both types 🠇 Brake caliper modifications on the…🠇
1. To avoid losing too much brake fluid when disconnecting the front brake hoses, remove the brake fluid reservoir cap and cover the hole with a piece of plastic film (large enough to accommodate the cork float) and install the cork on top of the film. Alternatively, you can take an old plug, block its vent hole, and temporarily install it on the tank in place of the original plug.
2. Loosen the nuts on the front wheels and jack up and support the front of the car so that the front wheels do not touch the ground. Apply the handbrake and remove the front wheels.
3. Clean any dirt from the front brakes and disconnect the brake hose from the wheel cylinder on one of the front brakes. Plug the end of the hose to prevent dirt from entering the system.
4. Remove the brake pads (see previous section).
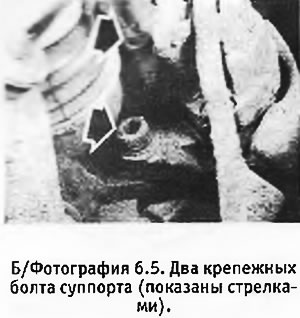
5. Remove the 2 bolts securing the brake caliper to the steering knuckle (see photo) and remove the caliper.
Teves brakes
6. Move the caliper to the work bench and remove the cylinder from the caliper bracket.
7. Remove the rubber boot and pull out the piston. It can be carefully blown out by applying compressed air to the brake hose nipple. To avoid dropping the piston, wrap the cylinder in a rag beforehand. If the piston gets stuck in the cylinder, you can wet the cylinder and piston with penetrating liquid and wait a while for it to soak in. This will most likely result in damage to the piston seal, but it should be replaced anyway.
8. After removing the piston, remove its seal from the groove on the cylinder wall. Thoroughly clean all metal parts in methyl alcohol without using abrasive materials or metal scrapers that may damage the treated surfaces or anti-corrosion coating.
9. Carefully inspect the sliding surfaces of the piston for scratches, grooves and other defects. If such are detected, the piston must be replaced (do not try to re-sand it under any circumstances). Inspect all caliper parts for obvious defects and replace them if necessary.
10. Moisten the new piston seal with brake fluid. Lubricate the inner surface of the cylinder and piston with brake fluid. Carefully install the seal into the groove on the inner wall of the cylinder. Insert the piston, being careful not to damage the seal. Wipe the assembled cylinder dry with a clean, lint-free cloth and install a new rubber boot.
DBA brakes
11. See the procedure for removing and reassembling the TEVES brake caliper. The procedure is similar for the DBA caliper.
Brakes of both types
12. Assembly and installation of the brake caliper is carried out in reverse order. Please note the following points:
(Original can be viewed at: PeugeotBook.ru)
- a. Before installing the caliper on the journal, thoroughly clean the bolt holes and the bolts themselves and apply thread locking fluid to their threads. Install new washers on the bolts and tighten them to the specified torque.
- b. Install the brake pads (see section 5).
- c. Before installing the cylinder, remove the bleed screw and fill the cylinder with fresh brake fluid, tilting the cylinder in all directions to remove air locks. Replace the bleed screw.
- g. Install a new copper washer onto the brake hose fitting and check that the hose is not kinked after connection. After the car is lowered onto its wheels, turn the steering wheel all the way to both sides and check that the hose does not touch any parts of the car.
- g. Remove the polyethylene film or plug with the sealed ventilation hole, install the "native" plug on the reservoir and bleed the brake system (see section 3).
Brake caliper modifications on the latest models
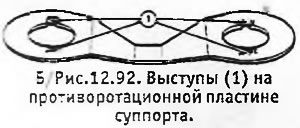
1. From identification number 9 352 397 onwards, the brake caliper anti-rotation plate no longer has projections. This was done because the protrusions on the plate tended to rub against the bushings and restrict the caliper's sliding travel, resulting in uneven pad wear.
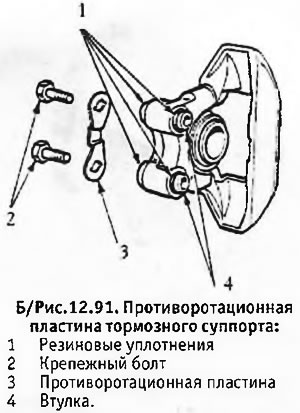
2. If desired, you can remove these protrusions from the caliper anti-rotation plate on early models yourself.
3. Starting with identification number 9 457 811, the seal between the caliper and the bushings has been improved. Previously, due to too large a gap between them, the brakes could make noise when reversing.
4. If desired, you can modify the calipers on early models yourself using a special kit for replacing caliper bushings. The kit contains 2 bushings, 4 seals and a special lubricant for the bushings and a liquid for locking threaded connections, which is applied to the caliper bolts.
5. When replacing the caliper bushings, take the opportunity to file down the projections from the anti-rotation plates.