
English Русский
Български
Беларускі
Український
Српски
Hrvatski
Română
Polski
Slovenský
Magyar
Bookmark Articles Sitemap Contacts
Company Hyundai Company Opel Company Skoda Company Kia Company Mitsubishi Company LADA Company Audi
PeugeotBook.ru


Series 100   Series 200   Series 300   400-500   Series 600   Crossovers   Others
 
Peugeot 305 (1977-1989) Peugeot 306 (1993-2002) Peugeot 307 (2001-2008)

Vacuum servo booster — overhaul (Peugeot 305)

  • Main
  • 30X
  • Peugeot 305 (1977-1989)
  • Chassis, running gear
  • Brake system
  • Vacuum servo booster — overhaul
0
Table of contents: Replacing the air filter 🠇 Replacing a one-way valve 🠇
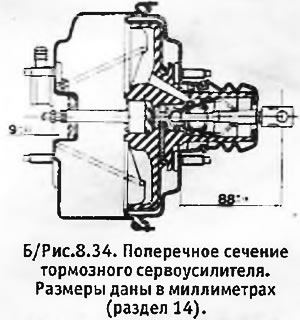
1. The vacuum servo amplifier rarely breaks down. If it is heavily worn out as a result of long service, it is recommended to replace the servo amplifier assembly.

2. A faulty servo amplifier can be determined by the additional force required to apply the brakes. The servo amplifier must be checked by a specialist with the necessary equipment. The only thing you can do yourself is to replace the servo air filter (it is recommended to do this once every 2 years) and a one-way valve.
2. A faulty servo amplifier can be determined by the additional force required to apply the brakes.…


Replacing the air filter


3. When replacing the filter, the servo amplifier does not need to be removed. The air filter is located around the pushrod and is covered by a rubber boot on the rear wall of the servo amplifier.

4. Remove the clamp securing the pivot pin where the pushrod connects to the brake pedal. Remove the rubber boot and filter retainer. Remove the old filter using a suitable hook.

5. Since the new filter cannot pass through the end piece of the pusher, make a diagonal cut on the filter with a sharp knife so that you can turn back the edges of the cut and pass the filter through the pusher. Install the filter, its retainer and cover. Replace the pivot pin and secure it with a new clamp.


Replacing a one-way valve


6. Loosen the clamp and disconnect the vacuum hose from the one-way valve located on the front surface of the servo amplifier. After this, you can pull the valve out of the rubber sealing sleeve. It is advisable to replace the bushing with a new one, regardless of its condition, and if it is worn or cracked, replacement becomes mandatory. Install a new valve into the sleeve. To make installation easier, you can use brake fluid as a lubricant.

Original published on the portal (www.peugeotbook.ru)
This article is available at russian, bulgarian, belarusian, ukrainian, serbian, croatian, romanian, polish, slovak, hungarian
Article reviewed by editor: Ostrovsky Fedor
Share information:
Previous
Peugeot 305: Brake system
Next

Vacuum servo booster — removal and installation
Master cylinder — removal, overhaul and installation
Hydraulic tubes — inspection and replacement
Brake discs and drums — refurbishment by regrinding
Rear wheel cylinders — removal, overhaul and installation
Brake compensator — general information
Handbrake — general information
Brake system fault diagnostics
See similar information for other Peugeot models

➨ Vacuum servo unit check valve — removal, testing and refitting Peugeot 106 (1991-2003)
➨ Removal and installation the vacuum booster Peugeot 207 (2006-2014)
➨ Vacuum brake booster — removal, inspection and installation Peugeot 405 (1987-1997)
➨ Brake booster vacuum — removal and installation Peugeot 605 (1989-2000)
➨ Vacuum booster brake drive Peugeot 806 (1994-2002)
Link to this article in different formats
Comments and feedback from visitors
No comments yet


Add two numbers 16 + 19


Peugeot 307 (2001-2008) 
  • User manual
  • Keys, doors and alarm
  • Controls and instruments
  • Driving and operation
  • Maintenance
  • Power unit
  • Petrol engines TU3 and TU5
  • Petrol engines EW10
  • Diesel engines DV10
  • Diesel engines DW10
  • Transmission
  • Clutch and drive shafts
  • Mechanical gearbox
  • Automatic gearbox
  • Chassis, running gear
  • Front suspension
  • Rear suspension
  • Steering
  • Brake system
  • Body and interior
  • Exterior (external elements)
  • Interior (internal elements)
  • Doors, locks and windows
  • Heating and air conditioning
  • Electrical equipment
  • Equipment and devices
  • Power devices
  • Airbags
  • Electrical circuits
Peugeot 306 (1993-2002) 
  • General information
  • Introduction to manual
  • Specifications
  • Gasoline engine
  • Engine repair
  • Lubrication system
  • Cooling system
  • Fuel injection
  • Ignition system
  • Diesel engine
  • Engine repair
  • Lubrication system
  • Cooling system
  • Fuel injection
  • Transmission
  • Clutch
  • Gearbox
  • Drive shafts
  • Chassis, running gear
  • Steering system
  • Front suspension
  • Rear suspension
  • Brake system
  • Electrical equipment
  • Power devices
  • Electrical circuits
Peugeot 305 (1977-1989) 
  • General information
  • Maintenance
  • Power unit
  • Gasoline engines
  • Diesel engines
  • Cooling system (gasoline)
  • Cooling system (diesel)
  • Fuel system (gasoline)
  • Fuel system (diesel)
  • Ignition system
  • Transmission
  • Clutch
  • Mechanical gearbox BB8
  • Mechanical gearbox BE1
  • Automatic gearbox ZF4
  • Shafts, hubs and wheels
  • Chassis, running gear
  • Brake system
  • Car suspension
  • Steering
  • Body and interior
  • Exterior (external elements)
  • Interior (internal elements)
  • Electrical equipment
  • Equipment and devices
  • Headlights and lighting
  • Power devices
  • Electrical circuits
  • Wiring diagrams (diesel)
PeugeotBook.ru © 2018–2026 | Mobile version | Sitemap: EN BG BY UA RS HR RO PL SK HU | Write message | Site search | Add to bookmarks | Peugeot owners
106 (1991-2003) | 206 (1998-2012) | 207 (2006-2014) | 305 (1977-1989) | 306 (1993-2002) | 307 (2001-2008) | 405 (1987-1997) | 406 (1995-2004) | 605 (1989-2000) | Partner-I (1996-2008) | Eurovans-807 (2002-2014) | Eurovans-806 (1994-2002) | J5 (1981-1993) |
Cookies are used to ensure the correct display of pages on the site.