
English Русский
Български
Беларускі
Український
Српски
Hrvatski
Română
Polski
Slovenský
Magyar
Bookmark Articles Sitemap Contacts
Company Hyundai Company Opel Company Skoda Company Kia Company Mitsubishi Company LADA Company Audi
PeugeotBook.ru


Series 100   Series 200   Series 300   400-500   Series 600   Crossovers   Others
 
Peugeot 305 (1977-1989) Peugeot 306 (1993-2002) Peugeot 307 (2001-2008)

Accessory drive belt (Peugeot 307)

  • Main
  • 30X
  • Peugeot 307 (2001-2008)
  • Power unit
  • Petrol engines TU3 and TU5
  • Accessory drive belt
0
Table of contents: TU3JP engine 🠇 Engine TU5JP4 🠇

TU3JP engine


Removal


Remove the right front wheel.

Remove the engine splash shield.
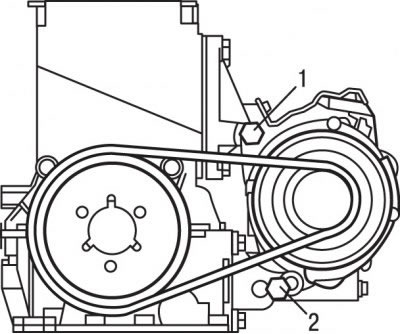
Figure 3.31. Location of the upper (1) and lower (2) generator mounting bolts on the TU3JP engine

Figure 3.31. Location of the upper (1) and lower (2) generator mounting bolts on the TU3JP engine


On vehicles without power steering and air conditioning, loosen the upper 1 (figure 3.31) and the lower 2 generator mounting bolts and rotate the generator toward the cylinder block, which will loosen the drive belt tension.

On vehicles with power steering and air conditioning, loosen the center tensioner pulley mounting bolt.

Remove the accessory drive belt from the pulleys.

Setting and adjusting tension


Place the belt on the crankshaft and accessory pulleys (generator, power steering pump and air conditioning compressor).

On vehicles without power steering and air conditioning, tilt the alternator away from the cylinder block, adjust the belt tension, and tighten the alternator mounting bolts.
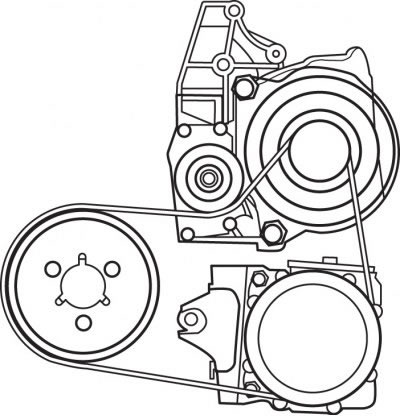
Figure 3.32. Location of the accessory drive belt on the TU3JP engine with power steering and air…

Figure 3.32. Location of the accessory drive belt on the TU3JP engine with power steering and air conditioning system


On vehicles with power steering (figure 3.32) and the air conditioning system, use a hexagonal torque wrench to turn the tension roller to a torque of 45 Nm, while the belt tension must correspond to the required value. Without loosening the torque wrench, tighten the central tension roller mounting bolt to 45 Nm.

Turn the engine crankshaft two revolutions.

Use tool 4122-T to measure the drive belt tension. If the tension is more than 150 conventional units, the belt is unsuitable for use. The minimum permissible belt tension is 62 conventional units.

Turn the engine crankshaft three revolutions.

Check and adjust the tension to obtain the required values.

Reinstall the engine mudguard and right front wheel.

Engine TU5JP4


Removal


Remove the right front wheel.

Remove the engine splash shield.
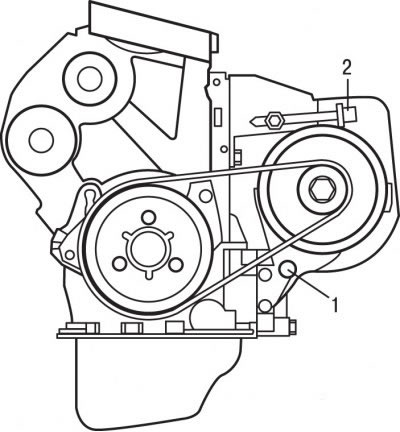
Figure 3.33. Location of the lower generator mounting bolt (1) and the belt tension adjustment bolt…

Figure 3.33. Location of the lower generator mounting bolt (1) and the belt tension adjustment bolt (2) on the TU5JP4 engine


On vehicles without power steering and air conditioning, loosen the lower bolt 1 (figure 3.33) generator mounts and, by turning the adjusting bolt 2, loosen the belt tension.
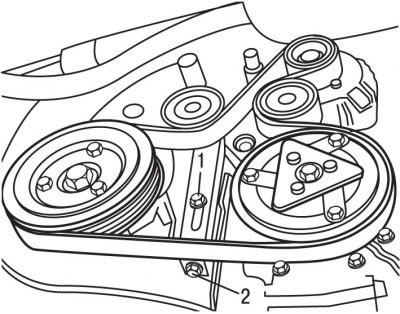
Figure 3.34. Location of the bolt (1) for fastening the tensioner mechanism and the bolt (2) for…

Figure 3.34. Location of the bolt (1) for fastening the tensioner mechanism and the bolt (2) for adjusting the belt tension on the TU5JP4 engine with power steering and air conditioning system


On vehicles with power steering and air conditioning, loosen bolt 1 (figure 3.34) and, by turning bolt 2, loosen the belt tension.

Remove the accessory drive belt from the pulleys.

Setting and adjusting tension


Place the belt on the crankshaft and accessory pulleys (generator, power steering pump and air conditioning compressor).

On vehicles without power steering and air conditioning, turn the adjusting bolt 2 (see figure 3.33), adjust the tension of the generator drive belt, then tighten the lower bolt 1 of the tension mechanism.

On vehicles with power steering and air conditioning, turn the adjusting bolt 2 (see figure 3.34), adjust the tension of the accessory drive belt, then tighten the generator mounting bolt 1.

Use tool S.0192 to measure the drive belt tension.

Turn the engine crankshaft three revolutions.

Check and adjust the tension to obtain the required values.

Reinstall the engine mudguard and right front wheel.
This article is available at russian, bulgarian, belarusian, ukrainian, serbian, croatian, romanian, polish, slovak, hungarian
Article reviewed by editor: Sidorov Timofey
Share information:
Previous
Peugeot 307: Petrol engines TU3 and TU5
Next

Camshafts — removal and installation
Cylinder head — removal and installation
Removal and installation the engine
General information about the TU3JP and TU5JP4 engines
Timing belt — removal and installation
Changes in the timing drive components of the TU3JP engine
Lubrication system — removal, inspection and installation
Replacing the coolant
Water pump — removal and installation
See similar information for other Peugeot models

➨ Timing belt covers — removal and refitting Peugeot 106 (1991-2003)
➨ Replacing the accessory drive belt (petrol engines) Peugeot 207 (2006-2014)
➨ Checking the auxiliary drive belt (10,000 km/6 months) Peugeot 405 (1987-1997)
➨ Accessory Drive Belt — Installation Peugeot 605 (1989-2000)
➨ Checking and replacing the accessory drive belt Peugeot Partner I (1996-2008)
Link to this article in different formats
Comments and feedback from visitors
No comments yet


Add two numbers 45 + 12


Peugeot 307 (2001-2008) 
  • User manual
  • Keys, doors and alarm
  • Controls and instruments
  • Driving and operation
  • Maintenance
  • Power unit
  • Petrol engines TU3 and TU5
  • Petrol engines EW10
  • Diesel engines DV10
  • Diesel engines DW10
  • Transmission
  • Clutch and drive shafts
  • Mechanical gearbox
  • Automatic gearbox
  • Chassis, running gear
  • Front suspension
  • Rear suspension
  • Steering
  • Brake system
  • Body and interior
  • Exterior (external elements)
  • Interior (internal elements)
  • Doors, locks and windows
  • Heating and air conditioning
  • Electrical equipment
  • Equipment and devices
  • Power devices
  • Airbags
  • Electrical circuits
Peugeot 306 (1993-2002) 
  • General information
  • Introduction to manual
  • Specifications
  • Gasoline engine
  • Engine repair
  • Lubrication system
  • Cooling system
  • Fuel injection
  • Ignition system
  • Diesel engine
  • Engine repair
  • Lubrication system
  • Cooling system
  • Fuel injection
  • Transmission
  • Clutch
  • Gearbox
  • Drive shafts
  • Chassis, running gear
  • Steering system
  • Front suspension
  • Rear suspension
  • Brake system
  • Electrical equipment
  • Power devices
  • Electrical circuits
Peugeot 305 (1977-1989) 
  • General information
  • Maintenance
  • Power unit
  • Gasoline engines
  • Diesel engines
  • Cooling system (gasoline)
  • Cooling system (diesel)
  • Fuel system (gasoline)
  • Fuel system (diesel)
  • Ignition system
  • Transmission
  • Clutch
  • Mechanical gearbox BB8
  • Mechanical gearbox BE1
  • Automatic gearbox ZF4
  • Shafts, hubs and wheels
  • Chassis, running gear
  • Brake system
  • Car suspension
  • Steering
  • Body and interior
  • Exterior (external elements)
  • Interior (internal elements)
  • Electrical equipment
  • Equipment and devices
  • Headlights and lighting
  • Power devices
  • Electrical circuits
  • Wiring diagrams (diesel)
PeugeotBook.ru © 2018–2026 | Mobile version | Sitemap: EN BG BY UA RS HR RO PL SK HU | Write message | Site search | Add to bookmarks | Peugeot owners
106 (1991-2003) | 206 (1998-2012) | 207 (2006-2014) | 305 (1977-1989) | 306 (1993-2002) | 307 (2001-2008) | 405 (1987-1997) | 406 (1995-2004) | 605 (1989-2000) | Partner-I (1996-2008) | Eurovans-807 (2002-2014) | Eurovans-806 (1994-2002) | J5 (1981-1993) |
Cookies are used to ensure the correct display of pages on the site.