



The oil filter element is mounted on a support located on the exhaust manifold side of the engine and is protected from heat transferred from the exhaust manifold/catalytic converter by a heat shield.
After passing through the oil filter, the purified oil enters the main oil line. It is equipped with an oil pressure warning sensor, which, by turning on the warning light in the instrument cluster, signals low oil pressure. The oil filter has a bypass valve through which, if the filter is heavily contaminated, uncleaned oil flows directly into the oil line.
From the main line, oil is supplied under pressure through channels to lubricate the main bearings of the crankshaft and then through channels in the crankshaft to the connecting rod bearings. To cool the pistons, oil is sprayed through nozzles onto the lower part of the pistons.
The channels supply oil to the cylinder head to lubricate the camshaft bearings and to the hydraulic tappets.
The engine is equipped with a vacuum system for draining oil.
The oil level indicator tube is adapted to accommodate a 14 mm diameter tip for draining oil using vacuum units.
It is also possible to drain the oil through the hole in the bottom of the oil pan.
Replacing the oil filter on the TU3JP engine
Removal
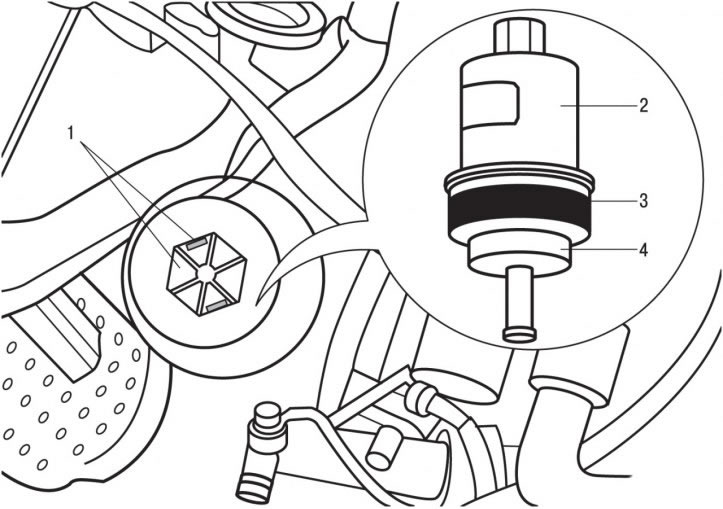
Figure 3.42. TU3JP engine oil filter: 1 - latches; 2 - lid; 3 - cover sealing ring; 4 - replaceable filter element
Unscrew the lid 2 (figure 3.42) oil filter. Latches 1 are designed to hold the cover on a 27 mm diameter bushing so that the cover can be moved away from the catalytic converter without burning your hands.
Slide and remove cover 2.
Caution: When removing the oil filter, avoid contact with the catalytic converter.
Remove the filter element from the cover.
Remove the sealing ring from the lid.
Installation
Clean the inside surfaces of the oil filter housing and cover.
Install a new sealing ring on the cover.
Insert a new replacement filter element into the lid.
Place the cover assembly back in place and tighten it to a torque of 28 Nm.
Oil pan
The stamped sheet steel oil pan is secured with 19 bolts.
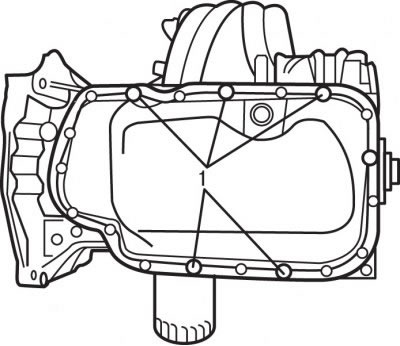
Figure 3.43. Location of oil pan mounting bolts that are missing on later engine models
Later models are equipped with an oil pan secured with 13 bolts. These engines are missing 6 threaded holes in the main bearing cap housing (figure 3.43).
When installing a new oil pan model on an older engine model, unused threaded holes should be sealed with E10 sealant.
Checking oil pressure
To check the pressure, use a pressure gauge with a hose and a fitting.
Important! Check the engine oil pressure on a hot engine after checking the oil level.
Disconnect the connector from the oil pressure sensor.
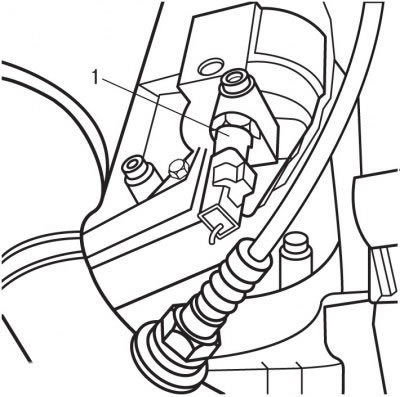
Figure 3.44. Location of the oil pressure sensor (1)
Unscrew sensor 1 (figure 3.44) oil pressure.
Instead of the oil pressure sensor, screw in the pressure gauge fitting.
Connect a tachometer to the engine.
Start the engine.
Set the engine crankshaft speed to 1000 min⁻¹, use the pressure gauge to determine the engine oil pressure and compare it with the technical data.
Similarly, measure the oil pressure at 2000, 3000 and 4000 rpm⁻¹.
Stop the engine.
Disconnect the tachometer and pressure gauge from the engine.
Screw the oil pressure sensor back into place and tighten it to a torque of 30 Nm.
Connect the contact connector to the oil pressure sensor.